Messenger: Setting up automations
On this page, you will find common examples for setting up automations in the Messenger. This page is constantly being updated and filled with new examples.
1. Setting up a confirmation email in case of a new email from customers
In the following, you can find an example with a step-by-step instruction how you set up that your customers will receive a confirmation email once they sent you an email with an inquiry.
Setting up a confirmation email in case of a new email from customers:
-
Go to Setup » CRM » Messenger » Automation.
Or: If you are already in the Messenger, expand the section settings Settings on the left side below the trash folder and click on auto_mode Automation to get redirected to the Setup » CRM » Messenger » Automation menu. -
Click on add Add automation.
-
Enter the a name for the automation, e.g.
New conversation / confirmation email. -
Select the setting Event-based as Type.
-
In the Trigger section, click on Add trigger (add).
-
Select the trigger New conversation from contact.
-
In the Filter section, click on Add filter (add).
-
Select the filter Inbox of conversation.
-
Select the appropriate inbox from the drop-down list, e.g.
Customer service. -
Select the filter Group, type and status of conversation.
-
Select the appropriate group from the drop-down list Group, e.g.
General. -
Select a type from the drop-down list Type, e.g.
Inquiry. -
Select the appropriate status from the drop-down list Status, e.g.
New. -
In the Action section, click on Add action (add).
-
Select the action Send email.
-
Select the template from the drop-down list.
→ First, you have to create the template in the EmailBuilder.
→ In our example, the template’s name is Messenger: Confirmation - New conversation. -
In the Email addresses of recipients field, enter further email addresses if you want to add further recipients to the conversation.
Existing recipients, i.e. the senders of the original email, receive the email automatically.
If users have subscribed for the conversation, they will receive a notification in the back end and not an email if you selected in the field Email to all subscribers of the conversation further down below the setting Yes. -
In the Users field, you can select (check_box) further subscribers and add them to the conversation.
-
Click on save (Save).
→ The automation is applied immediately because all new automations are set to active (toggle_on) by default.
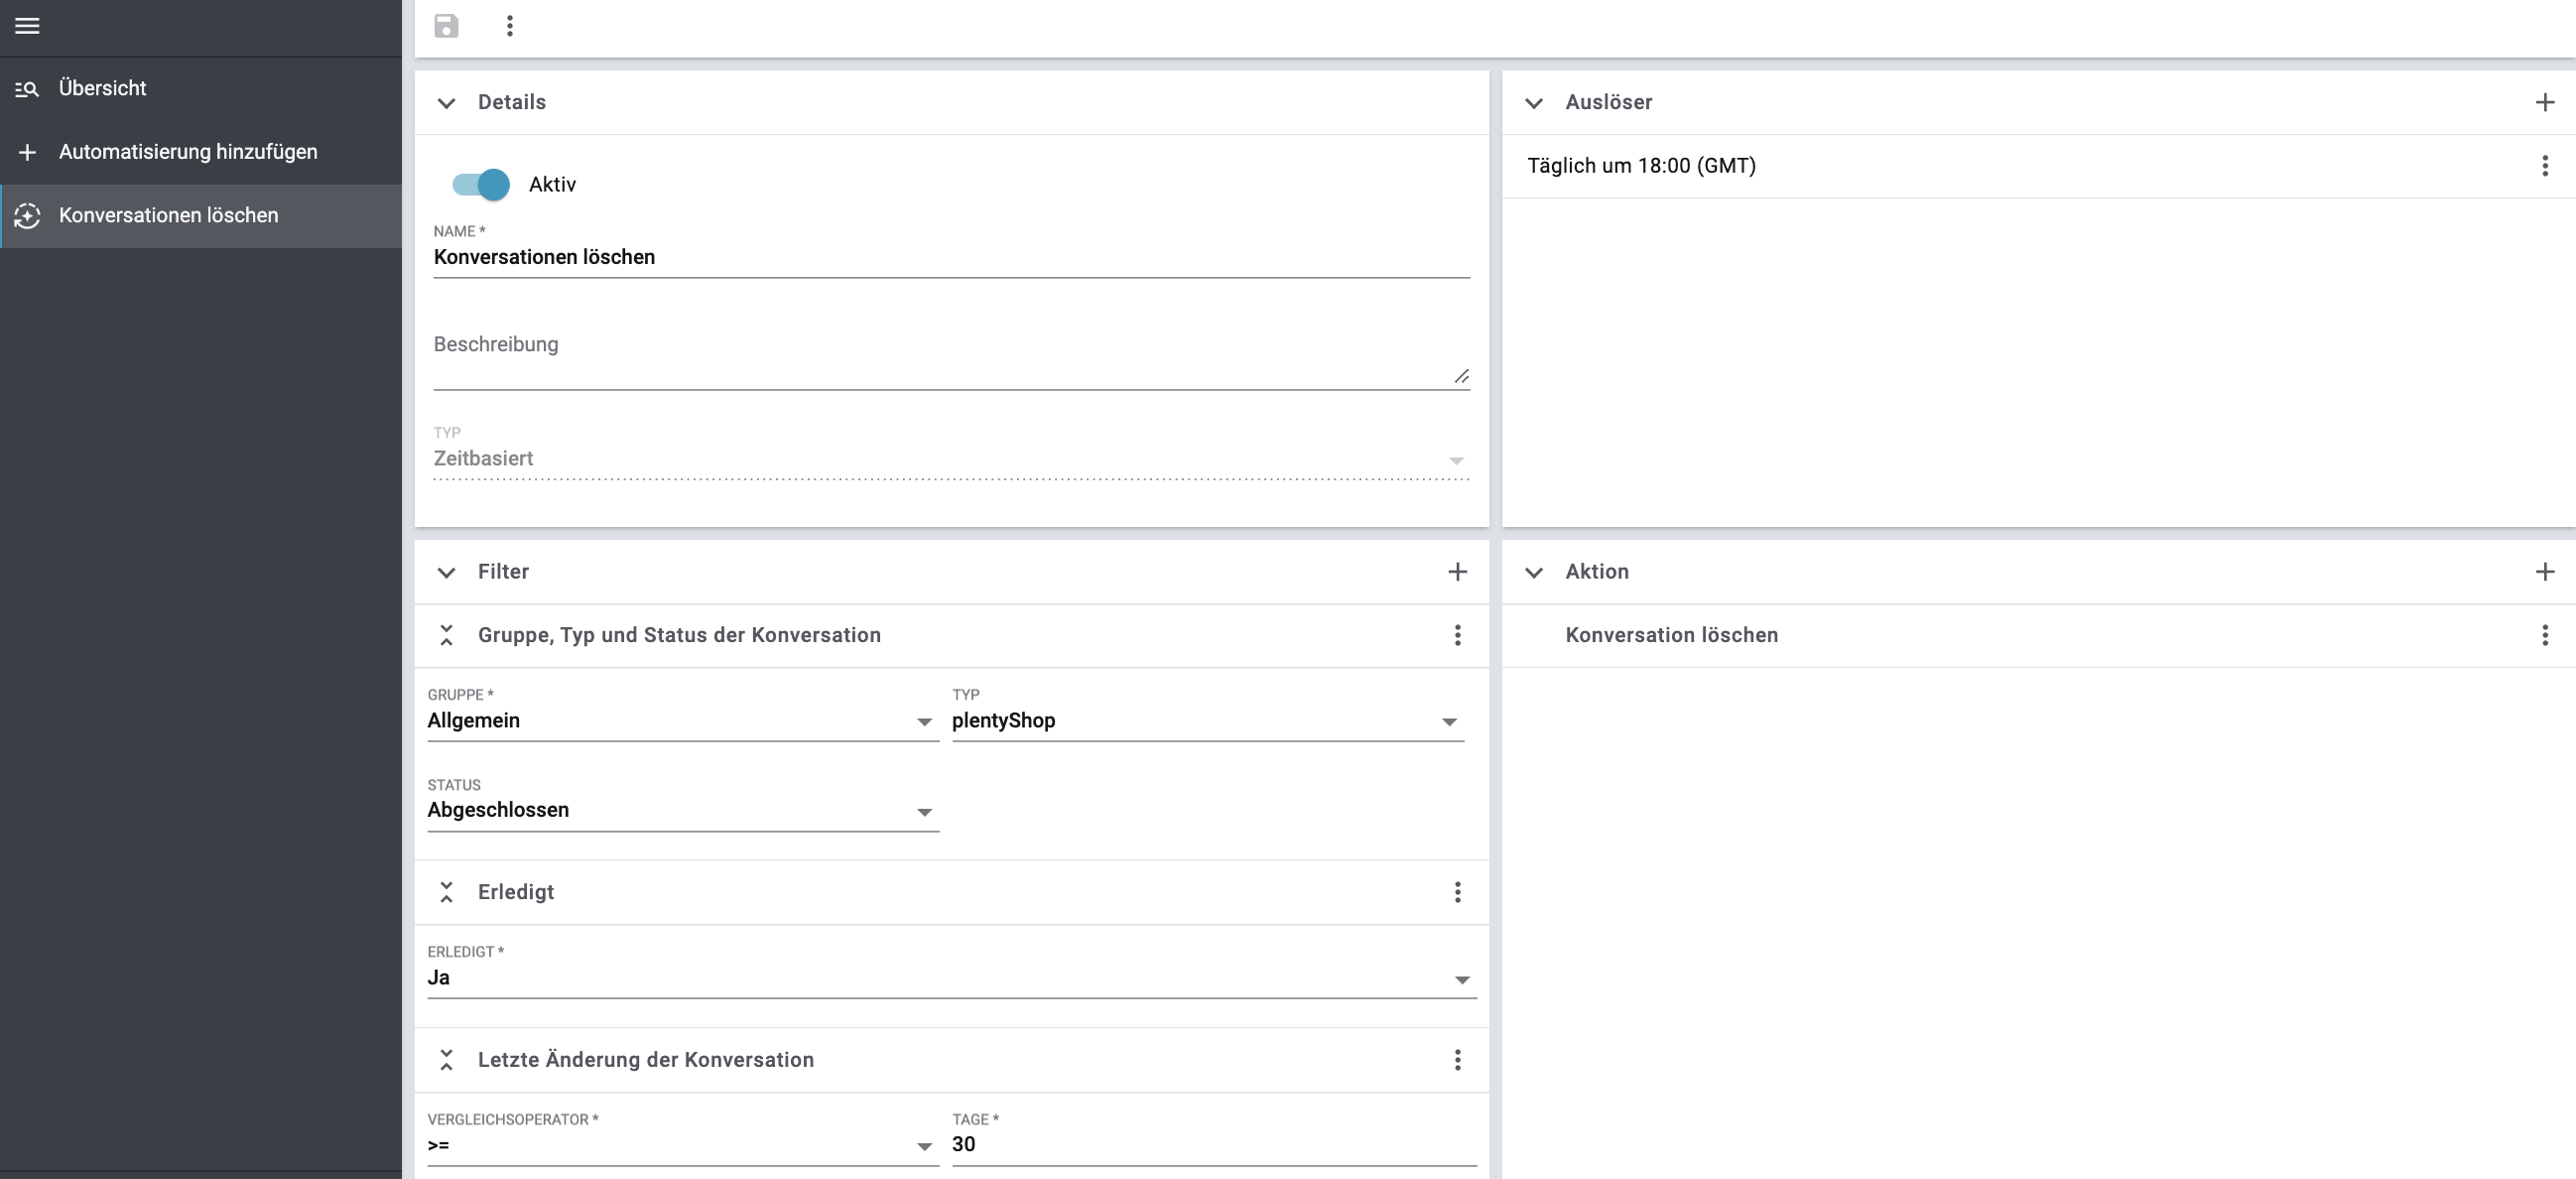
2. Automatically deleting conversations based on certain criteria
In this chapter, you will find an example with step-by-step instructions on how to set conversations with certain criteria to be deleted after a desired number of days.
In our case, all conversations that are marked as done, that were updated more than 30 days ago, that belong to the General group, that are assigned to the plentyShop type and to the Completed status are deleted every day at 6:00 p.m.
Automatically deleting conversations:
-
Go to Setup » CRM » Messenger » Automation.
Or: If you are already in the Messenger, expand the section settings Settings on the left side below the trash folder and click on auto_mode Automation to get redirected to the Setup » CRM » Messenger » Automation menu. -
Click on add Add automation.
-
Enter the a name for the automation, e.g.
Delete conversations. -
Select the setting Time-based as Type.
-
In the Trigger section, click on Add trigger (add).
→ The Create trigger window opens. -
Select the option Daily from the drop-down list Repeat.
-
Select the option 18:00 (GMT) from the drop-down list Time.
-
Click on add ADD.
-
In the Filter section, click on Add filter (add).
-
Select the option Group, type and status of conversation from the list.
-
Select the appropriate group from the drop-down list Group, e.g.
General. -
Select the appropriate type from the drop-down list Type, e.g.
plentyShop. -
Select the appropriate status from the drop-down list Status, e.g.
Completed. -
Click again on Add filter (add).
-
Select the option Done from the list.
-
Select the option Yes.
-
Click again on Add filter (add).
-
Select the option Last change of conversation from the list.
-
Select the option >= from the Operator list and enter the number
30in the field Days. -
In the Action section, click on Add action (add).
-
Select the option Delete conversation from the list.
-
Click on save (Save).
→ The automation is applied immediately because all new automations are set to active (toggle_on) by default.
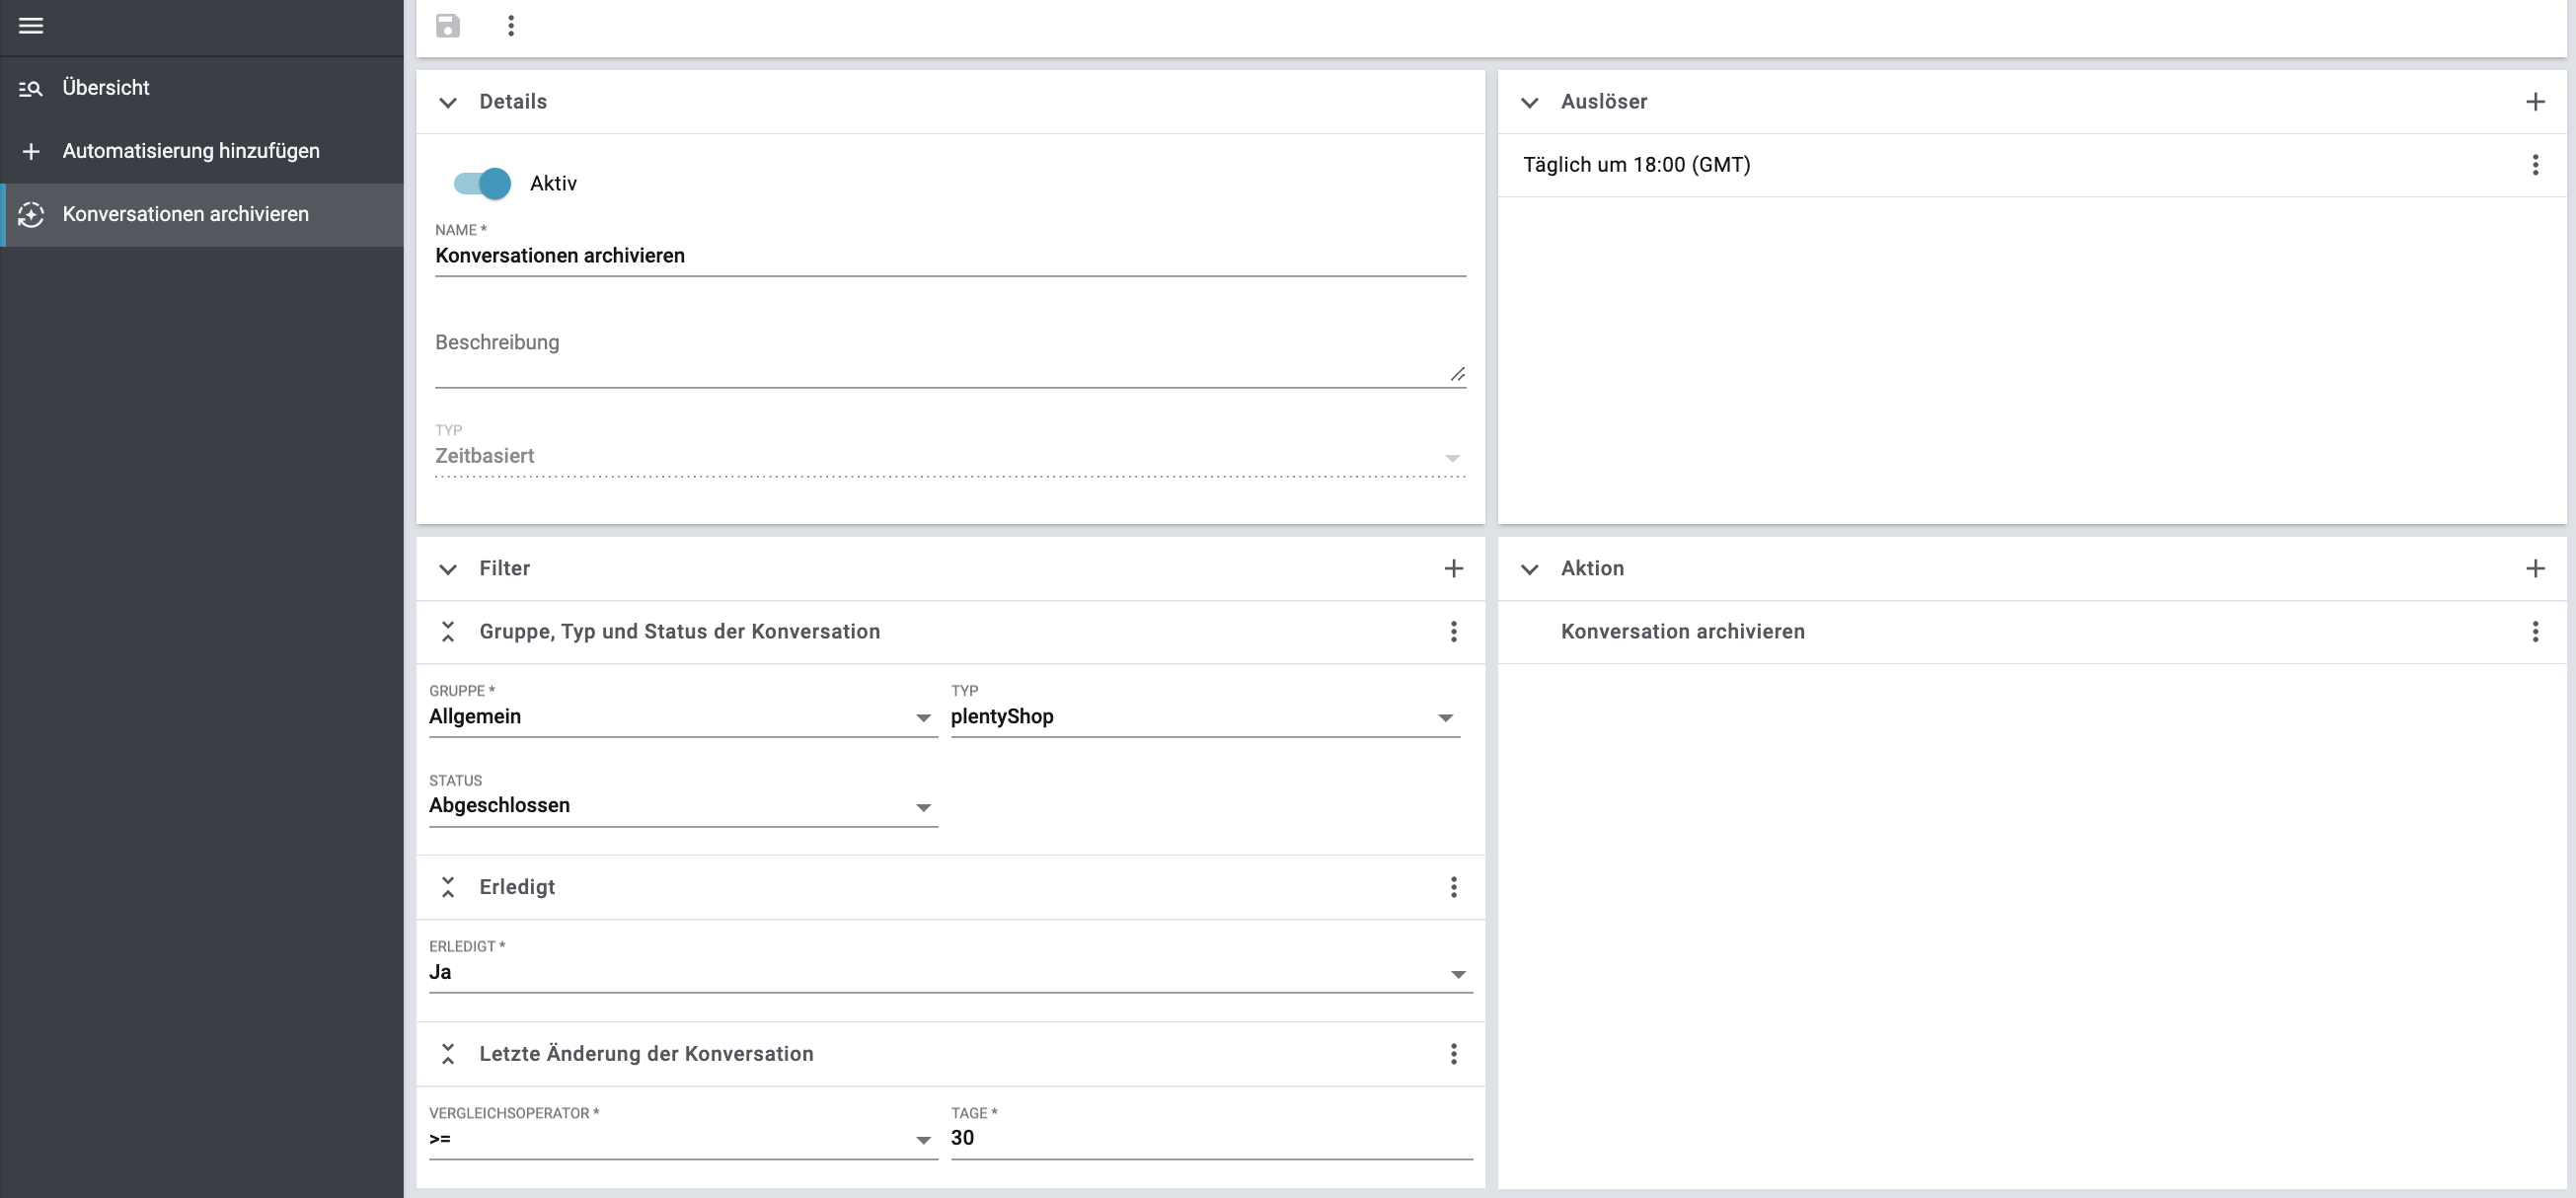
3. Automatically archiving conversations based on certain criteria
In this chapter, you will find an example with step-by-step instructions on how to set conversations with certain criteria to be moved to archive after a desired number of days.
In our case, all conversations that are marked as done, that were updated more than 30 days ago, that belong to the General group, that are assigned to the plentyShop type and to the Completed status are moved to archive every day at 6:00 p.m.
Automatically archiving conversations:
-
Go to Setup » CRM » Messenger » Automation.
Or: If you are already in the Messenger, expand the section settings Settings on the left side below the trash folder and click on auto_mode Automation to get redirected to the Setup » CRM » Messenger » Automation menu. -
Click on add Add automation.
-
Enter the a name for the automation, e.g.
Archive conversations. -
Select the setting Time-based as Type.
-
In the Trigger section, click on Add trigger (add).
→ The Create trigger window opens. -
Select the option Daily from the drop-down list Repeat.
-
Select the option 18:00 (GMT) from the drop-down list Time.
-
Click on add ADD.
-
In the Filter section, click on Add filter (add).
-
Select the option Group, type and status of conversation from the list.
-
Select the appropriate group from the drop-down list Group, e.g.
General. -
Select the appropriate type from the drop-down list Type, e.g.
plentyShop. -
Select the appropriate status from the drop-down list Status, e.g.
Completed. -
Click again on Add filter (add).
-
Select the option Done from the list.
-
Select the option Yes.
-
Click again on Add filter (add).
-
Select the option Last change of conversation from the list.
-
Select the option >= from the Operator list and enter the number
30in the field Days. -
In the Action section, click on Add action (add).
-
Select the option Archive conversation from the list.
-
Click on save (Save).
→ The automation is applied immediately because all new automations are set to active (toggle_on) by default.
4. Sending automatic replies outside of business hours
In the following, you can find an example with a step-by-step instruction on how to set up automatic replies to be sent to customers outside of business hours. In this case, an automation is triggered every Saturday and Sunday at 6 p.m., sending a predefined email in response to incoming conversations on the Amazon marketplace during the weekend.
The following actions are carried out for this practical example:
Creating an email template for automatic replies on the weekend:
-
Go to CRM » EmailBuilder.
-
In the bottom left, click on add Add.
Or: In the line of the folder in which you want to create a template, click on more_vert and then on add Add play_arrow. -
Click on description Template.
→ The Add new template window opens. -
Enter a Name for the template, e.g.
Amazon replies weekend. -
Click on*SAVE* (save).
-
Click on Add a new language.
-
Select a language, e.g.
English. -
Enter the following twig expression for the subject:
{% if '[IMPORTANT]' not in messenger.title %}[IMPORTANT] {% endif %} {{ messenger.title }}.
This ensures that the reply to the conversation retains the subject of the original conversation and that the wordImportantis included in the subject line, as this is a specific requirement of Amazon. -
Click on (edit) to edit the content of the email template.
-
Drag a text widget into the template by using drag & drop.
-
Click on (edit) to edit the content of the text widget.
-
Add a custom message for automatic replies on the weekend in the text widget, e.g.
Thank you. We have received your inquiry. -
(optional) Add further content if required. Make sure that the content complies with the specific requirements of the marketplace.
-
Click on (save).
Creating a status for incoming messages outside of business hours:
-
Go to Setup » CRM » Messenger » Groups, types and statuses.
Or: If you are already in the Messenger menu, click on the left side below the settings Settings section onchecklist_rtl Groups, types and statuses. -
Open the Amazon group.
-
In the Types section, click in the line of the type that you want to add a status to, e.g.
Customer inquiry. -
In the Status section, click on add Add status.
-
In the Details section, select
0%from the Progress drop-down list. -
In the Colour field, enter the Hex code of the colour or select the colour by clicking on rectangle.
-
In the Position section, enter a number for the position.
-
Save (save) the settings.
-
In the Names section, enter a name for the status, e.g.
Weekend inquiry.
Optional: Click on add Add language to add the status name also in English. -
Save (save) the settings.
Creating an automation for automatic replies:
-
Go to Setup » CRM » Messenger » Automation.
Or: If you are already in the Messenger, expand the section settings Settings on the left side below the trash folder and click on auto_mode Automation to get redirected to the Setup » CRM » Messenger » Automation menu. -
Click on add Add automation.
-
Enter a name for the automation, e.g.
Automatic replies weekend. -
In the Details section, enter an informative Description.
-
Select the setting Time-based as Type.
-
In the Trigger section, click on Add trigger (add).
→ The Create trigger window opens. -
Select the option Weekly from the drop-down list Repeat.
-
Select the option Saturday from the drop-down list Weekday.
-
Select the option 18:00 (GMT) from the drop-down list Time.
-
Click on add ADD.
-
In the Trigger section, click on Add trigger (add).
→ The Create trigger window opens. -
Select the option Weekly from the drop-down list Repeat.
-
Select the option Sunday from the drop-down list Weekday.
-
Select the option 18:00 (GMT) from the drop-down list Time.
-
Click on add ADD.
-
In the Filter section, click on Add filter (add).
-
Select the option Group, type and status of conversation from the list.
-
Select the group called
Amazonfrom the drop-down list. -
Select the Type called
Customer inquiryfrom the drop-down list. -
Select the Status called
Newfrom the drop-down list. -
In the Action section, click on Add action (add).
-
Select the Add reply option from the list.
-
Under template, select the previously created email template.
-
Click on save (Save).
-
In the Action section, click on Add action (add).
-
Select the option Set group, type and statuses from the list.
-
Select the group called
Amazonfrom the drop-down list. -
Select the Type called
Customer inquiryfrom the drop-down list. -
Select the previously created status
Weekend inquiryfrom the Status drop-down list. -
Click on save (Save).
→ The automation is applied immediately because all new automations are set to active (toggle_on) by default.
5. Assigning a return tag to a conversation and automatically changing the order status
In the following, you can find an example with a step-by-step instruction on how to set the order status to change automatically when you assign a return tag to a conversation.
The following actions are carried out for this practical example:
Creating a return tag:
-
Go to Setup » Settings » Tags menu.
-
Click on add.
-
Enter the name
Returnunder Tag name. -
Select a colour under Tag colour.
-
Click on NEXT.
-
Select the entry
Messenger conversationsunder Availability type. -
Click on NEXT.
-
Click on CREATE TAG.
Creating an order status for returns:
-
Go to the Setup » Orders » Order status menu.
-
Click on add Create new status.
-
Enter a number for sorting the new status, e.g.
9.6under New status. -
Enter the name
Messenger returnunder Name in system language (English). -
Select any colour for displaying the status.
-
Click on add CREATE.
Creating an automation to change the order status:
-
Go to Setup » CRM » Messenger » Automation.
Or: If you are already in the Messenger, expand the section settings Settings on the left side below the trash folder and click on auto_mode Automation to get redirected to the Setup » CRM » Messenger » Automation menu. -
Click on add Add automation.
-
Enter a name for the automation, e.g.
Creating a return tag. -
In the Details section, enter an informative Description.
-
Select the setting Event-based as Type.
-
In the Trigger section, click on Add trigger (add).
-
Select Tag has been added to conversation from the drop-down list.
-
In the Filter section, click on Add filter (add).
-
Select the option Tags of conversation from the list.
-
Select the Comparative operator At least these tags.
-
Select the previously created return tag called Return.
-
In the Action section, click on Add action (add).
-
Select the option Change order status from the list.
-
Select the previously created order status under Change order status.
-
Click on save (Save).
→ The automation is applied immediately because all new automations are set to active (toggle_on) by default.