Importing properties
You might already know what properties are and how to manually create them in PlentyONE. But what if you need to create lots of properties? It would take forever to create them all manually. Don’t worry, you can save lots of time by importing your properties into PlentyONE. This page of the manual guides you through the process step-by-step.
Procedure
-
Create the necessary groups, properties and selection values.
-
Link the properties to the appropriate products.
Instead of doing this manually, you will import the data.
|
Requirements
This page assumes that you already:
|
1. Practical example: Initial situation
Imagine you want to highlight the technical features and USPs of your headphones. Specifically, you want to create the following properties:
-
The keyword “Bluetooth”.
-
The reach of 10 metres.
-
The date when they will become available.
-
The information that the headphones have a built-in microphone.
-
The supported Bluetooth profiles.
Furthermore, you want to:
-
group the properties together into a group called “Headphones”.
-
import the properties, rather than create them manually in PlentyONE.

2. Creating groups
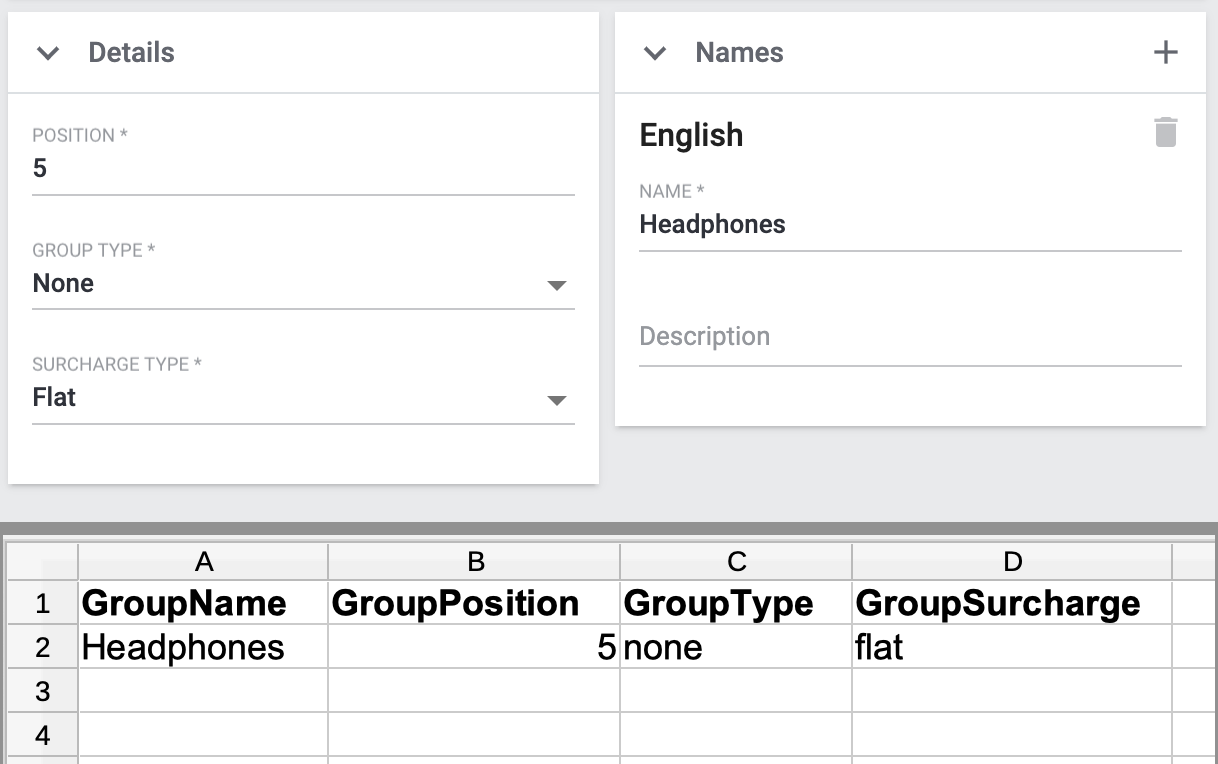
First, we will create the necessary property groups. In this example, I will create a group called “Headphones”, which I will use for all of the properties that relate to my Bluetooth headphones.
2.1. Setting up the CSV file
If you were to create a group manually, then you would enter information like the name, position, group type and sales price into the PlentyONE back end. Since you want to import the group, you will enter the same data into a CSV file.
|
List of valid import values
How do you know which combinations of characters you can use in the CSV file? Take a look at the manual. Here you can see which data fields are mandatory and how you must enter the individual options into your CSV file in order for them to be correctly interpreted by PlentyONE. |
2.2. Choosing the import settings
Once you have finished entering all of the group information into your CSV file, open the menu Data » Import and create a new import of the type Properties.
|
How do I create an import?
If you haven’t worked with the import tool yet, then you can learn the basics here. This page doesn’t describe every import option in detail. Rather, the page concentrates on a practical example for importing properties and groups. |
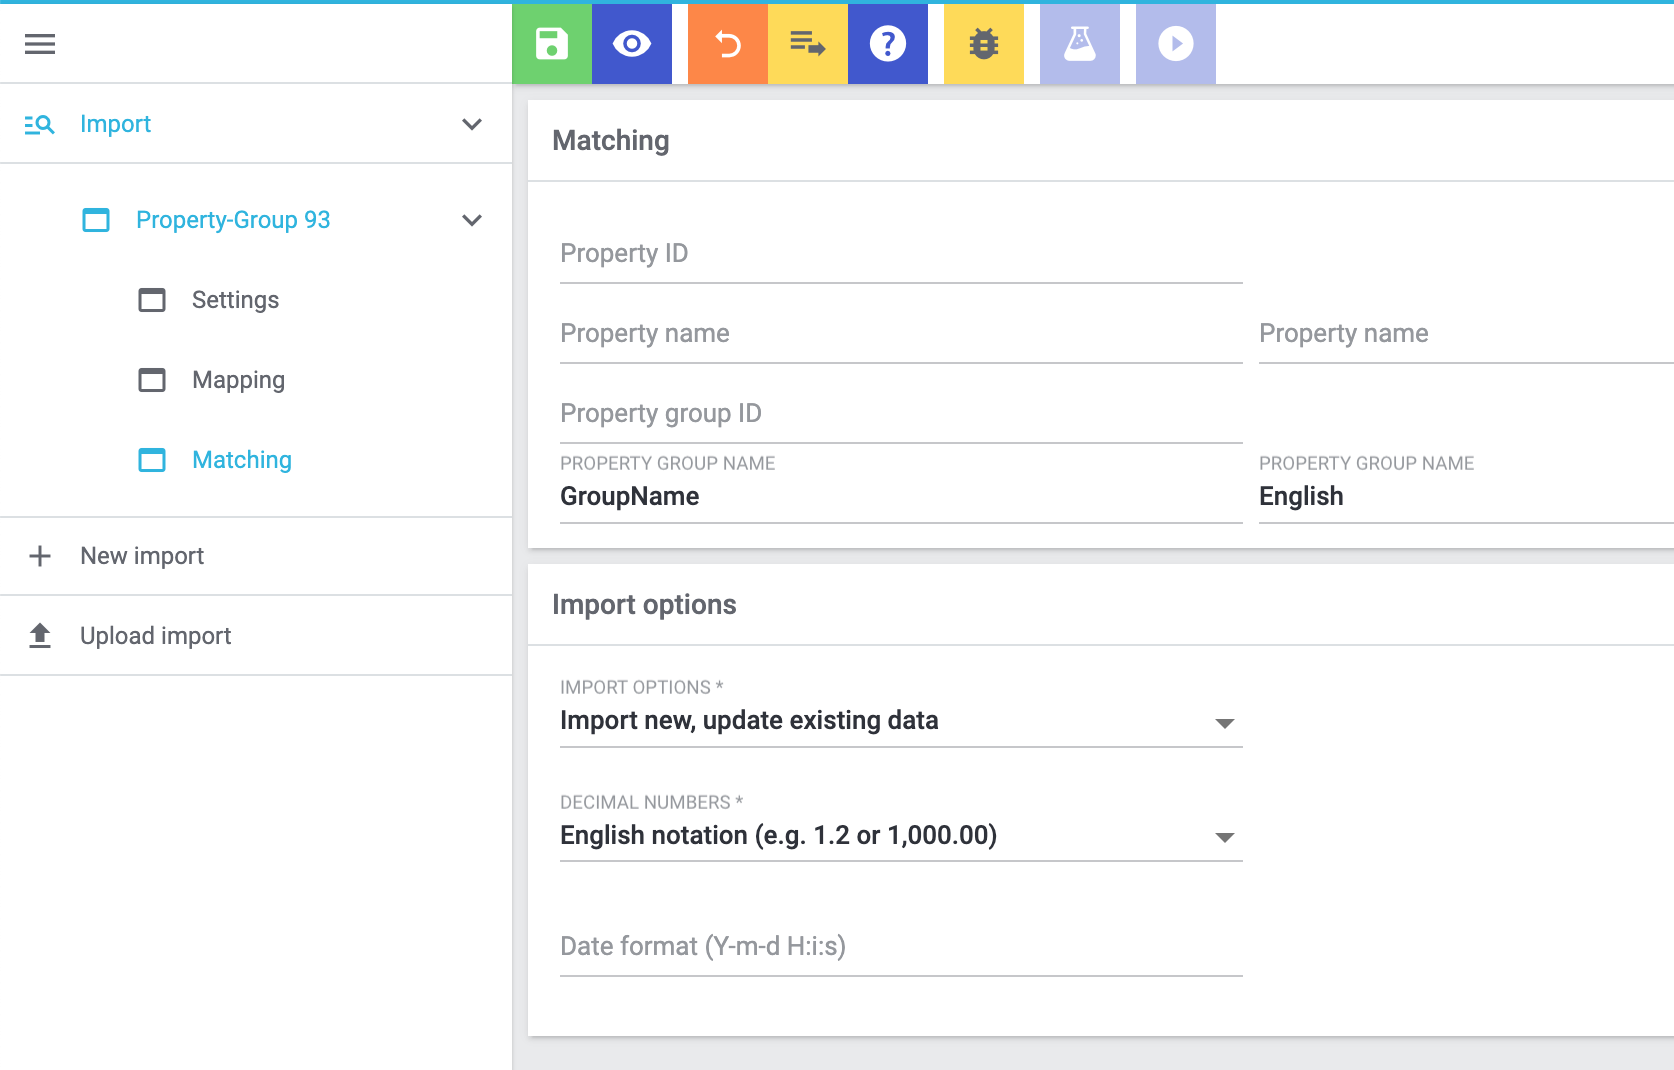
2.3. Choosing the matching settings
Once you have finished configuring the import settings, you can switch to the Matching settings.
-
The ID options are useful if you want to modify existing properties or groups.
-
The name options are useful if you want to create new properties or groups.
Since we want to import a new group in this example, configure the settings as follows:
| Setting | Explanation |
|---|---|
Property group name |
Which column of your CSV file lists the group name? Choose this column here. This option is useful if you want to create new groups. Then specify which language the name is written in. |
Import options |
Since you’ll be importing new groups, choose the option Only import new data or Import new, update existing data. |
2.4. Choosing the mapping settings
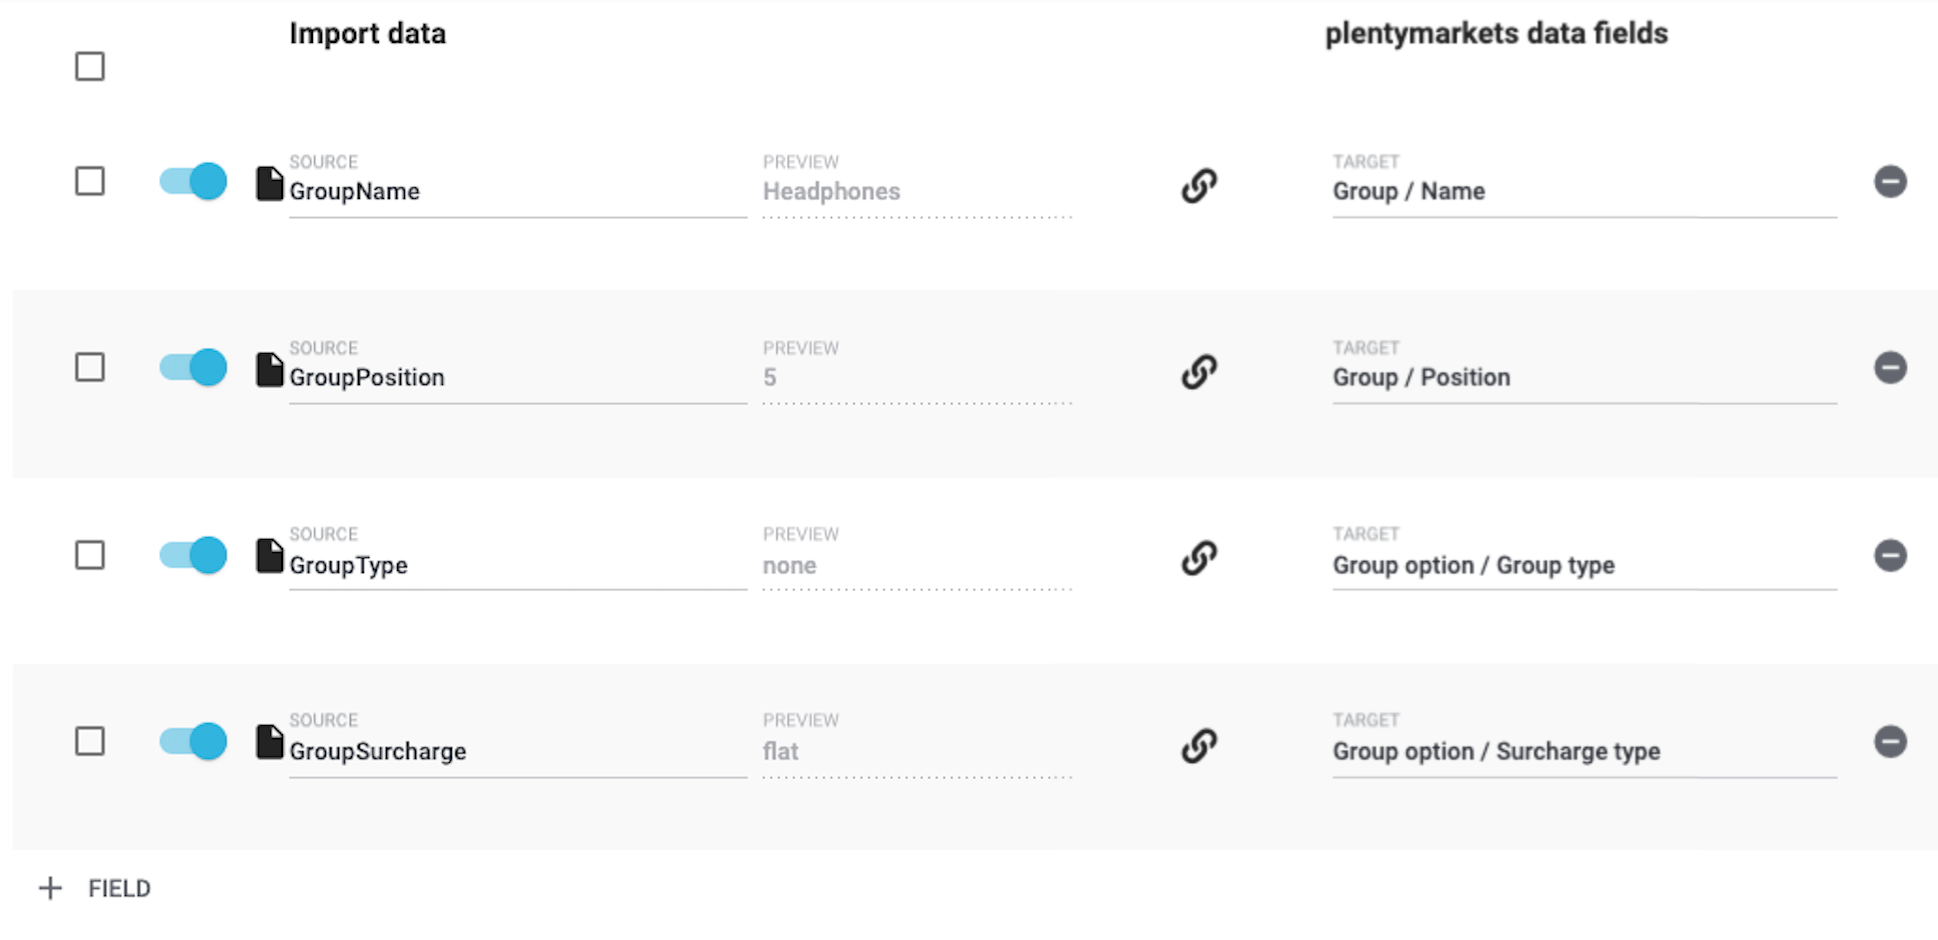
Let’s continue with the Mapping settings. Here you will specify which column of the CSV file corresponds to which data field in PlentyONE. For example, your CSV file might include a position number. On the right side, you will tell PlentyONE that this is the group position.
|
List of data fields
Take a look at the manual if you’re not sure what a specific option does or which PlentyONE data field it relates to. The information is listed here. |
2.5. Starting the import
Are you ready to import the data? Start the import and make sure the data was correctly imported into PlentyONE.
Starting the import and checking the result:
-
Activate all lines of the CSV file that should be imported ().
-
Test the import () or start the import ().
Note: This can take a few minutes. -
Go to Setup » Settings » Properties » Groups.
-
Search for and open a few groups to check their settings.
|
Do a trial run
We recommend testing the import () before you start it for the first time. This imports the first 10 rows of the file and bypasses the cache. It gives you time to check whether the import works correctly. If the import does not perform as expected, you can correct it before importing the entire file. |
|
Resetting the cache
Directly within the import, you’ll find the button Reset cache (). This button allows you to reset the import cache in order to reimport a file that does not contain any changes. |
3. Creating properties
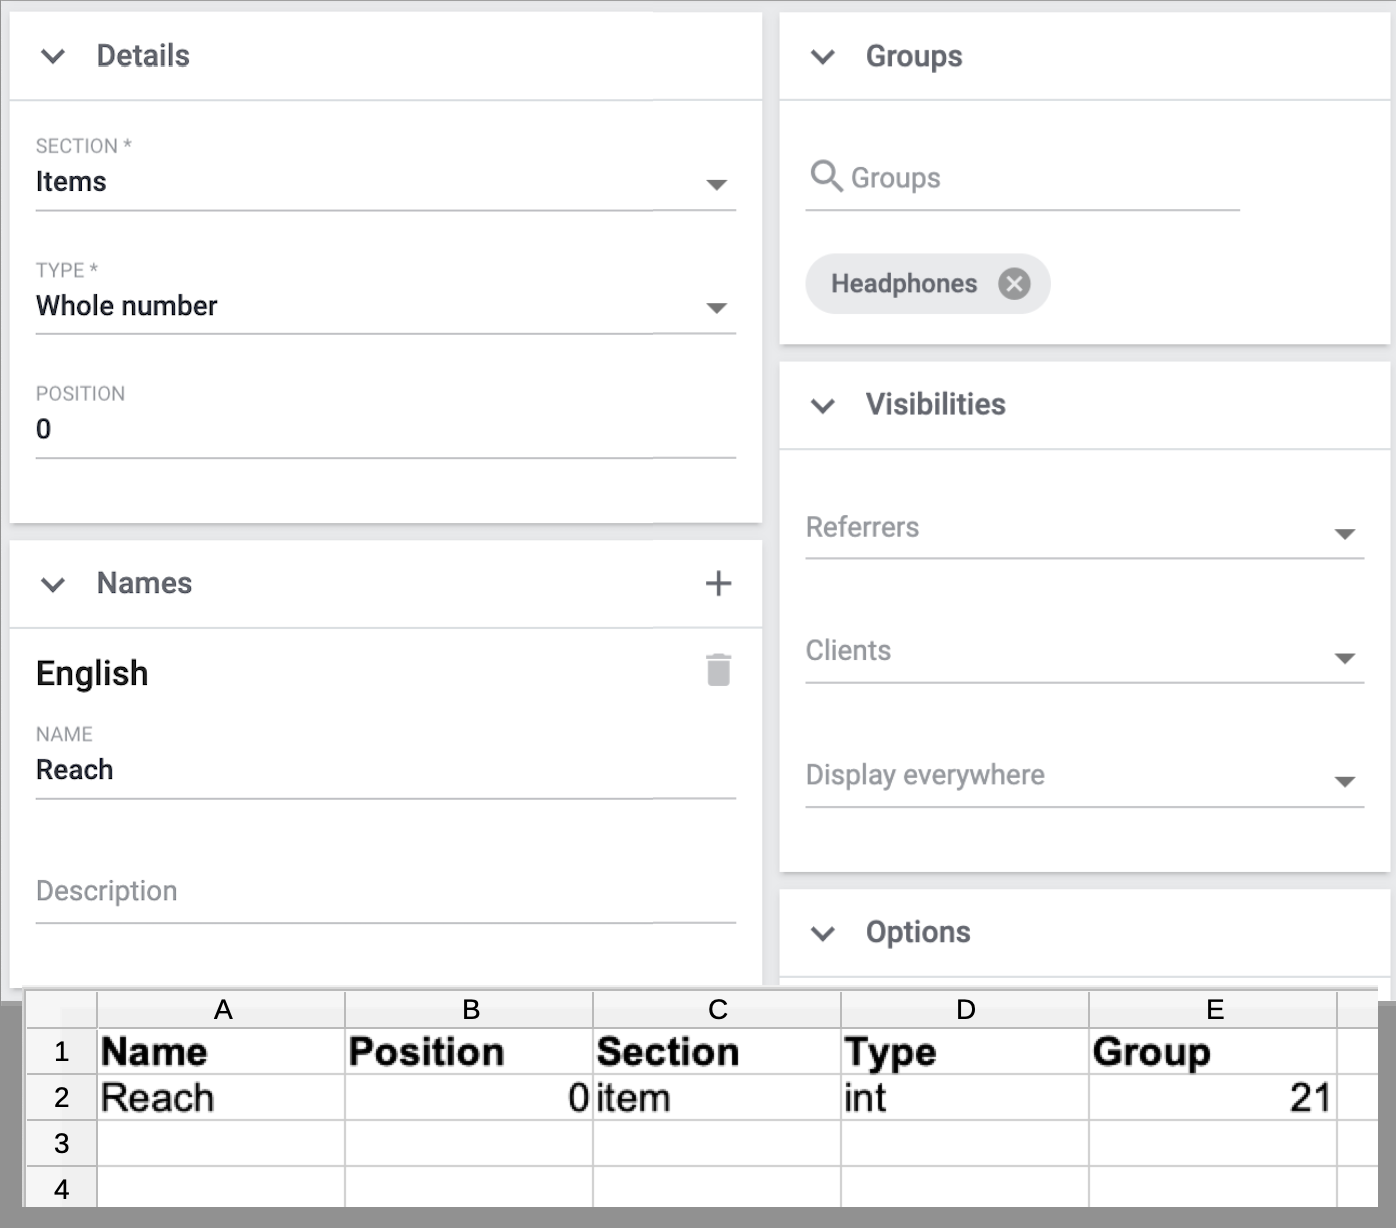
Next we’ll create the properties. In this example, I’ll import a text property, a whole number, a selection property and a multi-selection property.
3.1. Setting up the CSV file
If you were to create the properties manually, then you would enter information about them into the PlentyONE back end. Since you want to import the properties, you will enter the same data into a CSV file.
|
List of valid import values
How do you know which combinations of characters you can use in the CSV file? Take a look at the manual. Here you can see which data fields are mandatory and how you must enter the individual options into your CSV file in order for them to be correctly interpreted by PlentyONE. |
|
Visibilities and options can not be imported
Neither the area Visibilities nor the area Options can be configured via import. If you want to use these settings, then you will need to configure them manually after you have finished the import. |
3.2. Choosing the import settings
Once you have finished entering all of the property information into your CSV file, open the menu Data » Import and create a new import of the type Properties.
|
How do I create an import?
If you haven’t worked with the import tool yet, then you can learn the basics here. This page doesn’t describe every import option in detail. Rather, the page concentrates on a practical example for importing properties and groups. |
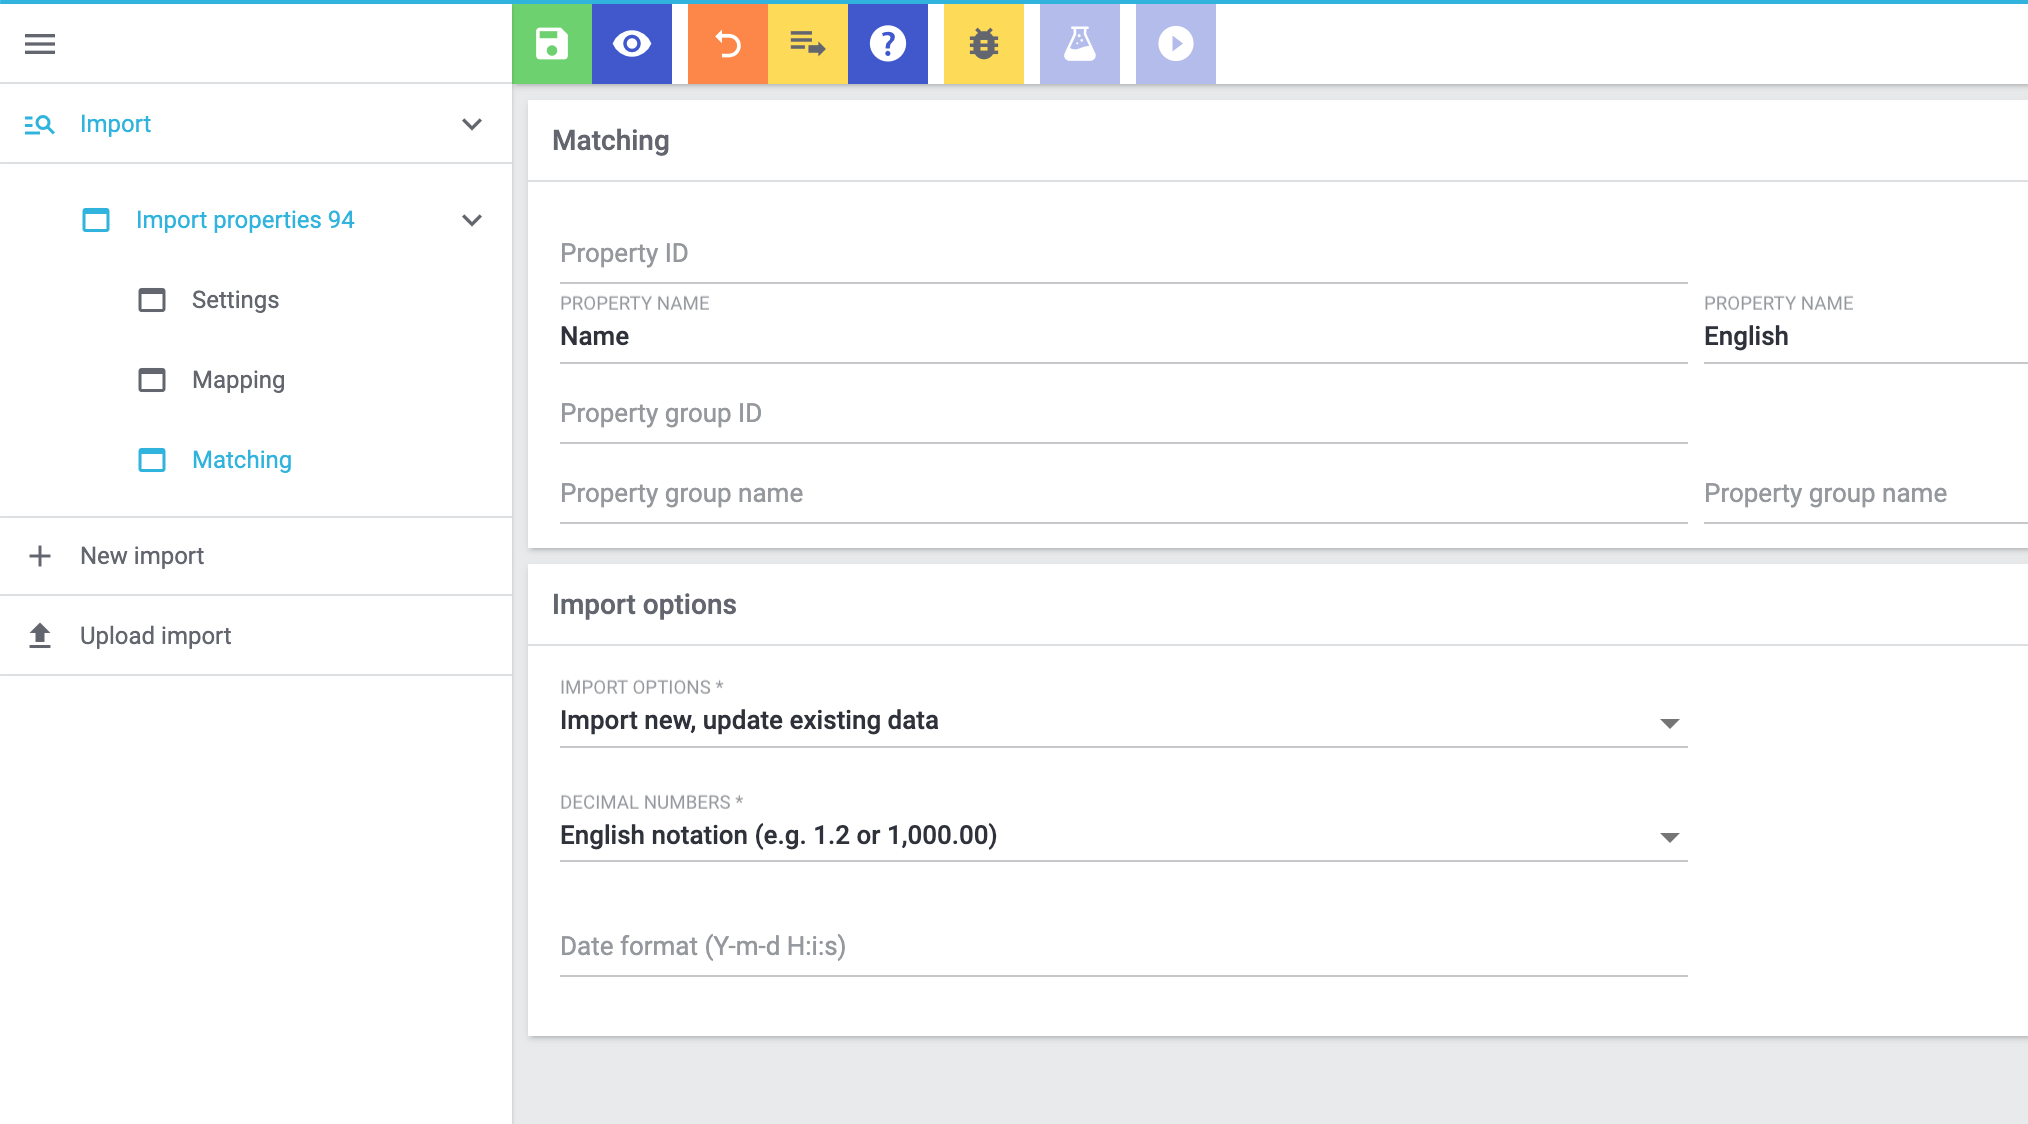
3.3. Choosing the matching settings
Once you have finished configuring the import settings, you can switch to the Matching settings.
-
The ID options are useful if you want to modify existing properties or groups.
-
The name options are useful if you want to create new properties or groups.
Since we want to import new properties in this example, configure the settings as follows:
| Setting | Explanation |
|---|---|
Property name |
Which column of your CSV file lists the property name? Choose this column here. This option is useful if you want to create new properties. Then specify which language the name is written in. |
Import options |
Since you’ll be importing new properties, choose the option Only import new data or Import new, update existing data. |
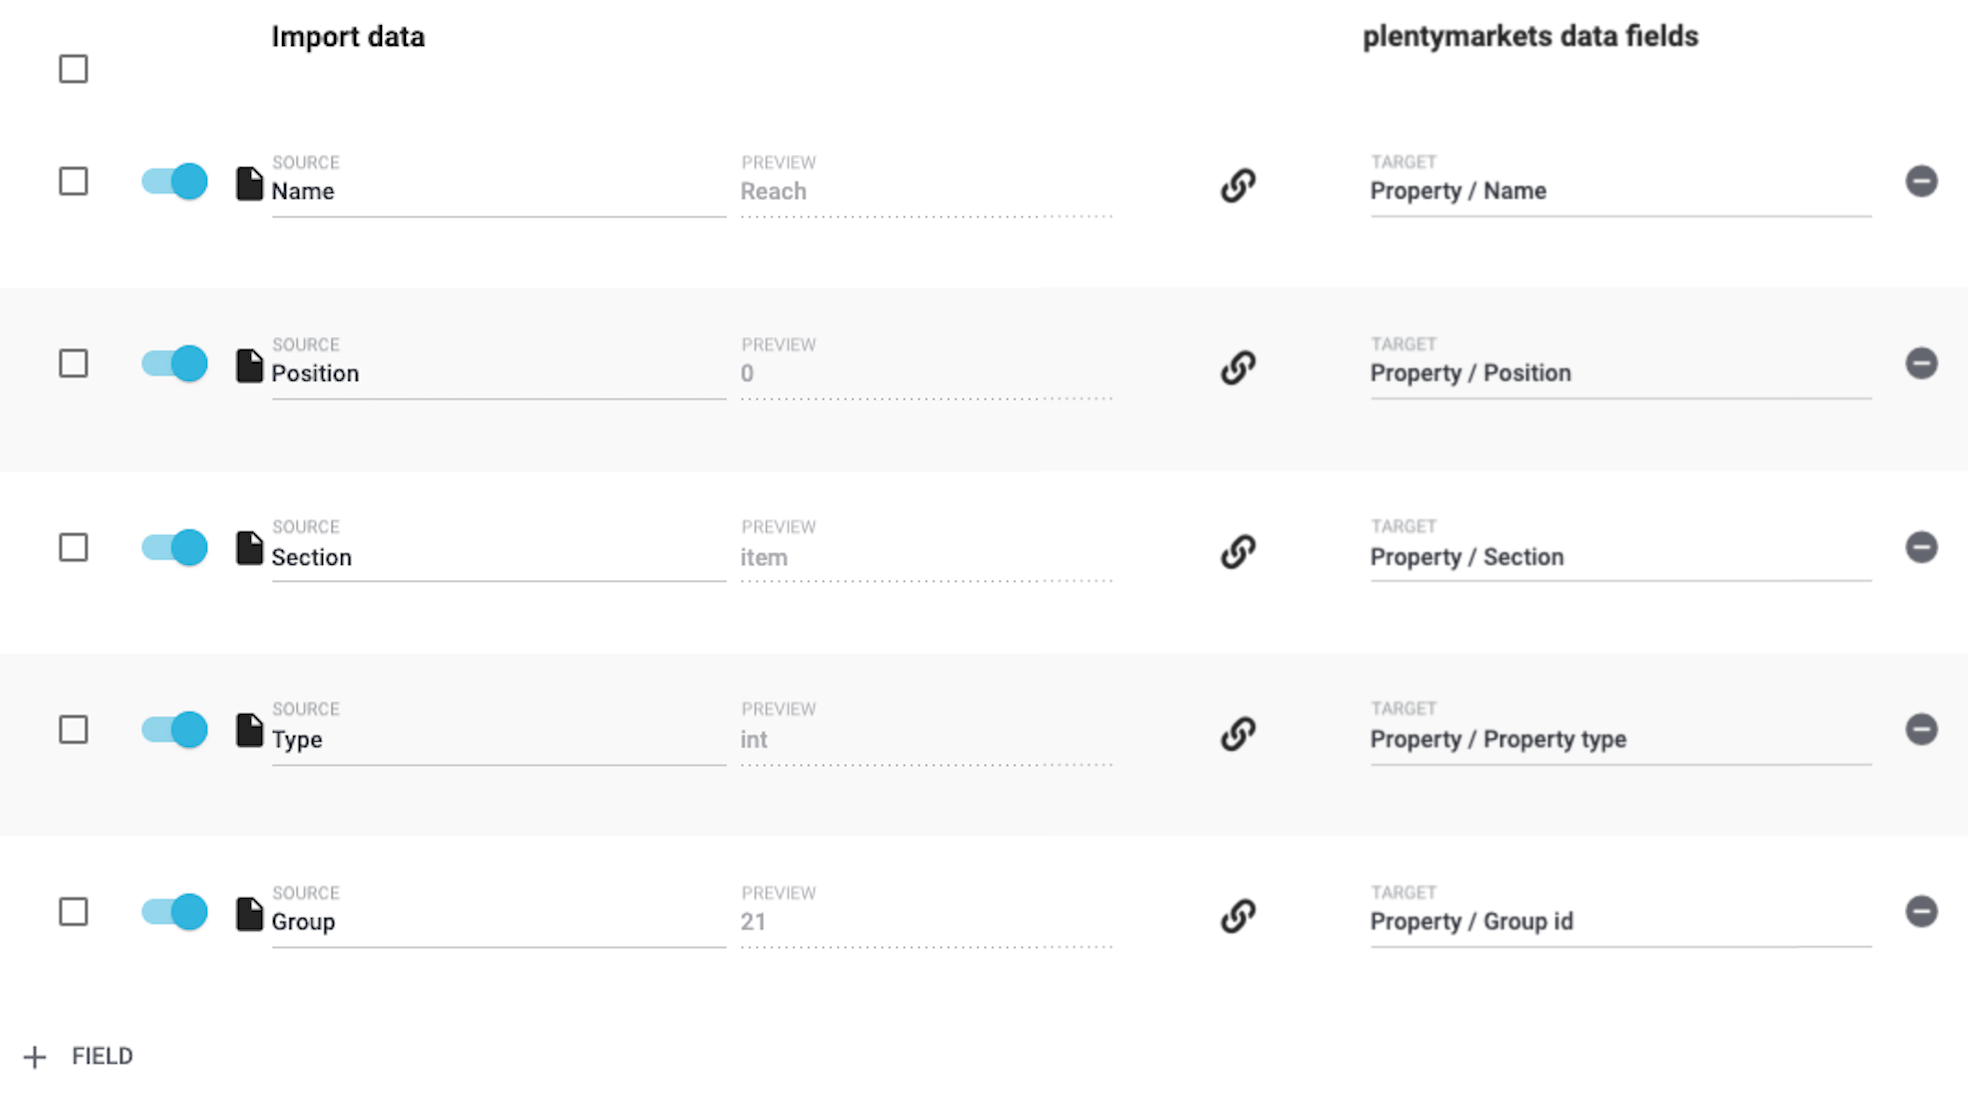
3.4. Choosing the mapping settings
Let’s continue with the Mapping settings. Here you will specify which column of the CSV file corresponds to which data field in PlentyONE.
|
List of data fields
Take a look at the manual if you’re not sure what a specific option does or which PlentyONE data field it relates to. The information is listed here. |
3.5. Starting the import
Are you ready to import the data? Start the import and make sure the data was correctly imported into PlentyONE.
Starting the import and checking the result:
-
Activate all lines of the CSV file that should be imported ().
-
Test the import () or start the import ().
Note: This can take a few minutes. -
Go to Setup » Settings » Properties » Configuration.
-
Search for and open a few properties to check their settings.
-
If necessary, manually configure the settings in the areas Visibilities and Options.
|
Do a trial run
We recommend testing the import () before you start it for the first time. This imports the first 10 rows of the file and bypasses the cache. It gives you time to check whether the import works correctly. If the import does not perform as expected, you can correct it before importing the entire file. |
|
Resetting the cache
Directly within the import, you’ll find the button Reset cache (). This button allows you to reset the import cache in order to reimport a file that does not contain any changes. |
|
Visibilities and options can not be imported
Neither the area Visibilities nor the area Options can be configured via import. If you want to use these settings, then you will need to configure them manually after you have finished the import. |
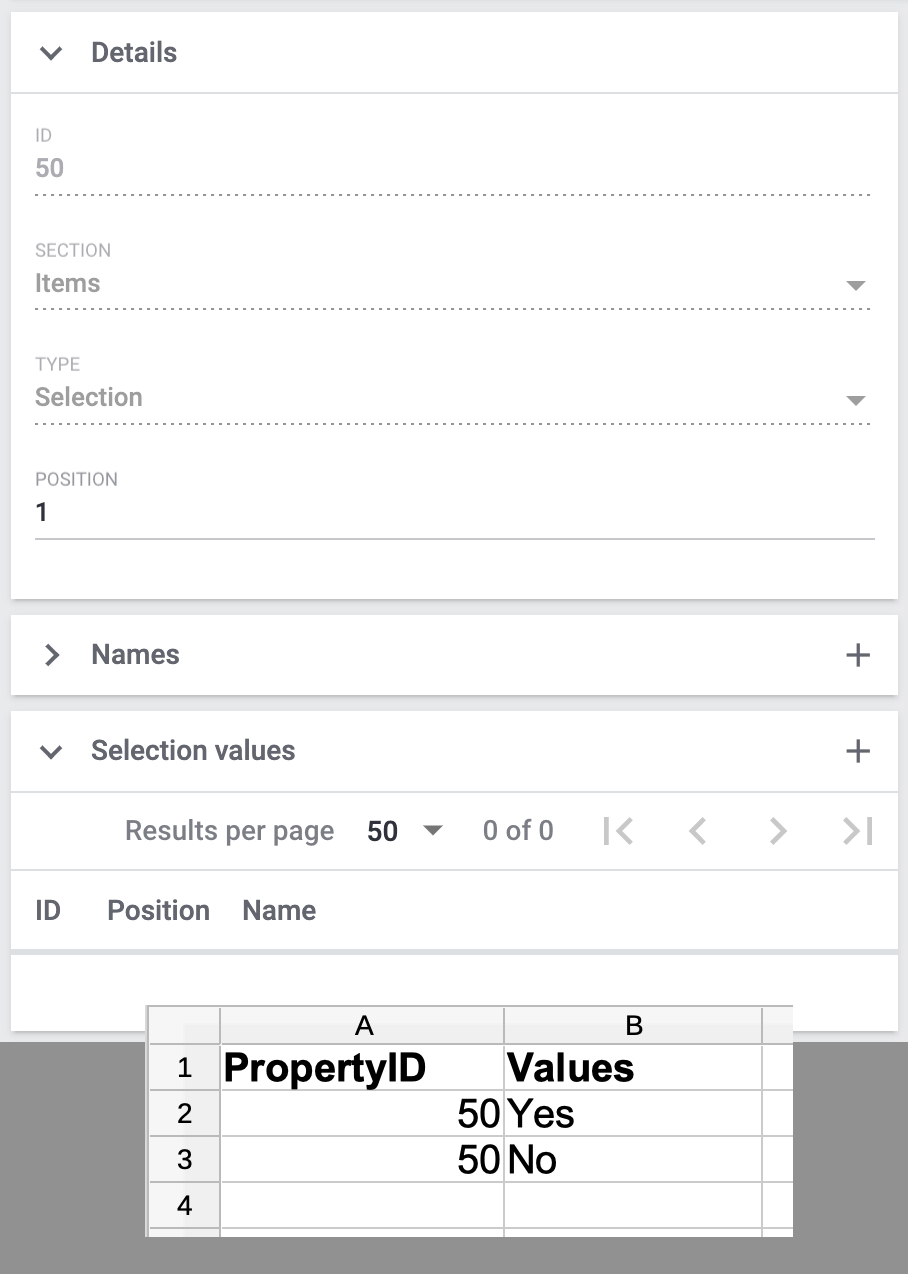
4. Creating selection values
Do you have properties of the type Selection or Multi-selection? The unique thing about these two property types is that they have individual values that are available for selection. Such selection values can also be imported.
This is done with the import type Properties: Selection values. The only requirement for this import type is that the properties must already exist in your system. In other words, it’s not possible to create the properties and their selection values together in one import. This needs to be done in two separate imports.
4.1. Setting up the CSV file
If you were to create the selection values manually, then you would enter their names into the PlentyONE back end. Since you want to import the selection values, you will enter their names into a CSV file. The CSV file is very simple. It only includes the property ID and the names of all the corresponding selection values.
|
List of valid import values
How do you know which combinations of characters you can use in the CSV file? Take a look at the manual. Here you can see which data fields are mandatory and how you must enter the individual options into your CSV file in order for them to be correctly interpreted by PlentyONE. |
4.2. Choosing the import settings
Once you have finished entering all of the selection values into your CSV file, open the menu Data » Import and create a new import of the type Properties: Selection values.
|
How do I create an import?
If you haven’t worked with the import tool yet, then you can learn the basics here. This page doesn’t describe every import option in detail. Rather, the page concentrates on a practical example for importing properties and groups. |
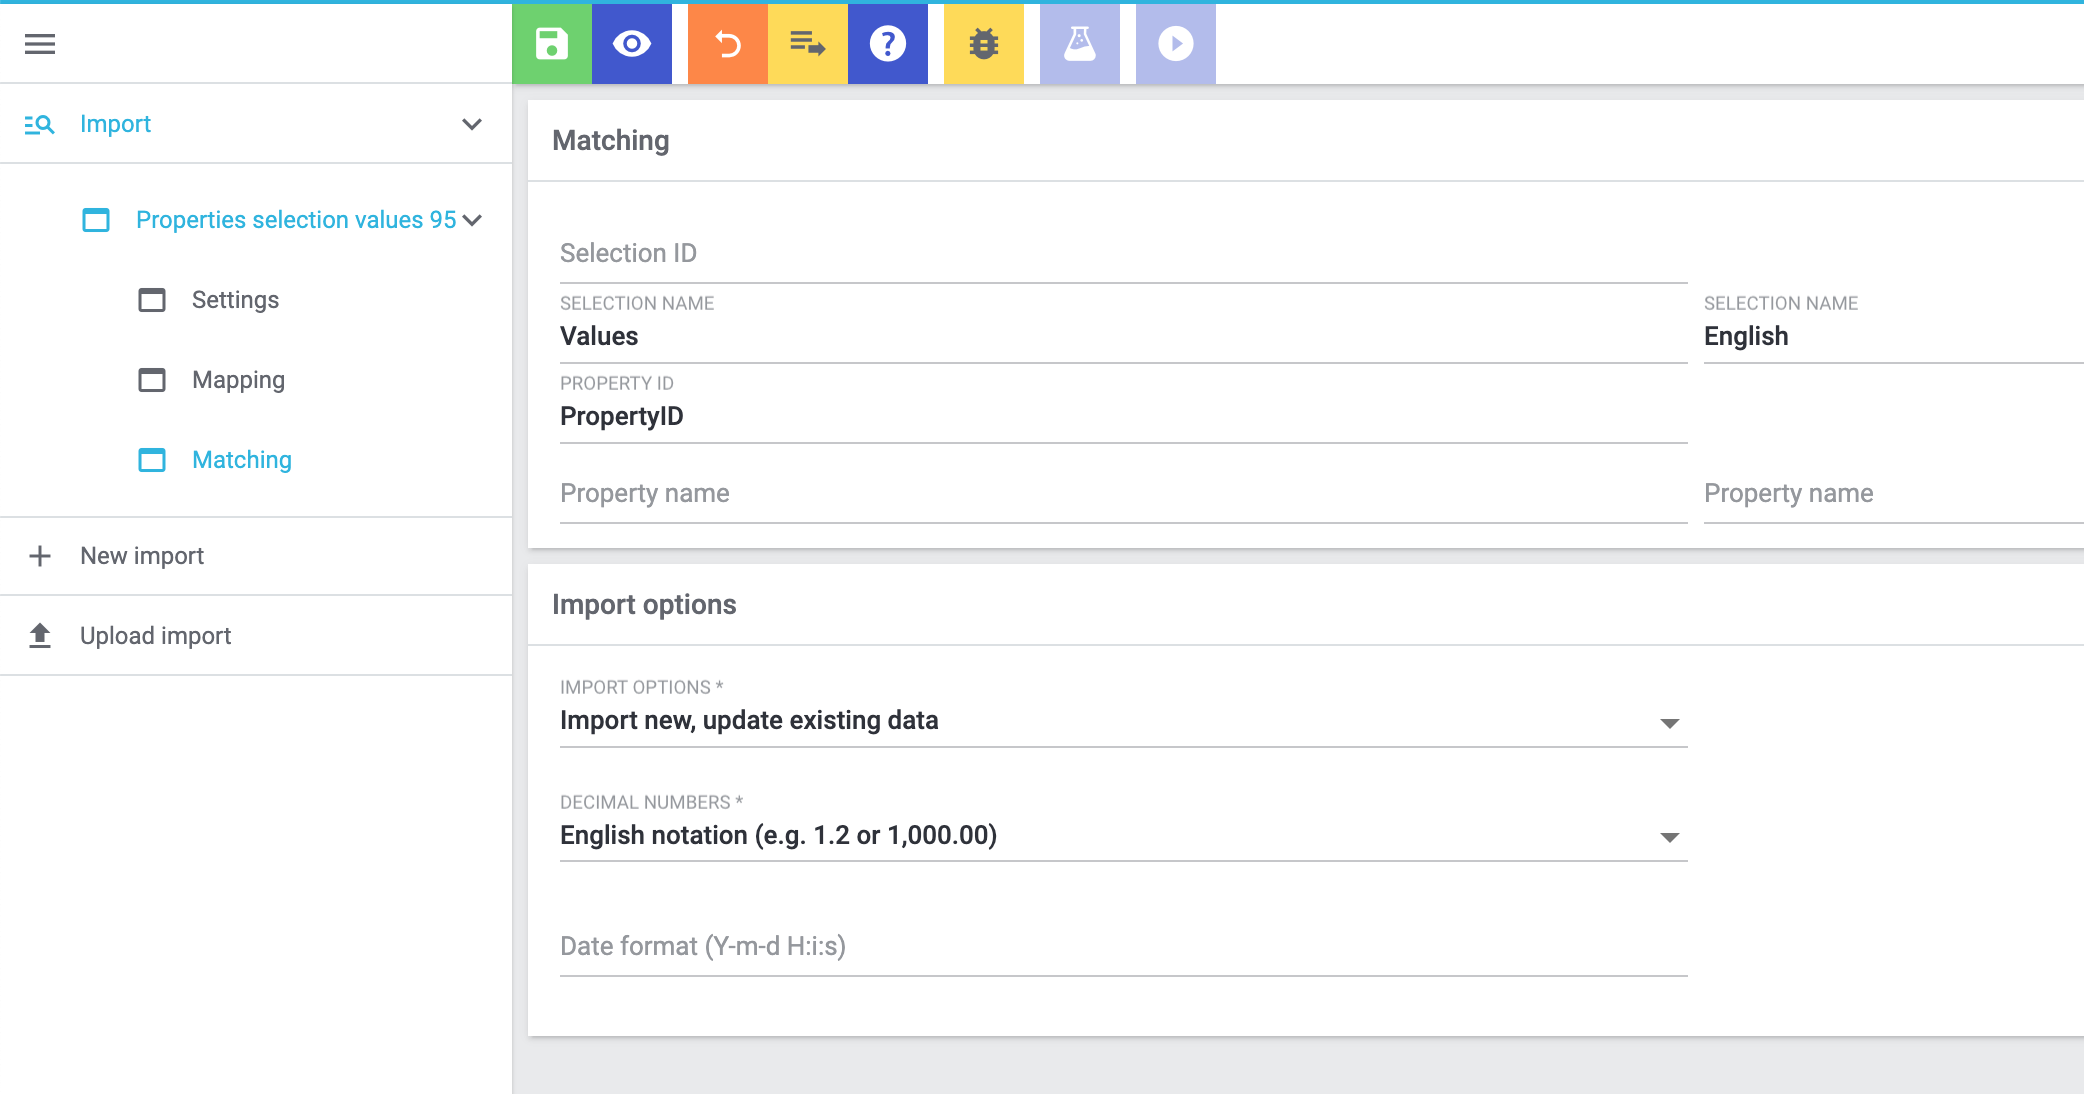
4.3. Choosing the matching settings
Once you have finished configuring the import settings, you can switch to the Matching settings.
-
The Selection ID option is useful if you want to update existing selection values.
-
The Selection name option is useful if you want to create new selection values. Note that this option can only be used together with the matching field Property ID or Property name. You can find further information in the table below.
Since we want to import new selection values in this example, configure the settings as follows:
| Setting | Explanation |
|---|---|
Selection name |
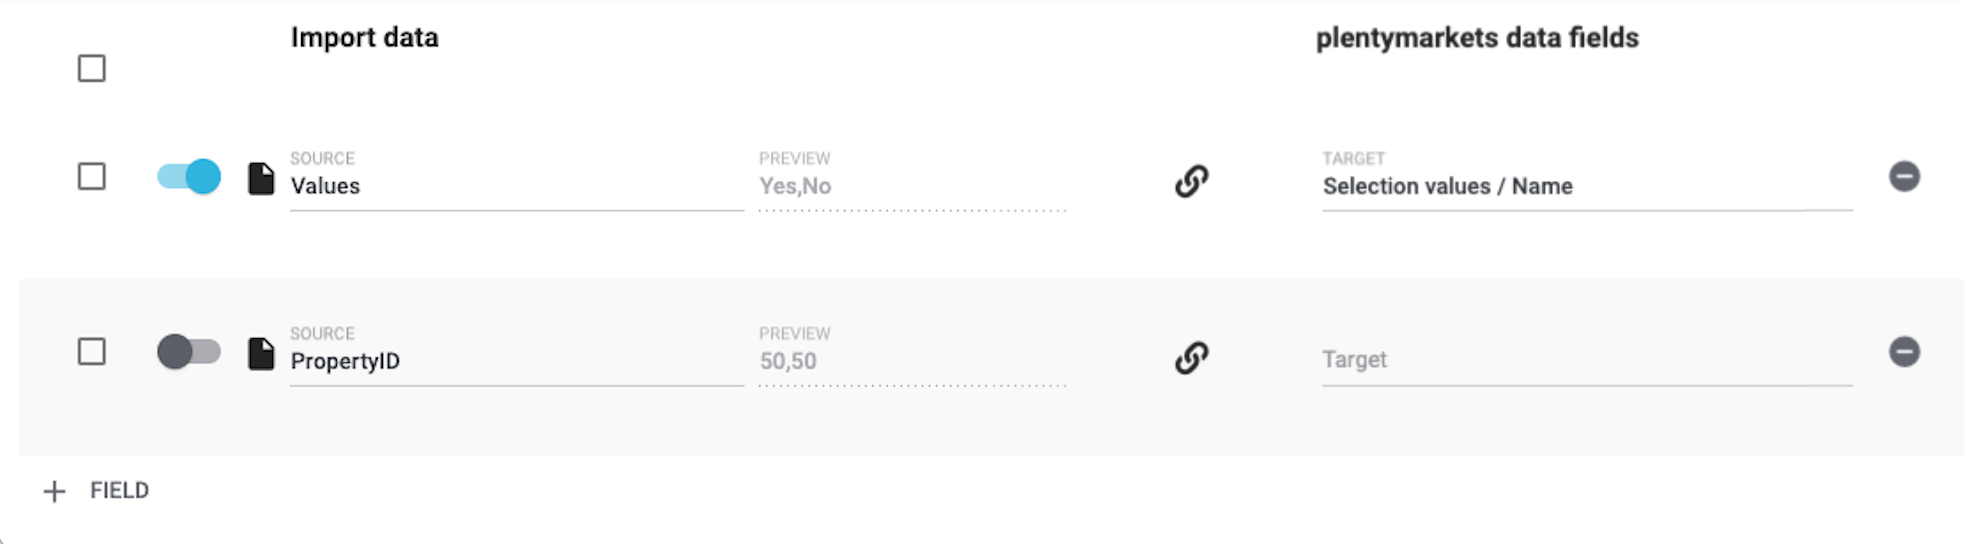
Which column of your CSV file contains the selection value’s name? Choose this column here. Then select the name’s language from the second drop-down list. This option is useful if you want to create new selection values. Additional settings: This option can only be used together with the matching field Property ID or Property name. Why? It’s possible to save the same selection name for multiple properties. The selection name alone isn’t a unique identifier. Therefore, use the selection name together with the property ID or the property name. |
Import options |
Since you’ll be importing new selection values, choose the option Only import new data or Import new, update existing data. |
4.4. Choosing the mapping settings
Let’s continue with the Mapping settings. Here you will specify which column of the CSV file corresponds to which data field in PlentyONE.
|
List of data fields
Take a look at the manual if you’re not sure what a specific option does or which PlentyONE data field it relates to. The information is listed here. |
4.5. Starting the import
Are you ready to import the data? Start the import and make sure the data was correctly imported into PlentyONE.
Starting the import and checking the result:
-
Activate all lines of the CSV file that should be imported ().
-
Test the import () or start the import ().
Note: This can take a few minutes. -
Go to Setup » Settings » Properties » Configuration.
-
Search for and open a few properties of the type Selection or Multi-selection.
-
Check the selection values.
|
Do a trial run
We recommend testing the import () before you start it for the first time. This imports the first 10 rows of the file and bypasses the cache. It gives you time to check whether the import works correctly. If the import does not perform as expected, you can correct it before importing the entire file. |
|
Resetting the cache
Directly within the import, you’ll find the button Reset cache (). This button allows you to reset the import cache in order to reimport a file that does not contain any changes. |
5. Linking properties with variations
Finally, you’ll specify which properties apply to which products. This can also be done via import. You’ll use the import type Item. This import type is extremely versatile. You can use it to import all of the information that’s found in an item data record. Among other things, the property links.
5.1. Setting up the CSV file
If you were to link the properties manually, then you would enter information about them into the PlentyONE back end. Since you want to import the links, you will enter the same data into a CSV file.
|
It can be easier to import every property type separately
In this example, I created a separate CSV file and import for every property type. Since the various property types require different information, this allows me to keep the process as simple as possible. Of course, you can proceed differently if that fits better with your own workflows. |
|
List of valid import values
How do you know which combinations of characters you can use in the CSV file? Take a look at the manual. Here you can see which data fields are mandatory and how you must enter the individual options into your CSV file in order for them to be correctly interpreted by PlentyONE. |
I entered the following information into my CSV file:
-
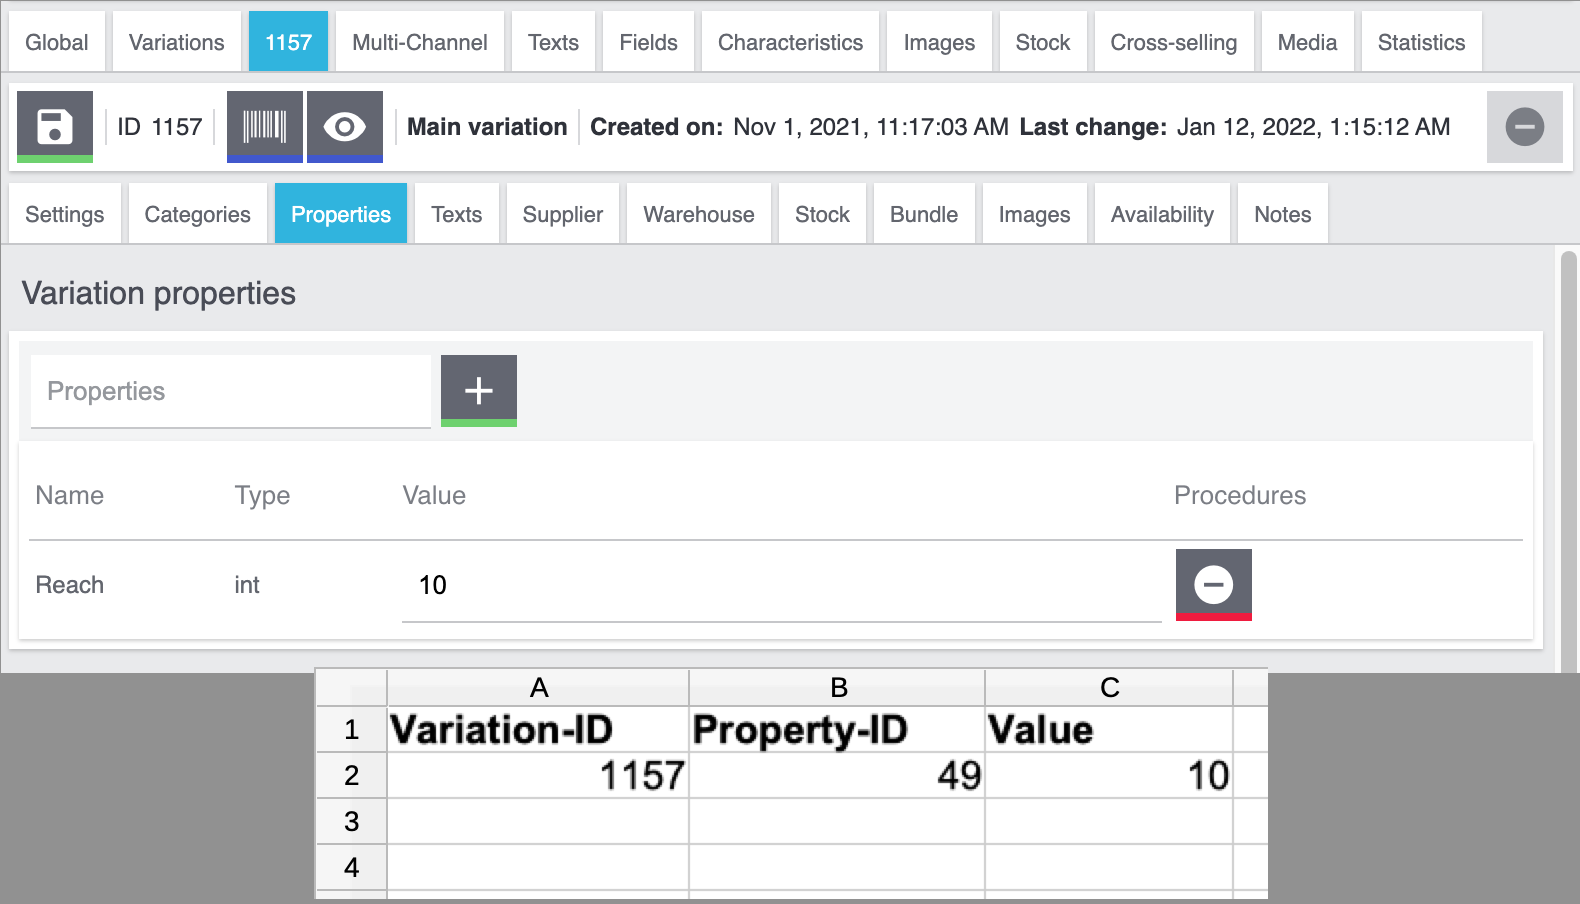
Variation ID = Which variation should the property be linked to? For example, the Bluetooth headphones. They have the ID 1157.
-
Property ID = Which property should be linked? For example, the reach. This property has the ID 49.
-
Value = What value does the property have? For example, the value “10” metres.
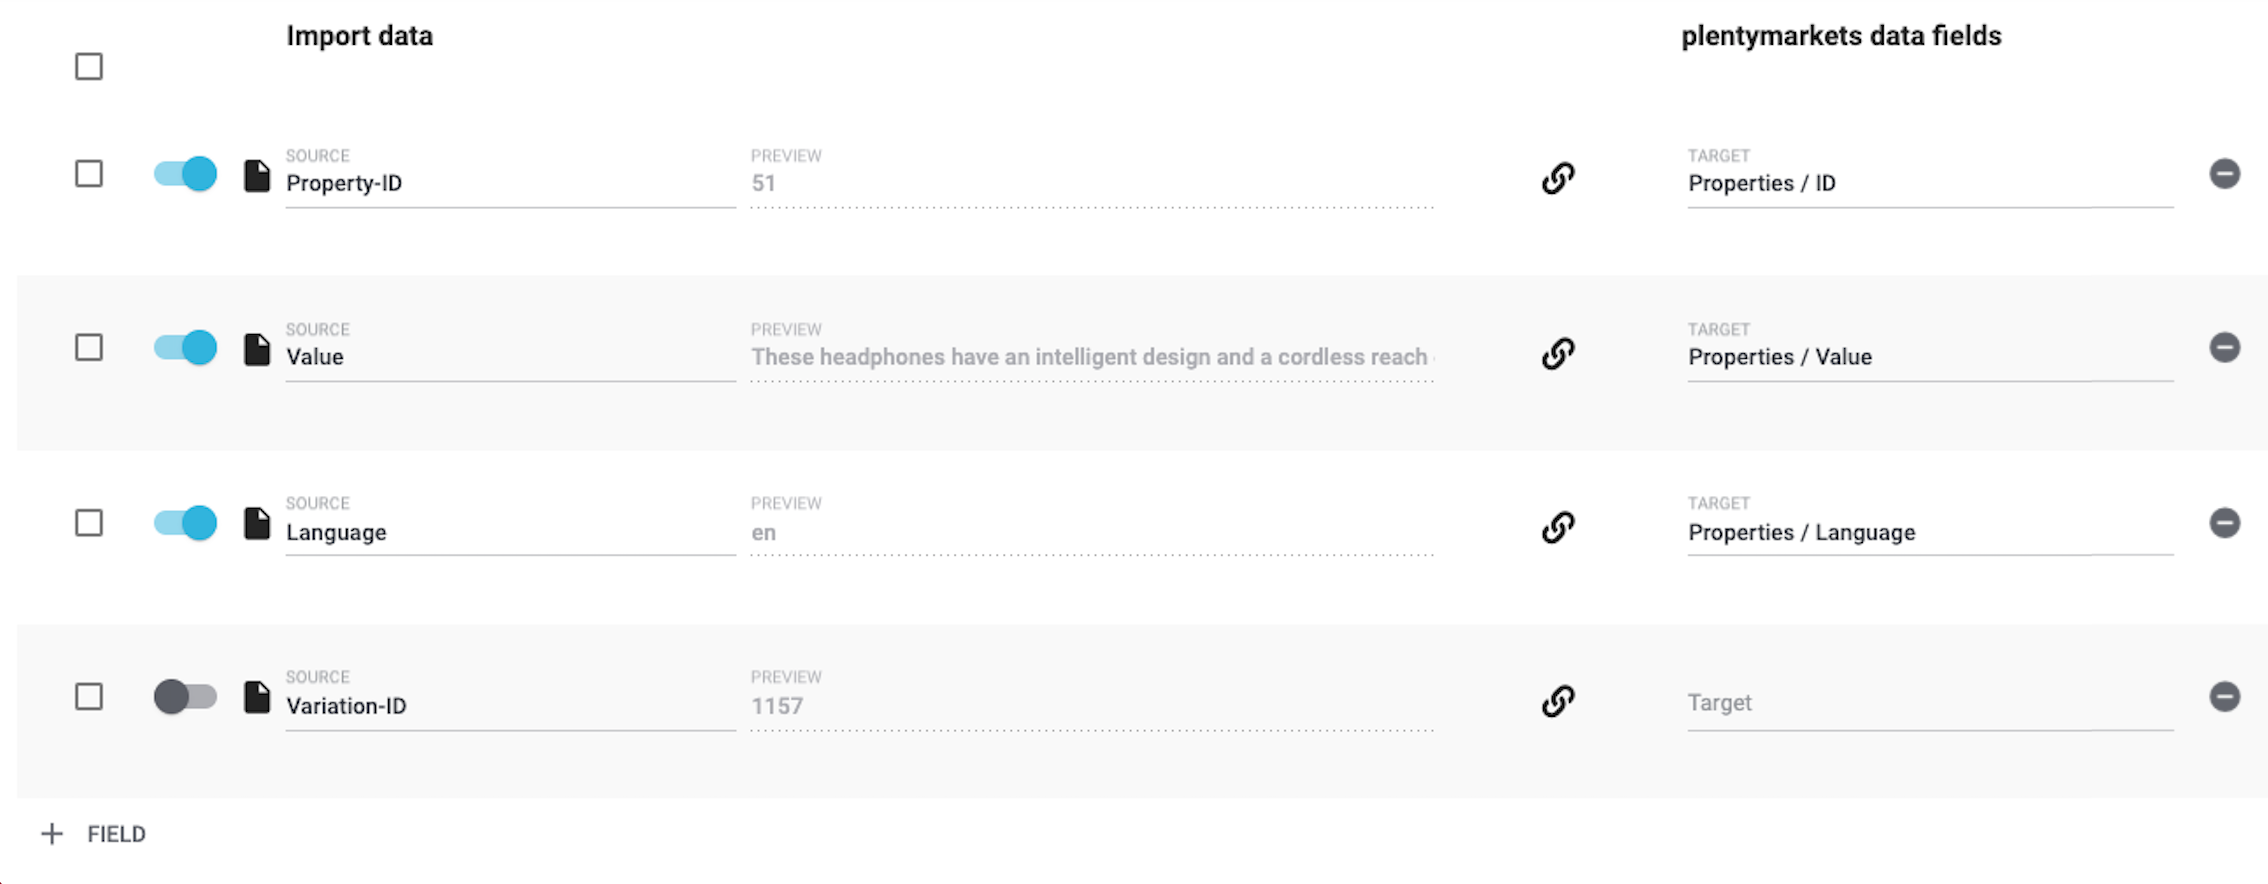
I entered the following information into my CSV file:
-
Variation ID = Which variation should the property be linked to? For example, the Bluetooth headphones. They have the ID 1157.
-
Property ID = Which property should be linked? For example, the product text. This property has the ID 51.
-
Value = What value does the property have? For example, the actual text.
-
Language = Texts are language-specific. So in this column, I’ll specify which language the text was written in.

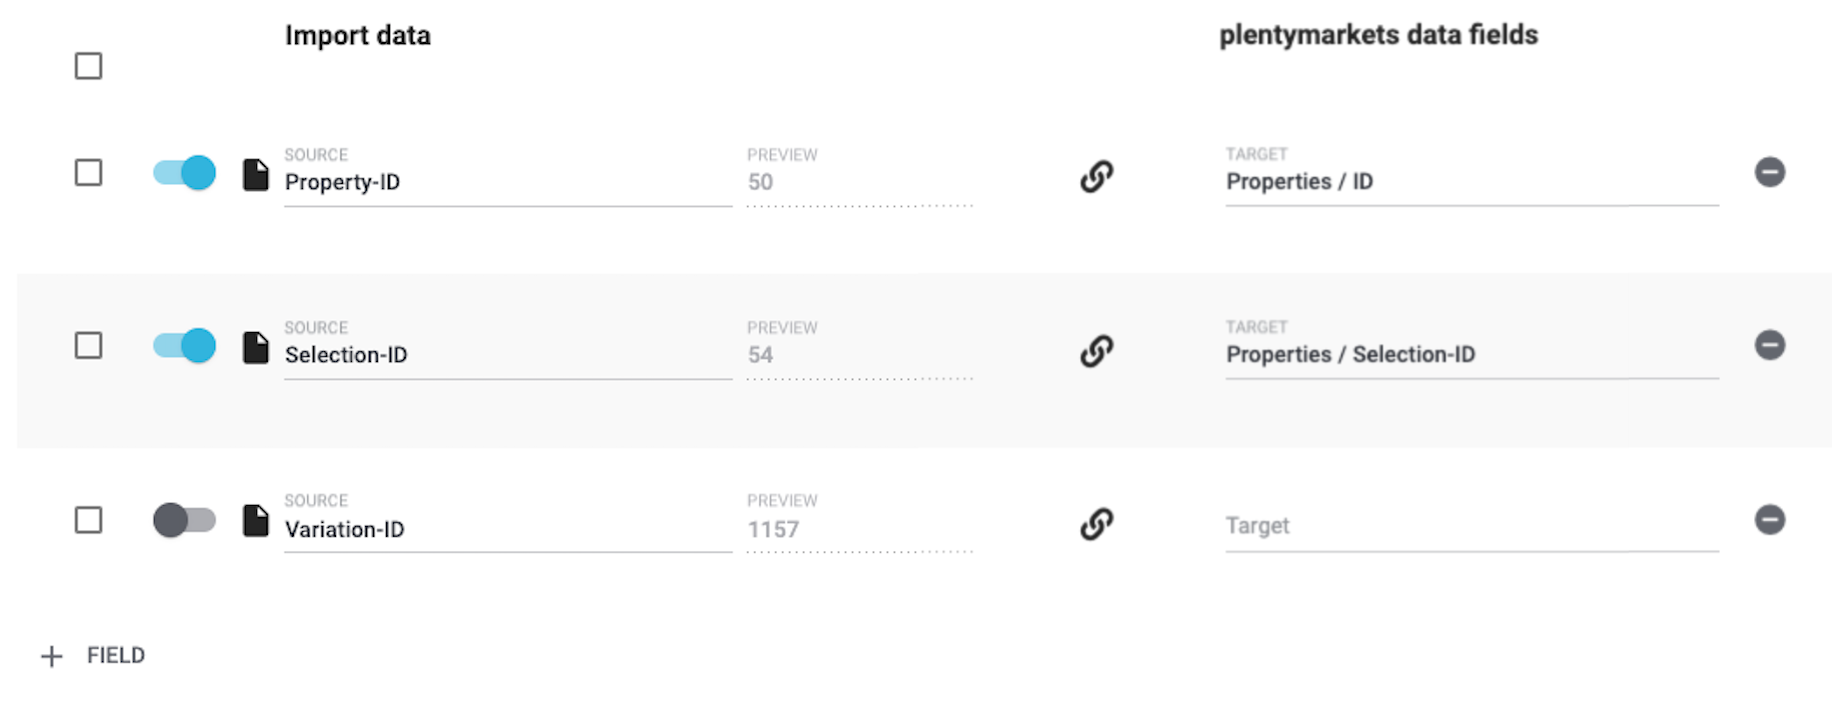
I entered the following information into my CSV file:
-
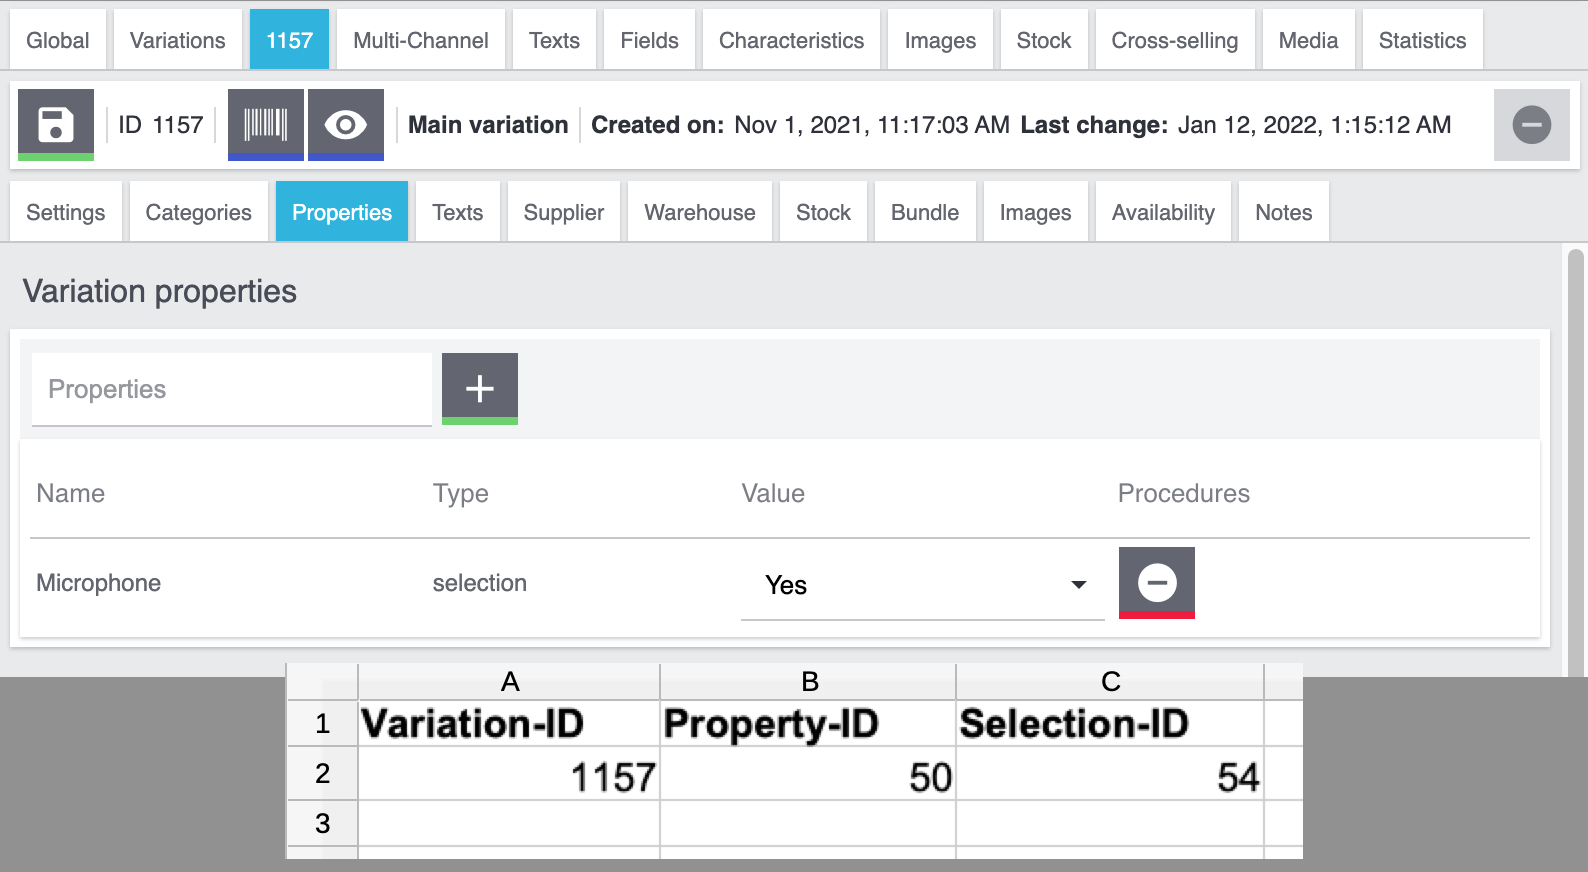
Variation ID = Which variation should the property be linked to? For example, the Bluetooth headphones. They have the ID 1157.
-
Property ID = Which property should be linked? For example, the question whether the headphones have a built-in microphone. This property has the ID 50.
-
Selection ID = Which option applies in this case? For example: “Yes”, the headphones have a built-in microphone. This selection value has the ID 54.
I entered the following information into my CSV file:
-
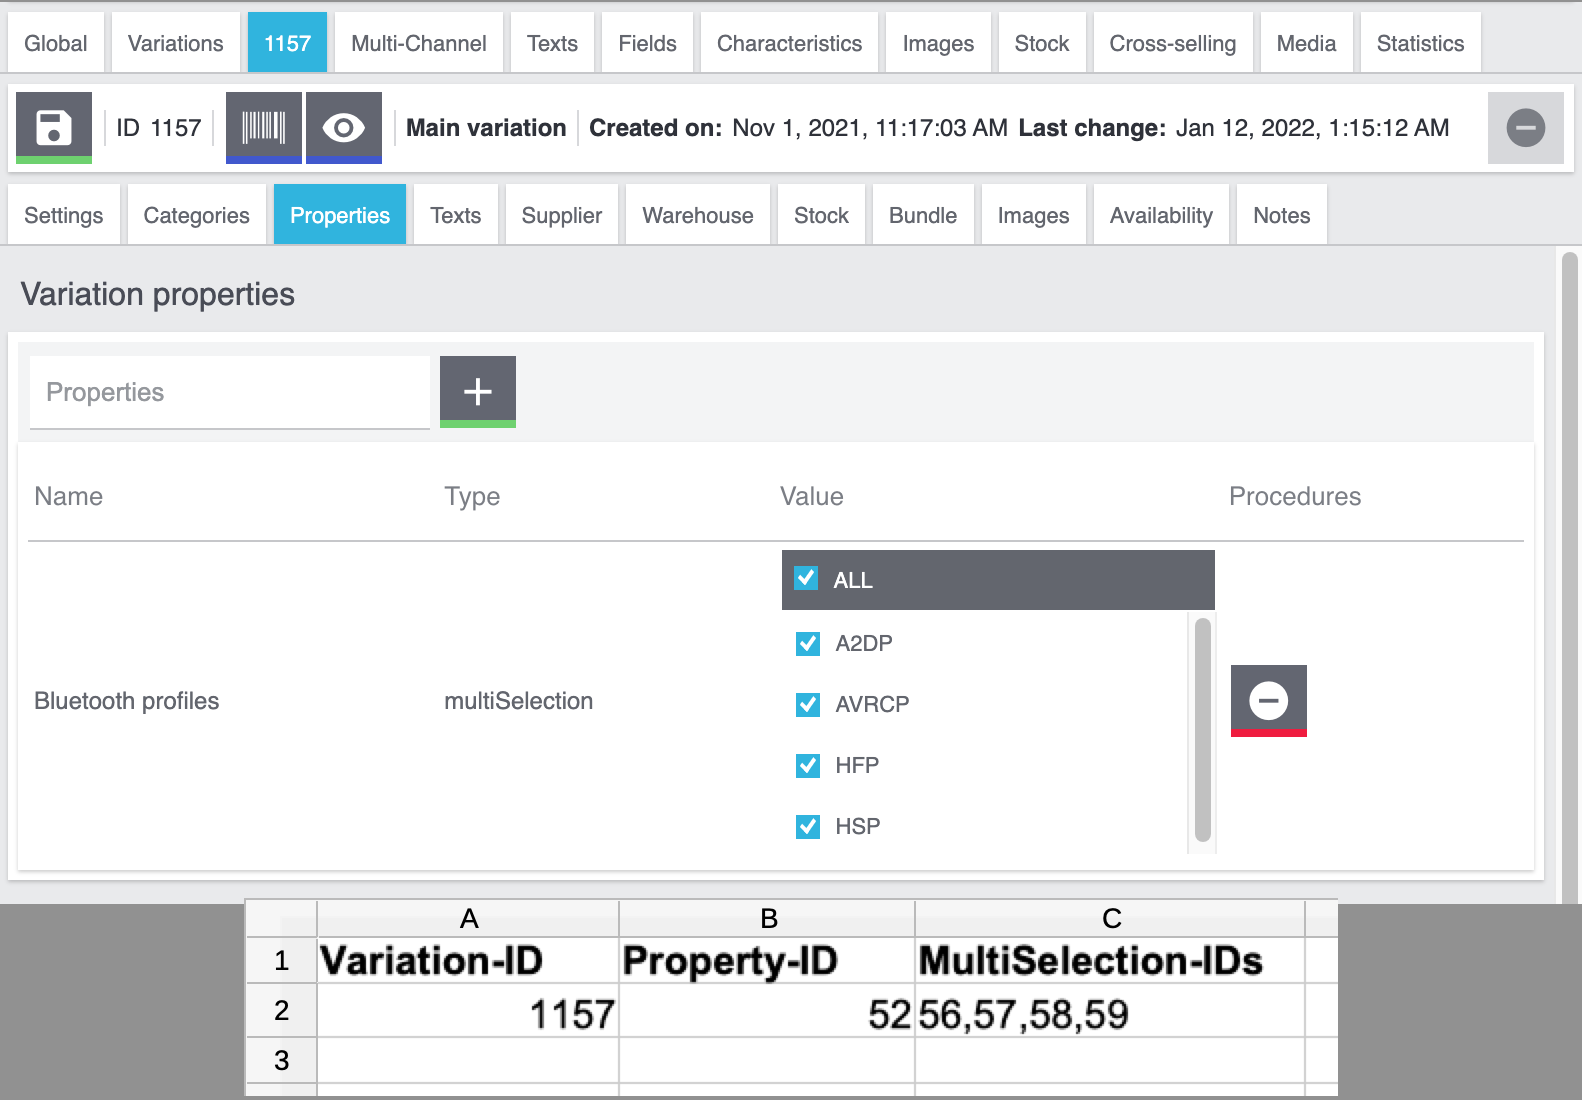
Variation ID = Which variation should the property be linked to? For example, the Bluetooth headphones. They have the ID 1157.
-
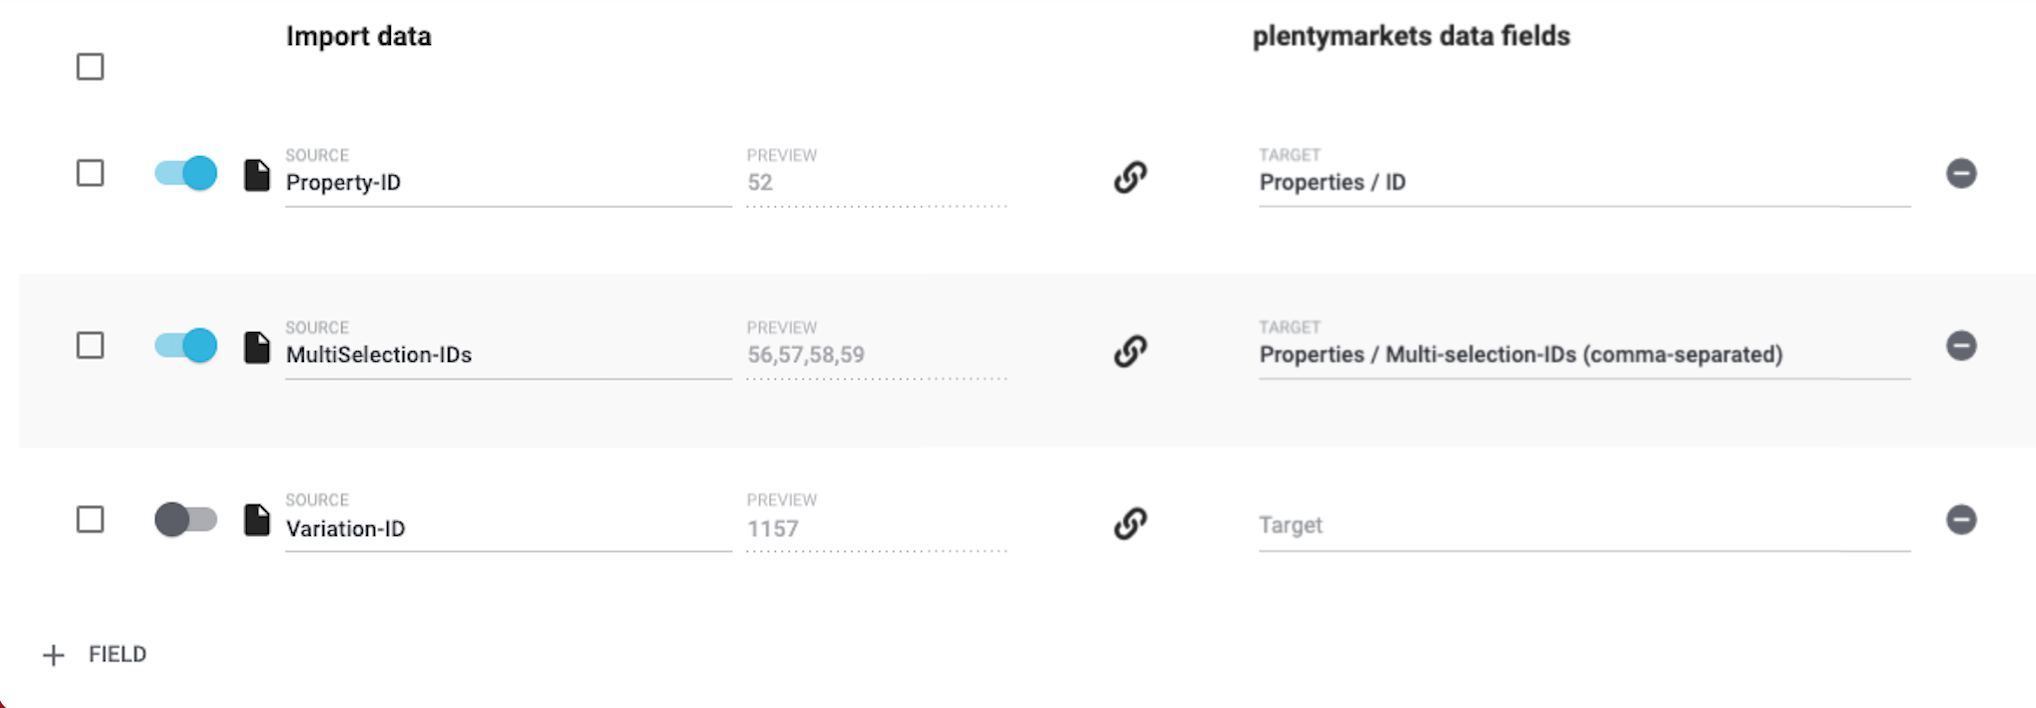
Property ID = Which property should be linked? For example, the question which Bluetooth profiles the headphones support. This property has the ID 52.
-
Multi-selection IDs = Which options apply in this case? For example: The headphones support the profiles A2DP, AVRCP, HFP and HSP. These selection values have the IDs 56, 57, 58 and 59.
5.2. Choosing the import settings
Once you have finished entering all of the property links into your CSV file, open the menu Data » Import and create a new import of the type Item.
|
How do I create an import?
If you haven’t worked with the import tool yet, then you can learn the basics here. This page doesn’t describe every import option in detail. Rather, the page concentrates on a practical example for importing properties and groups. |
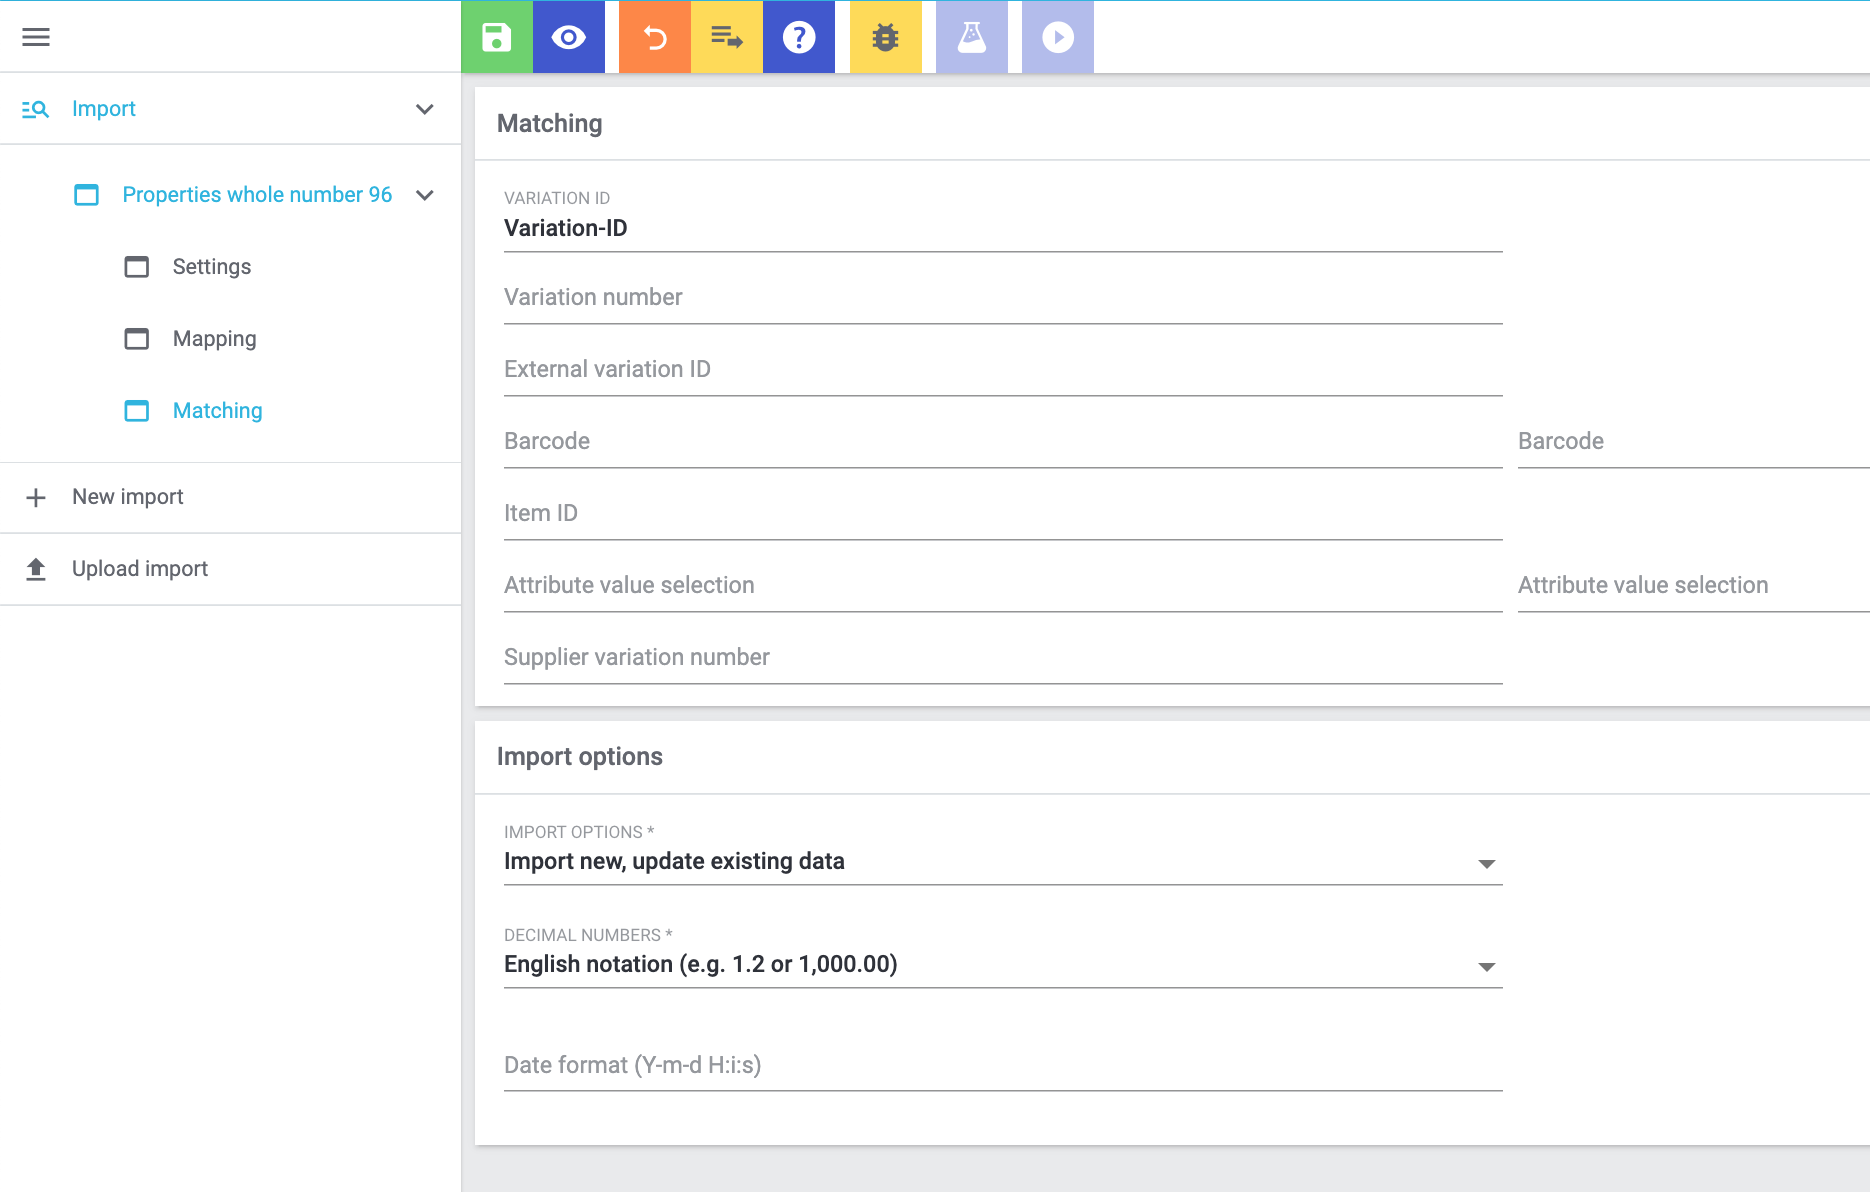
5.3. Choosing the matching settings
Once you have finished configuring the import settings, you can switch to the Matching settings.
-
The ID options are useful if you want to modify existing variations.
-
The name options are useful if you want to create new variations.
Since we want to import existing variations in this example, configure the settings as follows:
| Setting | Explanation |
|---|---|
Variation ID |
Which column of the CSV file lists the variation IDs? Choose this column here. This option is useful if you want to update existing variations. |
Import options |
Since you’ll be updating existing variations, choose the option Only update existing data or Import new, update existing data. |
5.4. Choosing the mapping settings
Let’s continue with the Mapping settings. Here you will specify which column of the CSV file corresponds to which data field in PlentyONE.
|
It can be easier to import every property type separately
In this example, I created a separate CSV file and import for every property type. Since the various property types require different information, this allows me to keep the process as simple as possible. Of course, you can proceed differently if that fits better with your own workflows. |
|
List of data fields
Take a look at the manual if you’re not sure what a specific option does or which PlentyONE data field it relates to. The information is listed here. |
I selected the mapping settings as follows:
-
Property ID
-
Value
-
Variation ID = I have already used the variation ID as the matching field. I do not need to use it as a mapping field too. Therefore, I leave this line inactive ().
I selected the mapping settings as follows:
-
Property ID
-
Value
-
Language
-
Variation ID = I have already used the variation ID as the matching field. I do not need to use it as a mapping field too. Therefore, I leave this line inactive ().
I selected the mapping settings as follows:
-
Property ID
-
Selection ID
-
Variation ID = I have already used the variation ID as the matching field. I do not need to use it as a mapping field too. Therefore, I leave this line inactive ().
I selected the mapping settings as follows:
-
Property ID
-
Multi-selection IDs
-
Variation ID = I have already used the variation ID as the matching field. I do not need to use it as a mapping field too. Therefore, I leave this line inactive ().
5.5. Starting the import
Are you ready to import the data? Start the import and make sure the data was correctly imported into PlentyONE.
Starting the import and checking the result:
-
Activate all lines of the CSV file that should be imported ().
-
Test the import () or start the import ().
Note: This can take a few minutes. -
Go to Item » Edit item.
-
Search for and open a few items.
-
Check whether the properties were correctly linked in the tabs Properties and Texts.
|
Do a trial run
We recommend testing the import () before you start it for the first time. This imports the first 10 rows of the file and bypasses the cache. It gives you time to check whether the import works correctly. If the import does not perform as expected, you can correct it before importing the entire file. |
|
Resetting the cache
Directly within the import, you’ll find the button Reset cache (). This button allows you to reset the import cache in order to reimport a file that does not contain any changes. |