Zalando Layer Integration
|
Closed beta phase
The version of the Zalando integration with PlentyONE described on this page is currently in a closed beta phase. If you are eligible for the closed beta test phase, PlentyONE will contact you. Alternatively, you can use the Zalando integration which is already available to all customers. |
Thanks to the Zalando partner programme, online sellers and manufacturers can use Zalando as an additional distribution channel for selling their high-quality products and take advantage of the well-known brand name Zalando.
Zalando is a closed, invite only market. In other words: Zalando will approach you if your products are a good fit for the Zalando product range.
With PlentyONE, you can use the following types of order processing:
-
Own logistics; Zalando calls this Partner Fulfillment (own logistics)
-
Shipping by Zalando, i.e. Zalando Fulfillment Solutions (ZFS)
| Which countries you can sell in with Zalando depends on your contract with Zalando. |
You can import orders from the following countries into PlentyONE:
-
Austria
-
Belgium
-
Bulgaria
-
Croatia
-
Czech Republic
-
Denmark
-
Estonia
-
Finland
-
France
-
Germany
-
Greece
-
Hungary
-
Ireland
-
Italy
-
Latvia
-
Lithuania
-
Luxembourg
-
Netherlands
-
Norway
-
Poland
-
Portugal
-
Romania
-
Switzerland
-
Slovakia
-
Slovenia
-
Spain
-
United Kingdom
1. Frequency of data exchange
Connecting to this market allows for the following automatic functions to take place:
| Data | Interval |
|---|---|
Item export |
Once a day |
Stock synchronisation |
Every 15 minutes, asynchronous |
Price synchronisation |
Every 15 minutes |
Order import |
Every 5 minutes |
2. Necessary steps for initial setup or switching to the new Zalando integration
Depending on whether you have already used the old Zalando integration in PlentyONE or whether you want to start selling on Zalando via PlentyONE for the first time, you will need to carry out different settings.
2.1. Option 1: I am not yet selling on Zalando via PlentyONE and want to set up the sales channel.
If you are not yet selling on Zalando via PlentyONE, you have to carry out the following settings to set up the sales channel in PlentyONE:
-
Go through the assistant Account settings - Zalando for the first time to create a Zalando account.
-
Contact the PlentyONE support to have your Zalando account linked to your zDirect account. Important: This is only possible after you have completed the assistant for the first time.
-
Go through the assistant Account settings - Zalando again to complete the remaining settings.
-
Activate the order referrer for Zalando.
-
Create catalogues for Zalando. You have to create product and offer catalogues for Zalando.
-
Create properties to provide detailed descriptions of your items on Zalando.
-
Create listings to offer your items on Zalando.
-
Activate your Zalando account in the assistant to start exchanging data with Zalando.
2.2. Option 2: I already sell on Zalando via PlentyONE and would like to use the new integration.
-
Link your Zalando account in the assistant Account settings - Zalando.
-
Create catalogues for Zalando. You have to create product and offer catalogues for Zalando.
-
Create properties to provide detailed descriptions of your items on Zalando.
-
Create listings to offer your items on Zalando.
|
Selling in additional countries
You have already set up the new Zalando integration and would now like to offer your items in another country? Then carry out the settings for an additional country. You can find an overview of the steps required to add a new sales channel for Zalando here. |
3. Setting up Zalando in PlentyONE
Now set up the sales channel in your PlentyONE system.
3.1. Creating an account
First, create an account for Zalando. You can either create an account for Zalando in the Setup » Assistants » Omni-Channel menu using the assistant Account settings - Zalando or in the Sales Channels » Accounts menu.
PlentyONE recommends to create the account in the assistant. If you create the account using the assistant, then the account will also be linked with the correct configuration.
You can find a description how to do this in the chapter Going through the assistant for the first time.
Note: If you create the Zalando account in the Sales Channels » Accounts menu, then you will have to link the account in the Zalando assistant afterwards.
Creating an account:
-
Open the Sales Channels » Accounts menu.
-
Click on Create account (add).
→ The window Create account opens. -
Select Zalando from the drop-down list Platform.
-
Select the Client (Shop) from the drop-down list.
-
Enter a name for the account.
-
Click on add CREATE.
→ The account for Zalando is created.
3.2. Going through the assistant for the first time
For Zalando, you carry out the basic settings in the assistant. First, complete the assistant Account settings - Zalando. To do so, go to Setup » Assistants » Omni-Channel.
You have to go through the assistant twice to complete the setup of Zalando in PlentyONE. First, you create an account for Zalando.
Going through the assistant for the first time:
-
Go to Setup » Assistants » Omni-Channel.
-
Open the assistant Account settings - Zalando.
-
Click on New configuration (add).
→ A new configuration for the Zalando account opens. -
Go through the assistant for the first time.
Tip: If you need additional information about one of the options, expand the info box below this description (). -
Important: You will see This account cannot be activated. That’s normal and as it should be. Next, contact the PlentyONE support so that your account can be linked to a zDirect account and activated, allowing you to continue with the setup.
-
In the step Summary, check your settings to make sure they are correct.
-
If everything is as it should be, click on Finalise.
→ The settings are saved.
Note: The account is added to the menu Setup » Assistants » Omni-Channel » Assistant: Account settings - Zalando after you have completed the assistant. The accountID that you need in the next step is also shown in this menu.
In this step, you create a Zalando account and link it to the configuration that you create with the assistant. This means that you carry out the settings for this Zalando account in the assistant.
In this step, you can either:
-
Create a new Zalando account and link it to this configuration.
-
To do so, select the option Create and link new account.
-
or
-
Link an existing Zalando account to this configuration.
-
To do this, you already need to have created a Zalando account. Select the desired account from the drop-down list Select account.
-
In this step, activate your Zalando account.
Important: When you go through the assistant for the first time, you will see This account cannot be activated. That’s normal and as it should be. Next, contact the PlentyONE support via Service Desk so that your account can be linked to a zDirect account and activated, allowing you to continue with the setup.
3.3. Linking account with zDirect account
You have completed the assistant for the first time. Now, request activation of your Zalando account:
To do so, create a ticket in Service Desk. Select the category Technical Support and ask the PlentyONE support to activate your Zalando account.
Provide the following details:
-
The company/brand name you used to register with Zalando
-
Your plenty ID
-
The ID of the Zalando account (accountId) in PlentyONE that you want to activate for the Zalando interface
Tip: Go to Setup » Assistants » Omni-Channel » Assistant: Account settings - Zalando to find the accountID.
3.4. Going through the assistant for the second time
Once your Zalando account has been linked to a zDirect account, you can go through the assistant Account settings - Zalando a second time. Now, carry out the account and channel settings.
Going through the assistant for the second time:
-
Go to Setup » Assistants » Omni-Channel.
-
Open the assistant Account settings - Zalando.
-
Open the configuration that you created in the first step.
-
Go through the assistant for the second time.
Tip: If you need additional information about one of the options, expand the info box below this description (). -
In the step Summary, check your settings to make sure they are correct.
-
If everything is as it should be, click on Finalise.
→ The settings are saved.
In this step, you create a Zalando account and link it to the configuration that you create with the assistant. You have already completed this step when you first went through the assistant.
In this step, you select the client (shop) which the Zalando orders should be assigned to.
| Setting | Explanation |
|---|---|
Map PlentyONE reasons for return to |
From the drop-down list, select a Zalando return reason for each return reason saved in PlentyONE. The return reasons are only transmitted for the order type Return and if they are saved in the order items of the return. Tip: You can save return reasons in the menu Setup » Orders » Order types » Return. Zalando currently has the following reasons for return:
Note: Sending reasons of return to Zalando is optional. However, Zalando recommends that you send a reason. |
In this step, you assign Zalando warehouses to your warehouses in PlentyONE that you use to ship items to Zalando. For each PlentyONE warehouse, select a Zalando outbound warehouse from the drop-down list.
| Setting | Explanation | ||
|---|---|---|---|
Do you want to use Zalando Fulfillment Solutions? |
Activate the toggle button to use Zalando Fulfillment Solutions. Background: Zalando Fulfillment Solutions is a service in which Zalando ships the orders to your customers. You send your items to Zalando and Zalando takes care of the storage and the shipment to your customers. |
||
Map warehouses |
Now, assign PlentyONE warehouses to the different Zalando locations (countries). There is a Zalando Fulfillment warehouse your items can be stored in each country that you can select here. Assign PlentyONE warehouses to these Zalando warehouses. This provides an overview of the Zalando locations your items are stored in. The stock from the Zalando locations is transferred to your PlentyONE warehouses.
Recommendation: Create new warehouses for Zalando Fulfilment Solutions. You can either specify a default warehouse only or a default warehouse and additional warehouses for each Zalando sales channel. Possibility 1: Only specify a default warehouse
Possibility 2: Specify a default warehouse and additional warehouses for each Zalando sales channel
|
Each country has a separate Zalando sales channel. Zalando activates you for the sales channels that you agreed upon in your contract. In the assistant, a separate step Settings for the sales channel is added for each country. The settings are the same for all countries.
You don’t see any steps for the sales channel settings? Then your account has not been linked to the zDirect account yet. (What do I need to do?)
Is a country missing? The countries are updated once a day. So when Zalando activates a new country for you, it can take up to 24 hours before that country is available in PlentyONE.
| Setting | Explanation |
|---|---|
Settings for self-fulfilled orders |
|
Import self-fulfilled orders |
Activate to automatically import self-fulfilled orders every five minutes. |
Start date of self-fulfilled order import |
Select a date (optional). Only orders updated on or after this date are imported. |
Import reservations |
If this option is activated, reservations will be imported into PlentyONE with the status [3] Waiting for payment. What are reservations? Items are considered reserved if a customer has placed an order which has either not been paid for or has not been released for shipping by Zalando. |
Status for cancelled reservations |
Decide which status cancelled reservations should be moved to. Select a status [8.X] or higher. If the customer or Zalando cancels, reservations are moved to this status. Any orders that customers cancel before the import of reservations is started are not imported. |
Reuse package numbers for returns |
Activate this option if you generate Hermes shipping labels that also serve as return labels. The package numbers stay the same. |
Settings for ZFS orders (shipment by Zalando) |
|
Import ZFS orders |
Activate to automatically import ZFS orders. ZFS orders are then imported once per hour. |
Start date of ZFS order import |
Select a date (optional). Only orders updated on or after this date are imported. |
Initial status of ZFS orders |
What order status do you want to assign to ZFS orders on import? |
Import ZFS returns |
Activate to automatically import ZFS returns. ZFS returns are then imported once per hour. |
Initial status of ZFS returns |
What order status do you want to assign to ZFS returns on import? |
Stock settings |
|
Export stock |
Activate option to export your stock to Zalando every 15 minutes. |
Select sales warehouse |
Select one or more sales warehouses. The totalled net stock of these sales warehouses is exported. |
Maximum stock to export |
If a variation has a higher stock, the value you entered in the Maximum stock field will be exported instead. |
Stock buffer |
A stock buffer is the amount of an item that should not be sold, but kept as a buffer. The quantity you enter in the * Stock buffer*field is deducted from the net stock of each variation before export. |
Stock for variations without positive net stock and without stock limitation |
Enter the stock to be exported for variations that have no positive net stock. Variations that have no positive net stock are variations with the setting Section: Availability and visibility, Setting: Stock limitation, Option: None that have no positive net stock. |
Stock for variations without stock administration |
Enter the stock to be exported for variations without stock administration. Variations for which no stock is administered are variations with the setting Section: Availability and visibility, Setting: Stock limitation, Option: Do not administer stock for this variation. The entered value is exported for these variations. |
Price settings |
|
Export prices |
Activate option to export your prices to Zalando every 15 minutes. |
Ignore warnings of Zalando on price updates |
During price updates, Zalando checks the plausibility of your prices based on specific criteria. For example, Zalando compares the prices of the same variations on different platforms and compares the regular price with the reduced price. If any significant differences are detected, Zalando triggers a warning. Select if such warnings should be ignored when prices are updated.
|
Regular price |
Select the sales price from the drop-down list that you want to export to Zalando as the regular price. You can select from sales prices of the types Default or RRP for which the referrer Zalando, the country and the currency of the country are activated. |
Reduced price |
Select the sales price from the drop-down list that you want to export to Zalando as the reduced price. You can select from sales prices of the types Offer price or Default for which the referrer Zalando, the country and the currency of the country are activated. |
Scheduled prices |
|
Planned price 1 |
Use scheduled prices to announce any temporary or permanent price changes to Zalando ahead of time. Define up to three scheduled prices. Scheduled prices ensure that Zalando really changes your prices at the specified time. To export scheduled prices to Zalando, you need at least a sales price for the regular price and a property that contains the start date and start time for the new price. The start date for scheduled prices must be in the future. You can also select a property for an end date for a scheduled price.
|
| Setting | Explanation |
|---|---|
In which interface environment do you want to exchange data with Zalando? |
|
Interface environment |
Select if real or test data is to be exchanged with Zalando.
|
Would you like to activate your Zalando account now? |
|
Activating the Zalando account |
You have not completed the setup. |
3.5. Account overview
The Sales Channels » Accounts menu provides an overview of the account.
Table 1 contains an overview of the accounts in the Sales Channels » Accounts menu.
| Setting | Explanation | ||||||||||
|---|---|---|---|---|---|---|---|---|---|---|---|
bigtop_updates Connection |
Connection status of the account.
|
||||||||||
Name |
Account name. |
||||||||||
more_vert More |
Click here to display more actions.
|
||||||||||
Listings online |
Hover over Listings online to see the number of product listings and offer listings that are listed on sales channels for this account. |
||||||||||
Errors |
Hover over Errors to see the number of errors that occurred for product listings and offer listings. |
3.6. Modifying the account settings
In the General settings tab, you can edit the account name and enable or disable data exchange with the relevant sales channel. In the following chapters, these functions will be further explained.
3.6.1. Renaming the sales channel
You can rename the sales channel anytime. To do so, proceed as follows.
Renaming the sales channel:
-
Open the Sales Channels » Accounts menu.
-
Open the account for Zalando.
→ The menu Channel settings opens. -
Open the menu General settings.
-
Enter a name for the sales channel.
-
Save () the settings.
3.6.2. (De)Activating the data exchange
You can fully activate or deactivate data exchange between a sales channel and its corresponding online marketplace at any time using a button in the general settings. To delete multiple mappings, proceed as follows:
(De)activating the data exchange:
-
Go to Sales Channels » Accounts.
-
Open the account for Zalando.
→ The menu Channel settings opens. -
Open the menu General settings.
-
Activate the toggle Data sync enabled to activate the data exchange with the respective market.
OR: Deactivate the toggle Data sync enabled to deactivate the data exchange with the respective market. -
Save () the settings.
3.7. Activating an order referrer
Go to Setup » Orders » Order referrer to activate the order referrer. This ensures that orders are assigned to the correct sales channel.
An order referrer tags an order with the sales channel on which the order was generated. Sales channels can be e.g. your online shop or markets on which you sell your items. Each sales channel has an individual order referrer. Some order referrers are available by default in your PlentyONE system. Further order referrers are added e.g. if you install a new plugin. For further information about the order referrer, see the page Order referrer of the PlentyONE manual.
Activating the order referrer for Zalando:
-
Go to Setup » Orders » Order referrer.
-
Click Search (search).
-
In the list, navigate to the Zalando referrer, for example Zalando DE.
-
On the right of the referrer’s line, click Edit (edit).
→ The window Edit referrer opens. -
Activate the option Visible in selection (toggle_on).
-
Click SAVE (save).
→ The referrer is active.
118 = Zalando
118.01 = Zalando DE
118.02 = Zalando NL
118.03 = Zalando FR
118.04 = Zalando IT
118.05 = Zalando UK
118.06 = Zalando AT
118.07 = Zalando CH
118.08 = Zalando PL
118.09 = Zalando BE
118.1 = Zalando SE
118.11 = Zalando FI
118.12 = Zalando DK
118.13 = Zalando ES
118.14 = Zalando NO
118.15 = Zalando CZ
118.16 = Zalando IE
118.17 = Zalando PT
118.18 = Zalando SK
118.19 = Zalando SI
118.2 = Zalando LT
118.21 = Zalando LV
118.22 = Zalando EE
118.23 = Zalando HR
118.24 = Zalando HU
118.25 = Zalando RO
118.26 = Zalando LU
Order referrers for Zalando ZFS:
172 = Zalando ZFS
172.01 = Zalando ZFS DE
172.02 = Zalando ZFS NL
172.03 = Zalando ZFS FR
172.04 = Zalando ZFS IT
172.05 = Zalando ZFS UK
172.06 = Zalando ZFS AT
172.07 = Zalando ZFS CH
172.08 = Zalando ZFS PL
172.09 = Zalando ZFS BE
172.1 = Zalando ZFS SE
172.11 = Zalando ZFS FI
172.12 = Zalando ZFS DK
172.13 = Zalando ZFS ES
172.14 = Zalando ZFS NO
172.15 = Zalando ZFS CZ
172.16 = Zalando ZFS IE
172.17 = Zalando ZFS PT
172.18 = Zalando ZFS SK
172.19 = Zalando ZFS SI
172.2 = Zalando ZFS LT
172.21 = Zalando ZFS LV
172.22 = Zalando ZFS EE
172.23 = Zalando ZFS HR
172.24 = Zalando ZFS HU
172.25 = Zalando ZFS RO
172.26 = Zalando ZFS LU
3.8. Setting the variation availability
You need to activate the variations you want to sell on Zalando and enable them for the relevant sales channel. This is done in the Item » Items » [Open variation] menu.
Making a variation available for Zalando:
-
Go to Item » Items » [Open variation].
Tip: To sell all variations of an item on Zalando, carry out the settings for the item’s main variation. If the inheritance function is active for the variations, then this activates the availability of all variations of the item. -
In the Availability and visibility section, enable the option Active (toggle_on).
-
Click the Sales channels tab.
-
In the Sales channels section, activate the sales channel Zalando in the Status column (toggle_on).
Tip: You can activate multiple sales channels at once. To do so, activate the checkboxes to the left of the desired sales channels. Then activate the toggle above the checkbox column (toggle_on). Click ACTIVATE to confirm the activation.
Important: Activate the sales channel Zalando. The other sales channels (Zalando DE, Zalando NL etc.) will be ignored. -
Save (save) the settings.
→ The variation is available for Zalando.
Use the variation group function to edit multiple variations at once. You select the variations that you want to edit.
Making several variations available for Zalando using the variation group function:
-
Go to Item » Items.
-
Select () the variations to be edited.
-
In the toolbar, click on layers » layers Variation group function.
→ The Variation group function window opens. -
Select the action Sales channels from the drop-down list Actions.
→ The action is added to the lower part of the window. -
Select (check_box) the option Zalando from the drop-down list Sales channels.
→ The sales channel is added below the Sales channels drop-down list.
Important: Select the sales channel Zalando. The other sales channels (Zalando DE, Zalando NL etc.) will be ignored. -
Activate (toggle_on) the toggles to the left of the sales channels.
-
Click EXECUTE & CLOSE to apply the settings.
Batch processing allows you to edit several variations at once. You use filters to limit which variations are edited.
Making several variations available for Zalando using batch processing:
-
Navigate to the area Market availability.
-
Activate the checkbox to the left of the option Zalando.
-
Activate the checkbox to the right of the option Zalando.
Important: Activate the availability Zalando. The availabilities for each Zalando platform (Zalando DE, Zalando NL etc.) will be ignored. -
Navigate to the area Availability.
-
Activate the checkbox to the left of the option Active.
-
Activate the checkbox to the right of the option Active.
-
Click on Apply to apply the settings to the variations.
4. Creating catalogues
Item and offer data is exported to Zalando using catalogues. Go to Data » Catalogues to create catalogues for Zalando. Afterwards, link the Zalando data fields with item data saved in Zalando in the catalogue.
After you activate the catalogue, the catalogue data is automatically exported to Zalando in regular intervals.
There are two types of catalogues for Zalando:
-
Item data is transferred to Zalando via a product catalogue.
-
Offer data is transferred to Amazon via an offer catalogue.
Catalogues are used to export data from your PlentyONE system. There are two different catalogue formats:
-
Marketplace formats are used to export item data to markets.
-
Standard formats are used to export data from your PlentyONE system into a file.
Catalogues with marketplace formats allow you to tailor your item information exactly to the needs of the market. Because here, you assign a suitable PlentyONE data field to each of the data fields of the market. When your variation data is exported to the market, the market’s data fields are then filled with the correct PlentyONE data.
-
Is this your first time working with catalogues? Then read up on the basic concept of catalogues first.
4.1. Creating a product catalogue
Item data is exported to Zalando using catalogues. To export your items to Zalando, create a product catalogue in the Data » Catalogues menu. Afterwards, link the Zalando data fields with item data saved in Zalando in the catalogue. After you activate the product catalogue, the catalogue data is automatically exported to Zalando within 24 hours.
To simplify the creation of new catalogues, you can now create Channel maps for Zalando. With Channel maps, you can create cross-category mappings for a marketplace and apply them to catalogues afterwards. All linked catalogues automatically inherit the mapping from the Channel map. This will save you a lot of time as you don’t need to carry out the mappings for each catalogue.
You can find more information on how to create Channel maps in the Channel maps section.
Note: There is a separate catalogue format for each Zalando product category. Different item data is exported in each format, depending on which information Zalando requires for a product category.
Creating a catalogue:
-
Go to Data » Catalogues.
-
Click Create catalogue (add).
-
Enter a name for the catalogue.
-
In the drop-down list Marketplace, select the option Zalando.
-
In the drop-down list Export type, select the option Listing.
-
In the drop-down list Category, select the Zalando category.
-
Save () the settings.
→ The catalogue is created.
→ The catalogue is opened for editing.
Other catalogue settings
Other catalogue settings are optional. Once you carried out the settings described on this page, your catalogue is automatically exported to Zalando. That means you can ignore the catalogue settings for Format settings, Export settings and Download settings.
The Format settings, Export settings, and Download settings allow you to create a file with the variation data contained in the catalogue. However, this file does not contain information about whether the data export to Zalando was successful.
|
Do not change the format in the catalogue’s Format settings. To ensure that the export to the sales channel works, all required settings are already configured when you create a catalogue. If you change the settings, errors might occur during the export. |
4.1.1. Mapping data fields in the product catalogue
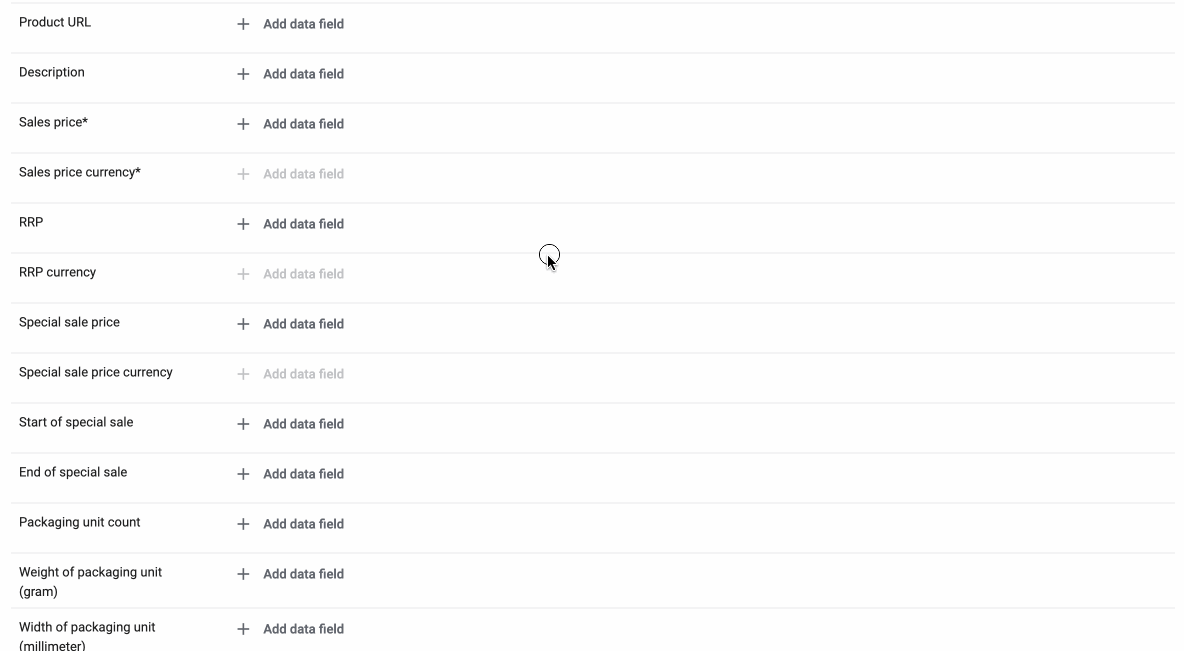
After you have created a catalogue, map the sales channel’s data fields to item data saved in PlentyONE. This chapter describes how you map data fields and what particularities apply for item exports to Zalando.
-
The market expects product data that cannot be saved in the PlentyONE item menu? Then create a property for this data. Link this property with your variations. The actual values are saved as property values for this property. Is this your first time working with properties? Then read up on the principles of properties first.
| Availability | Explanation |
|---|---|
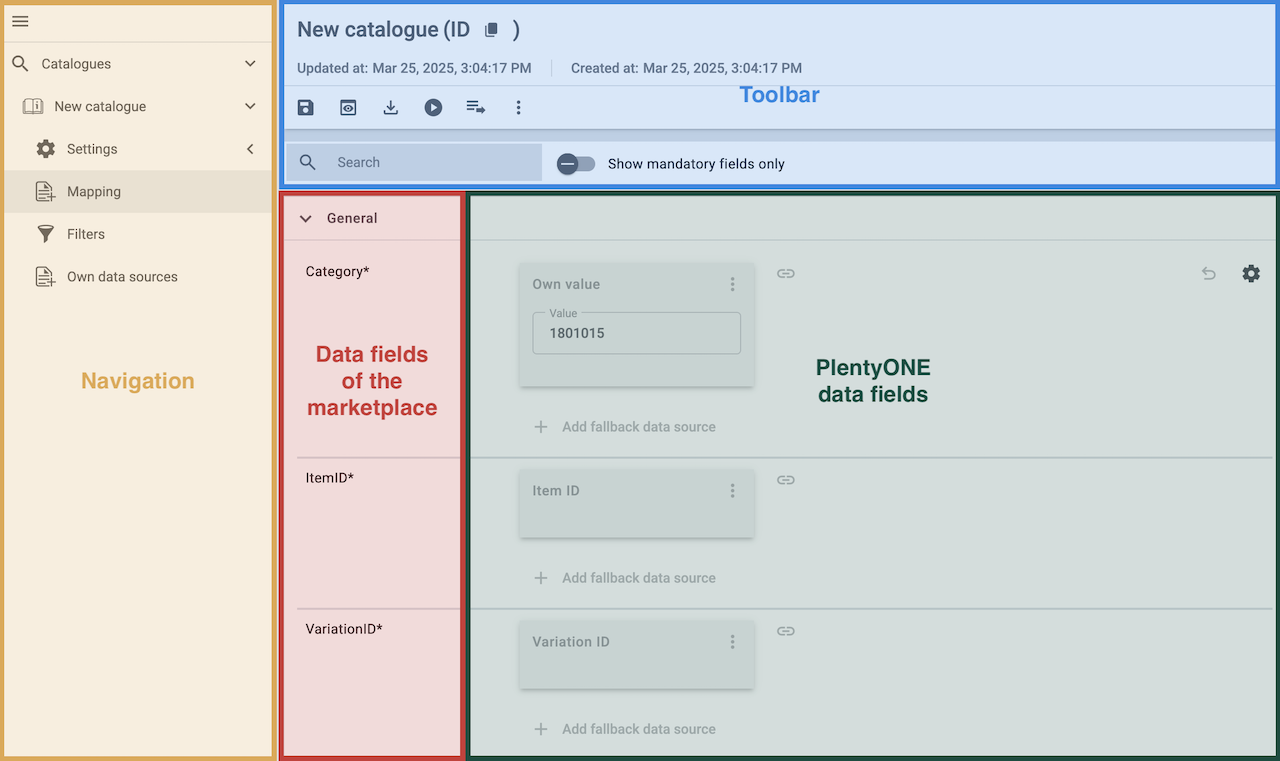
Navigation |
When you open a catalogue, the view Mapping is shown. On the very left is the navigation.
|
Toolbar |
The toolbar provides actions for the catalogue. For example, save your mappings, restore an older version of the catalogue or hide or show optional marketplace data fields. |
Live preview |
You can use the Live preview feature to display which values of a given variation would be exported to the marketplace by each mapping. Simply activate the toggle and enter the ID of the variation you want to use in order to show live previews for that variation. |
Marketplace data field |
To the right of the navigation, all data fields available for the market are listed. Mandatory fields are marked with an asterisk (✱). |
PlentyONE data fields |
On the right side of the catalogue, you map the marketplace data fields to appropriate PlentyONE data fields. In the screenshot above, a few of the fields are already mapped. |
Mapping catalogue fields:
-
Go to Data » Catalogues.
-
Click on the catalogue.
→ The Mapping tab opens.
→ In the left-hand column, the market’s data fields are listed.
Tip: Mandatory fields are flagged with an asterisk (*).
→ In the right column, you map the PlentyONE data fields. Any PlentyONE data fields that you already mapped are also shown in this column. -
Map suitable PlentyONE data fields to the market data fields.
For each marketplace data field, you have a number of mapping options. Expand the info boxes below to get more information about each of these mapping options.-
Simple 1:1 mapping
-
Simple 1:1 mapping with properties
-
Complex 1:1 mapping
-
1:1 mapping with fallback data fields
-
1:n mapping
-
Own value mapping
-
Mapping with mathematical calculations
-
-
Save () the catalogue.
→ The mappings are saved.
In a simple 1:1 mapping, you map a PlentyONE data field to the marketplace data field. If no suitable setting exists in PlentyONE. you can map a property instead.
As such, simple 1:1 mappings allow you to:
-
I want to fill this marketplace data field with the data from this PlentyONE setting.
-
If the data field is empty for a variation, no value is exported for this variation.
Creating a simple 1:1 mapping:
-
Next to the marketplace data field, click on + Add data field.
→ To the left, the list of available PlentyONE data fields are shown in groups. -
Click on the group you need.
→ The PlentyONE data fields of the group are shown. -
Click on the plus to the right of the PlentyONE data field you want to select.
→ The PlentyONE data field is added to the right. -
Click on Confirm.
Example: Sales price and RRP for Otto Market
This gif shows you how to map the marketplace data fields Sales price and RRP for Otto Market to PlentyONE data fields:
Reminder: In a simple 1:1 mapping, you map a PlentyONE data field to the marketplace data field. However, what can you do if PlentyONE does not offer a suitable data field? Then it’s the properties' moment to shine. Properties allow you to save any kind of information in your properties.
-
Is this your first time working with properties? Then read up on the principles of properties first.
Creating a property:
-
Create a property with the necessary values.
Tip: Find out how to do that here.
Creating a simple 1:1 mapping with properties:
-
Next to the marketplace data field, click on + Add data field.
→ To the left, the list of available PlentyONE data fields are shown in groups. -
Expand the group Property.
→ The property groups are shown. -
Expand the group you need.
-
Click on the Plus sign on the right of the property you want.
-
From the drop-down list Language, select the language in which you send the data to the market.
-
Click on Confirm.
→ The property is mapped to the marketplace data field.
Like with the simple 1:1 mappings, you map a PlentyONE setting or property to a marketplace data field. Complex mappings are necessary whenever a marketplace data field has more than one possible value. Instead of mapping data fields, for complex mappings you map individual values of these data fields. For example, you cannot simply map the PlentyONE data field Shipping profile to the marketplace data field Shipping method. Why? The market cannot know which of your shipping profiles in PlentyONE corresponds to which of their shipping methods.
| Do not enter own values for complex mappings. All values that you enter must be saved for the variations, either in a setting or as a property value. This also applies if the value Comparative value is shown. You still need to enter exactly the value of the setting or property that you mapped. |
In complex mappings, the value of the market is always exported. Only when you map an own value, the own value that you enter is exported.
You can recognise complex mappings from the field that is shown below the name of the marketplace data field. Click on the field to show the values available for the marketplace data field.

Examples for complex 1:1 mappings are:
-
Categories
-
Brands
-
Shipping setting
Important: For complex mappings, do not map own values or properties of the type None.
Creating a complex 1:1:n mapping:
-
Click on the field for the marketplace data field.
→ A list of the available values is shown. -
Select the value that you want to map a PlentyONE data field to.
→ The value is mapped. -
Next to the marketplace data field, click on + Add data field.
→ To the left, the available PlentyONE data fields are listed in groups. -
Click on a group.
→ The PlentyONE data fields of the group are shown. -
Click on the PlentyONE data field for which you want to map values.
Important: Do not map own values or properties of the type None. -
Your next steps depend on the PlentyONE data field you selected:
-
Alternative 1: The available values for the PlentyONE data value are shown on the left.
-
Next to the value you want to select, click on the plus.
→ The value is added to the field on the right. -
Click on Confirm.
-
-
Alternative 2: The PlentyONE data field is inserted and the field Comparative value is shown.
-
In the field Comparative value, enter a value that is saved in the setting or the property of the mapped PlentyONE data field.
-
Click on Confirm.
-
-
Alternative 3: The PlentyONE data field is inserted and a drop-down list is shown.
-
Select a value from the drop-down list.
-
Click on Confirm.
→ The value of the marketplace data field is exported, not the value of the PlentyONE data field.
Exception: Only when you map an own value, the own value that you enter is exported.
-
-
Example: Delivery time in days for Otto Market
This gif shows you how to map suitable PlentyONE values to the values of the marketplace data fields Delivery time in days for Otto Market:
In a 1:1 mapping with one or more fallback data fields, you map a PlentyONE data field to the marketplace data field. In addition, you specify one or more fallback data fields. This ensures that the system keeps looking if the first PlentyONE data field is missing or empty.
So this mapping specifies:
-
I want to fill the marketplace data field with the data from the selected PlentyONE setting.
-
If that data field is missing or empty for a variation, the first fallback data field is checked. The value of that fallback data field is exported instead.
-
If the first fallback data field is also missing or empty for the variation, the second fallback data field is checked. If a value is found, the value of the second fallback data field is exported for the variation etc.
Two separate fallback conditions are available:
Null (default) |
The fallback data field is used if the data field above is mapped in the catalogue but not linked to the variation. The condition "Null" is useful when you want to map fallback data fields for the following types of PlentyONE data fields:
Important: When you add a fallback data field, the fallback condition "null" is selected automatically. To apply the fallback condition "leer", you need to change the default setting. |
Empty |
The fallback data field is used if the data field above is mapped in the catalogue and linked to the variation, but is empty. The condition "Empty" is useful when you want to map fallback data fields for the following type of PlentyONE data fields:
Important: When you add a fallback data field, the fallback condition "null" is selected automatically. To apply the fallback condition "leer", you need to change the default setting. |
Note: Even if you assign one or more fallback data fields, the value of only one of those fields is exported. For each variation, the mapped PlentyONE data fields are checked in the order in which you mapped them. This means that if the first data field does not provide a value for a variation, the first fallback data field is exported etc.
Creating a 1:1 mapping with fallback data fields:
-
Next to the marketplace data field, click on + Add data field.
→ To the left, the list of available PlentyONE data fields are shown in groups. -
Click on the group you need.
→ The PlentyONE data fields of the group are shown. -
Click on the plus to the right of the PlentyONE data field you want to select.
→ The PlentyONE data field is added to the right. -
In the list of PlentyONE data fields, click on the plus icon next to the PlentyONE data field that you want to map.
→ The fallback data field is added with the fallback condition "null". -
Alternative 1: To add the fallback data field with the fallback condition "null":
-
Click on Confirm.
→ The fallback data field is exported if the data field above is not linked to the variation.
-
-
Alternative 2: To add the fallback data field with the fallback condition "empty":
-
To the left of the fallback data field, click on the cog ().
→ The window Data column settings is shown. -
For the setting Fallback condition, select the option Empty.
-
Click on Save.
→ The fallback data field is added with the fallback condition "empty". -
Click on Confirm.
→ The fallback data field is exported if the data field above is empty for the variation.
-
Example: Fallback data field for SKU for Otto Market
This GIF shows you the mapping for the OTTO Market marketplace data field SKU. The PlentyONE data field SKU is mapped to this marketplace data field. The PlentyONE data field Variation ID is mapped as the fallback data field. The fallback condition "null" is applied automatically.
Result: The fallback data field Variation ID is exported if the data field SKU is not linked to the variation.
In a 1:n mapping, you map several PlentyONE data fields to the marketplace data field. You can link these data fields with a separator.
So this mapping specifies:
-
I want to combine these PlentyONE data fields during export so that the marketplace data field is filled with the data of these two or more PlentyONE settings.
Creating a 1:n mapping:
-
Next to the marketplace data field, click on + Add data field.
→ To the left, the list of available PlentyONE data fields are shown in groups. -
Click on the group you need.
→ The PlentyONE data fields of the group are shown. -
Click on the plus to the right of the PlentyONE data field you want to select.
→ The PlentyONE data field is added to the right. -
Click on Confirm.
-
To the right of the mapped PlentyONE data field, click on Add data field ().
→ To the left, the list of available PlentyONE data fields again are shown in groups. -
Map one or several additional PlentyONE data fields to the marketplace data field as described above.
-
Click on Confirm.
-
To the very right of the row, click on Settings ().
-
Select a separator from the drop-down list Separator or add a custom separator.
-
Click on Save.
-
Save () the catalogue.
→ The mappings are saved.
→ During the export, the content of the PlentyONE data fields is combined and exported as one field.
You are sure that you want to export the same value for all variations of a catalogue for a marketplace data field? Then specify an own value. This own value is then exported for all variations.
So this mapping specifies:
-
For this marketplace data field, I want to export the value that I entered in the field Own value for all variations of this catalogue. The value you enter is always exported. The value overwrites the market value also in complex mappings where usually the value of the market is exported. As such, make sure you enter an own value that the market accepts for this marketplace data field.
Creating an own value mapping:
-
Next to the marketplace data field, click on + Add data field.
→ To the left, the list of available PlentyONE data fields are shown in groups. -
Click on the plus next to Own value at the top of the list.
→ The field for the own value is added to the view. -
Enter a value into the input field.
→ This value is exported for all variations.
Example: Diameter information
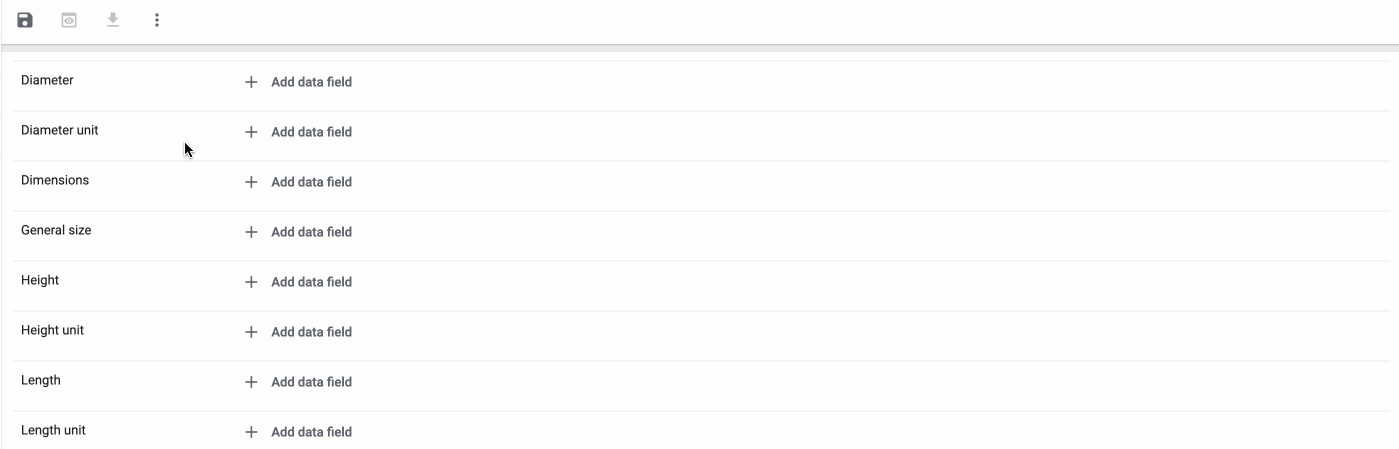
You want to export diameter information for some of your variations. The diameter is saved in centimetres for all your variations. Instead of creating a property for the unit and linking this property to the variations, you can enter the own value cm.
This is an example of how you can map an own value for the diameter unit:
Mathematical calculations allow you to change numerical values automatically during the export.
-
This function only works for data fields that contain numerical values.
-
This functionality is new and not available for all catalogue formats.
So this mapping specifies:
-
I want the numerical value of a PlentyONE data field to be recalculated during the export. Basic arithmetic operations are available for the formulas.
Recalculating numerical values:
-
Next to the marketplace data field, click on + Add data field.
→ To the left, the list of available PlentyONE data fields are shown in groups. -
At the very top of the list, click on the plus icon next to Formula (calculate).
→ The data field Formula is added to the field on the right. -
Click into the data field.
→ The window Modify value is shown. -
Enter a numerical value or select a PlentyONE data field at the bottom right of the window to add it to the calculation (add).
Tip: Use the search function. This helps you to find data fields quickly. -
Optional: If the symbol more_vert is shown in the data field, select the correct assignment for the data field.
Tip: A number tells you how many assignments are necessary for the data field.-
Click on the icon more_vert.
-
In the window shown, select the assignments from the drop-down list.
-
Save the settings.
-
-
Enter numbers and mathematical operators with the on-screen calculator or the keyboard.
-
Save the settings.
→ The entered formula is displayed in the overview.
→ The calculation will be carried out in the next export.
4.1.2. Particularities for mapping data fields in the product catalogue
Every market structures item data differently. As such, there are some particularities for each market when mapping data fields. This chapter contains mapping information for important data fields for Zalando.
4.1.2.1. Exporting the material composition
If textile fibres make up at least 80% of the weight of a product, you need to specify the material composition.
Zalando product catalogues contain several mandatory fields in which you must specify the material composition. For example:
-
material - Top part material
-
material - Lining
-
material - Filling
The material composition is exported to Zalando with a property of the type Text. Therefore, you have to create a separate property for every Zalando data field that specifies the material. Link the properties with the item’s main variation and specify all components of a material mix in this property. Use the following format:
-
materialtype1:percentage;materialtype2:percentage;materialtype3:percentage
Example:Cotton:80;polyester:20
-
Go to Setup » Settings » Properties » Configuration.
-
Click on add Create property.
-
In the drop-down list Section, select the option Items.
-
In the drop-down list Type, select the option Text.
-
Enter a name for the property.
-
Select the group where the property is to be displayed.
-
Carry out additional settings as necessary.
-
Save (save) the settings.
-
Open the variation in the Item » Items » [Open variation] menu.
-
Open the Properties tab in the navigation bar on the left-hand side.
-
Click Add properties (add).
→ The window Add properties opens.
Tip: Use the search to search for the property. -
Place a check mark next to the desired property.
-
Click APPLY.
-
Enter the material composition in the following format:
-
materialtype1:percentage;materialtype2:percentage;materialtype3:percentage
Example:Cotton:80;polyester:20
-
-
Save () the settings.
Note:
-
Specify the individual materials in descending order based on the percentage value. As such, the first material is the one with the highest percentage value, the last one that with the lowest percentage value.
-
The sum of all percentages must be 100.
-
If the variations of the same item have different material mixes, deactivate the inheritance function for properties and save the material mixes separately for each variation. Note that deactivating the inheritance affects all properties of the item. As such, you also need to manually manage all other properties for each variation.
4.1.3. Activating the catalogue export
You have set up Zalando in PlentyONE and created a catalogue for exporting your item data? Then activate the catalogues you want to export to Zalando in the Data » Catalogues menu and continue with creating product listings.
Once you have activated the product catalogue, the Zalando account, the product listing and the variations, the product data will be automatically exported to Zalando once a day.
Activating the catalogue export to Zalando:
-
Go to Data » Catalogues.
→ The catalogues are listed. -
Scroll to the Zalando catalogue.
-
In the Active column, move the toggle button to the right ().
→ The catalogue is active.
→ The catalogue data is exported to Zalando once a day.
Tip: Go to Data » Catalogue export status for information about the status of the export.
4.2. Creating an offer catalogue
Offer data is exported to Zalando using catalogues. To export your items to Zalando, create an offer catalogue in the Data » Catalogue menu. Afterwards, link the Amazon data fields with item data saved in PlentyONE in the catalogue.
After you activate the offer catalogue, the catalogue data is automatically exported to Zalando within 15 minutes.
To simplify the creation of new catalogues, you can now create Channel maps for Zalando. With Channel maps, you can create cross-category mappings for a marketplace and apply them to catalogues afterwards. All linked catalogues automatically inherit the mapping from the Channel map. This will save you a lot of time as you don’t need to carry out the mappings for each catalogue.
You can find more information on how to create Channel maps in the Channel maps section.
Creating a catalogue:
-
Go to Data » Catalogues.
-
Click Create catalogue (add).
-
Enter a name for the catalogue.
-
In the drop-down list Marketplace, select the option Zalando.
-
In the drop-down list Export type, select the option Listing.
-
In the drop-down list Category, select Offer data.
-
Save () the settings.
→ The catalogue is created.
→ The catalogue is opened for editing.
Other catalogue settings
Other catalogue settings are optional. Once you carried out the settings described on this page, your catalogue is automatically exported to Zalando. That means you can ignore the catalogue settings for Format settings, Export settings and Download settings.
The Format settings, Export settings, and Download settings allow you to create a file with the variation data contained in the catalogue. However, this file does not contain information about whether the data export to Zalando was successful.
|
Do not change the format in the catalogue’s Format settings. To ensure that the export to the sales channel works, all required settings are already configured when you create a catalogue. If you change the settings, errors might occur during the export. |
4.2.1. Mapping data fields in the offer catalogue
After you have created a catalogue, map the sales channel’s data fields to item data saved in PlentyONE. This chapter describes how you map data fields and what particularities apply for item exports to Zalando.
-
The market expects product data that cannot be saved in the PlentyONE item menu? Then create a property for this data. Link this property with your variations. The actual values are saved as property values for this property. Is this your first time working with properties? Then read up on the principles of properties first.
| Availability | Explanation |
|---|---|
Navigation |
When you open a catalogue, the view Mapping is shown. On the very left is the navigation.
|
Toolbar |
The toolbar provides actions for the catalogue. For example, save your mappings, restore an older version of the catalogue or hide or show optional marketplace data fields. |
Live preview |
You can use the Live preview feature to display which values of a given variation would be exported to the marketplace by each mapping. Simply activate the toggle and enter the ID of the variation you want to use in order to show live previews for that variation. |
Marketplace data field |
To the right of the navigation, all data fields available for the market are listed. Mandatory fields are marked with an asterisk (✱). |
PlentyONE data fields |
On the right side of the catalogue, you map the marketplace data fields to appropriate PlentyONE data fields. In the screenshot above, a few of the fields are already mapped. |
Mapping catalogue fields:
-
Go to Data » Catalogues.
-
Click on the catalogue.
→ The Mapping tab opens.
→ In the left-hand column, the market’s data fields are listed.
Tip: Mandatory fields are flagged with an asterisk (*).
→ In the right column, you map the PlentyONE data fields. Any PlentyONE data fields that you already mapped are also shown in this column. -
Map suitable PlentyONE data fields to the market data fields.
For each marketplace data field, you have a number of mapping options. Expand the info boxes below to get more information about each of these mapping options.-
Simple 1:1 mapping
-
Simple 1:1 mapping with properties
-
Complex 1:1 mapping
-
1:1 mapping with fallback data fields
-
1:n mapping
-
Own value mapping
-
Mapping with mathematical calculations
-
-
Save () the catalogue.
→ The mappings are saved.
In a simple 1:1 mapping, you map a PlentyONE data field to the marketplace data field. If no suitable setting exists in PlentyONE. you can map a property instead.
As such, simple 1:1 mappings allow you to:
-
I want to fill this marketplace data field with the data from this PlentyONE setting.
-
If the data field is empty for a variation, no value is exported for this variation.
Creating a simple 1:1 mapping:
-
Next to the marketplace data field, click on + Add data field.
→ To the left, the list of available PlentyONE data fields are shown in groups. -
Click on the group you need.
→ The PlentyONE data fields of the group are shown. -
Click on the plus to the right of the PlentyONE data field you want to select.
→ The PlentyONE data field is added to the right. -
Click on Confirm.
Example: Sales price and RRP for Otto Market
This gif shows you how to map the marketplace data fields Sales price and RRP for Otto Market to PlentyONE data fields:
Reminder: In a simple 1:1 mapping, you map a PlentyONE data field to the marketplace data field. However, what can you do if PlentyONE does not offer a suitable data field? Then it’s the properties' moment to shine. Properties allow you to save any kind of information in your properties.
-
Is this your first time working with properties? Then read up on the principles of properties first.
Creating a property:
-
Create a property with the necessary values.
Tip: Find out how to do that here.
Creating a simple 1:1 mapping with properties:
-
Next to the marketplace data field, click on + Add data field.
→ To the left, the list of available PlentyONE data fields are shown in groups. -
Expand the group Property.
→ The property groups are shown. -
Expand the group you need.
-
Click on the Plus sign on the right of the property you want.
-
From the drop-down list Language, select the language in which you send the data to the market.
-
Click on Confirm.
→ The property is mapped to the marketplace data field.
Like with the simple 1:1 mappings, you map a PlentyONE setting or property to a marketplace data field. Complex mappings are necessary whenever a marketplace data field has more than one possible value. Instead of mapping data fields, for complex mappings you map individual values of these data fields. For example, you cannot simply map the PlentyONE data field Shipping profile to the marketplace data field Shipping method. Why? The market cannot know which of your shipping profiles in PlentyONE corresponds to which of their shipping methods.
| Do not enter own values for complex mappings. All values that you enter must be saved for the variations, either in a setting or as a property value. This also applies if the value Comparative value is shown. You still need to enter exactly the value of the setting or property that you mapped. |
In complex mappings, the value of the market is always exported. Only when you map an own value, the own value that you enter is exported.
You can recognise complex mappings from the field that is shown below the name of the marketplace data field. Click on the field to show the values available for the marketplace data field.
Examples for complex 1:1 mappings are:
-
Categories
-
Brands
-
Shipping setting
Important: For complex mappings, do not map own values or properties of the type None.
Creating a complex 1:1:n mapping:
-
Click on the field for the marketplace data field.
→ A list of the available values is shown. -
Select the value that you want to map a PlentyONE data field to.
→ The value is mapped. -
Next to the marketplace data field, click on + Add data field.
→ To the left, the available PlentyONE data fields are listed in groups. -
Click on a group.
→ The PlentyONE data fields of the group are shown. -
Click on the PlentyONE data field for which you want to map values.
Important: Do not map own values or properties of the type None. -
Your next steps depend on the PlentyONE data field you selected:
-
Alternative 1: The available values for the PlentyONE data value are shown on the left.
-
Next to the value you want to select, click on the plus.
→ The value is added to the field on the right. -
Click on Confirm.
-
-
Alternative 2: The PlentyONE data field is inserted and the field Comparative value is shown.
-
In the field Comparative value, enter a value that is saved in the setting or the property of the mapped PlentyONE data field.
-
Click on Confirm.
-
-
Alternative 3: The PlentyONE data field is inserted and a drop-down list is shown.
-
Select a value from the drop-down list.
-
Click on Confirm.
→ The value of the marketplace data field is exported, not the value of the PlentyONE data field.
Exception: Only when you map an own value, the own value that you enter is exported.
-
-
Example: Delivery time in days for Otto Market
This gif shows you how to map suitable PlentyONE values to the values of the marketplace data fields Delivery time in days for Otto Market:
In a 1:1 mapping with one or more fallback data fields, you map a PlentyONE data field to the marketplace data field. In addition, you specify one or more fallback data fields. This ensures that the system keeps looking if the first PlentyONE data field is missing or empty.
So this mapping specifies:
-
I want to fill the marketplace data field with the data from the selected PlentyONE setting.
-
If that data field is missing or empty for a variation, the first fallback data field is checked. The value of that fallback data field is exported instead.
-
If the first fallback data field is also missing or empty for the variation, the second fallback data field is checked. If a value is found, the value of the second fallback data field is exported for the variation etc.
Two separate fallback conditions are available:
Null (default) |
The fallback data field is used if the data field above is mapped in the catalogue but not linked to the variation. The condition "Null" is useful when you want to map fallback data fields for the following types of PlentyONE data fields:
Important: When you add a fallback data field, the fallback condition "null" is selected automatically. To apply the fallback condition "leer", you need to change the default setting. |
Empty |
The fallback data field is used if the data field above is mapped in the catalogue and linked to the variation, but is empty. The condition "Empty" is useful when you want to map fallback data fields for the following type of PlentyONE data fields:
Important: When you add a fallback data field, the fallback condition "null" is selected automatically. To apply the fallback condition "leer", you need to change the default setting. |
Note: Even if you assign one or more fallback data fields, the value of only one of those fields is exported. For each variation, the mapped PlentyONE data fields are checked in the order in which you mapped them. This means that if the first data field does not provide a value for a variation, the first fallback data field is exported etc.
Creating a 1:1 mapping with fallback data fields:
-
Next to the marketplace data field, click on + Add data field.
→ To the left, the list of available PlentyONE data fields are shown in groups. -
Click on the group you need.
→ The PlentyONE data fields of the group are shown. -
Click on the plus to the right of the PlentyONE data field you want to select.
→ The PlentyONE data field is added to the right. -
In the list of PlentyONE data fields, click on the plus icon next to the PlentyONE data field that you want to map.
→ The fallback data field is added with the fallback condition "null". -
Alternative 1: To add the fallback data field with the fallback condition "null":
-
Click on Confirm.
→ The fallback data field is exported if the data field above is not linked to the variation.
-
-
Alternative 2: To add the fallback data field with the fallback condition "empty":
-
To the left of the fallback data field, click on the cog ().
→ The window Data column settings is shown. -
For the setting Fallback condition, select the option Empty.
-
Click on Save.
→ The fallback data field is added with the fallback condition "empty". -
Click on Confirm.
→ The fallback data field is exported if the data field above is empty for the variation.
-
Example: Fallback data field for SKU for Otto Market
This GIF shows you the mapping for the OTTO Market marketplace data field SKU. The PlentyONE data field SKU is mapped to this marketplace data field. The PlentyONE data field Variation ID is mapped as the fallback data field. The fallback condition "null" is applied automatically.
Result: The fallback data field Variation ID is exported if the data field SKU is not linked to the variation.
In a 1:n mapping, you map several PlentyONE data fields to the marketplace data field. You can link these data fields with a separator.
So this mapping specifies:
-
I want to combine these PlentyONE data fields during export so that the marketplace data field is filled with the data of these two or more PlentyONE settings.
Creating a 1:n mapping:
-
Next to the marketplace data field, click on + Add data field.
→ To the left, the list of available PlentyONE data fields are shown in groups. -
Click on the group you need.
→ The PlentyONE data fields of the group are shown. -
Click on the plus to the right of the PlentyONE data field you want to select.
→ The PlentyONE data field is added to the right. -
Click on Confirm.
-
To the right of the mapped PlentyONE data field, click on Add data field ().
→ To the left, the list of available PlentyONE data fields again are shown in groups. -
Map one or several additional PlentyONE data fields to the marketplace data field as described above.
-
Click on Confirm.
-
To the very right of the row, click on Settings ().
-
Select a separator from the drop-down list Separator or add a custom separator.
-
Click on Save.
-
Save () the catalogue.
→ The mappings are saved.
→ During the export, the content of the PlentyONE data fields is combined and exported as one field.
You are sure that you want to export the same value for all variations of a catalogue for a marketplace data field? Then specify an own value. This own value is then exported for all variations.
So this mapping specifies:
-
For this marketplace data field, I want to export the value that I entered in the field Own value for all variations of this catalogue. The value you enter is always exported. The value overwrites the market value also in complex mappings where usually the value of the market is exported. As such, make sure you enter an own value that the market accepts for this marketplace data field.
Creating an own value mapping:
-
Next to the marketplace data field, click on + Add data field.
→ To the left, the list of available PlentyONE data fields are shown in groups. -
Click on the plus next to Own value at the top of the list.
→ The field for the own value is added to the view. -
Enter a value into the input field.
→ This value is exported for all variations.
Example: Diameter information
You want to export diameter information for some of your variations. The diameter is saved in centimetres for all your variations. Instead of creating a property for the unit and linking this property to the variations, you can enter the own value cm.
This is an example of how you can map an own value for the diameter unit:
Mathematical calculations allow you to change numerical values automatically during the export.
-
This function only works for data fields that contain numerical values.
-
This functionality is new and not available for all catalogue formats.
So this mapping specifies:
-
I want the numerical value of a PlentyONE data field to be recalculated during the export. Basic arithmetic operations are available for the formulas.
Recalculating numerical values:
-
Next to the marketplace data field, click on + Add data field.
→ To the left, the list of available PlentyONE data fields are shown in groups. -
At the very top of the list, click on the plus icon next to Formula (calculate).
→ The data field Formula is added to the field on the right. -
Click into the data field.
→ The window Modify value is shown. -
Enter a numerical value or select a PlentyONE data field at the bottom right of the window to add it to the calculation (add).
Tip: Use the search function. This helps you to find data fields quickly. -
Optional: If the symbol more_vert is shown in the data field, select the correct assignment for the data field.
Tip: A number tells you how many assignments are necessary for the data field.-
Click on the icon more_vert.
-
In the window shown, select the assignments from the drop-down list.
-
Save the settings.
-
-
Enter numbers and mathematical operators with the on-screen calculator or the keyboard.
-
Save the settings.
→ The entered formula is displayed in the overview.
→ The calculation will be carried out in the next export.
4.3. Recommendations for data field mappings
To help you with mapping your data fields for the catalogue, we have created a list of recommended data field mappings. Note that these mappings are recommendations only. Depending on how you manage your item data, other mappings may be more appropriate than the recommendation given here.
-
Need more information about the PlentyONE data fields? All data fields are described on the manual page for the export type Listing.
| Sales channel field | Mandatory? | Recommended PlentyONE mapping |
|---|---|---|
General |
||
GTIN-13 |
yes |
|
Settings for the sales channel |
||
Currency |
yes |
This data field is assigned automatically for each sales channel and cannot be changed. |
Ignore warnings of Zalando on price updates |
no |
During price updates, Zalando checks the plausibility of your prices based on specific criteria. For example, Zalando compares the prices of the same variations on different platforms and compares the regular price with the reduced price. If any significant differences are detected, Zalando triggers a warning.
or
|
Regular price |
yes |
Note: If you assign a reduced price, then the regular price will be exported as strike price. |
Reduced price |
no |
Note: The reduced price replaces the regular price as the sales price if the reduced price is at least 0.01 lower than the regular price. |
Scheduled price 1-3 - Regular price |
no |
If you want to export a scheduled price, then the corresponding regular price is mandatory. The scheduled price then replaces the regular price and applies from the start time to the end time (if defined) or until the scheduled price is removed or replaced by a new scheduled price.
|
Scheduled price 1-3 - Start time |
no |
If you want to export a scheduled price, then the corresponding start time is mandatory. The start date of the scheduled price determines when the current regular price and promotional price will be replaced. The start time must be at least two hours in the future. Otherwise, the scheduled price change will be applied immediately to avoid Zalando rejecting the scheduled price. There must be at least one hour between multiple start times.
|
Scheduled price 1-3 - End time |
no |
The end date of the scheduled price determines when the scheduled price ends. There must be at least one hour between the start and end times. If another scheduled price starts before the end date, the existing scheduled price will be overwritten by the new scheduled price.
|
Scheduled price 1-3 - Promotional price |
no |
If no promotional price is defined for the scheduled price, the current promotional price will be removed during the scheduled period. Instead, the regular price of the scheduled price applies. If a promotional price is defined for the scheduled price, then the promotional price replaces the current promotional price from the start to the end time (if defined) or until the scheduled price is removed or replaced by a new scheduled price.
|
Internal |
||
variationID |
yes |
This data field is assigned automatically. |
4.3.1. Activating the catalogue export
You have set up Zalando in PlentyONE and created a catalogue for exporting your offer data? Then activate the catalogues you want to export to Zalando in the Data » Catalogues menu and continue with creating offer listings.
Once you have activated the offer catalogue, the Zalando account, the offer listing and the variations, the offer data will be automatically exported to Zalando .
Activating the catalogue export to Zalando:
-
Go to Data » Catalogues.
→ The catalogues are listed. -
Scroll to the Zalando catalogue.
-
In the Active column, move the toggle button to the right ().
→ The catalogue is active.
→ The catalogue data is exported to Zalando .
Tip: Go to Data » Catalogue export status for information about the status of the export.
5. Creating properties
Characteristics cannot be used for the catalogue export. Therefore, you must create properties for all characteristics that you use to describe your items in more detail on Zalando.
For further information, refer to the Properties and characteristics page.
Creating a property:
-
Go to Setup » Settings » Properties » Configuration.
-
Click on Create property.
-
Customise the settings to meet your needs.
-
Save () the settings.
5.1. Requirements for exporting properties to Zalando
In order for a property to be transferred to Zalando, it must be linked to the desired variation and assigned in the offer or product catalogue for Zalando.
-
Open the variation in the Item » Items » [Open variation] menu.
-
Open the Properties tab in the navigation bar on the left-hand side.
-
Click Add properties (add).
→ The window Add properties opens.
Tip: Use the search to search for the property. -
Place a check mark next to the desired property.
-
Click APPLY.
-
Enter additional information depending on the property type. If the property is a selection property, for example, you must also select a suitable value from the drop-down list.
-
Save () the settings.
-
Go to Data » Catalogues.
-
Open the Zalando catalogue for which the property is to be used.
-
Assign the property to the desired Zalando data field.
-
Save () the settings.
6. Managing listings
You create and manage offers for Zalando via listings. The Sales channels » Accounts » [Open account] menu offers you an overview of your listings. Here you can create and manage product listings and offer listings. Click on the tile for Zalando to create product listings or offer listings for Zalando.
6.1. Offer listings
In the list Offer listings menu of the account you gain an overview of your offer listings.
Tip: You can switch between specific views of offers and the listing group view via the menu button and folder.
-
menu gives you an overview of all the offer listings.
-
folder shows you the listing groups of the offer listings. Extend a listing group by clicking chevron_right, to see all listings within the group.
| If you only want to take a look at certain offer listings, apply filters and narrow down the listings which are displayed. To do so, click on Filters (tune) at the top of the menu. |
Applying filters:
-
Open the Sales Channels » Accounts » [Open account] » Offer listings menu.
-
Click Filters (tune) at the top of the menu.
-
Select one or multiple filters.
-
Click Search (search).
→ The selected filters are applied and the appropriate offer listings are displayed.
→ The filters that were applied are displayed at the top of the menu.
Tip: You can also reset (refresh) the selected filters. Then all offer listings will be displayed again.
Table 2 offers an overview of the single listing view of offer listings.
| Column | Explanation | ||||||
|---|---|---|---|---|---|---|---|
Data sync |
This column indicates whether data exchange for the offer listing is active or paused. |
||||||
Group ID |
The ID of the listing group to which the offer listing is assigned. By clicking on the ID, you can open the listing group view. |
||||||
Listing Name |
Name of the offer listing. |
||||||
SKU |
SKU of the offer listing. |
||||||
Variation ID |
ID of the variation. |
||||||
Channel |
The sales channel to which the listing is exported. |
||||||
Status on Channel |
Displays the listing status on the sales channel, for example if the listing is already listed on the sales channel. Possible status are:
Note: For platforms with multiple sales channels, the number after the status icon indicates on how many sales channels the offer listing has this status. |
||||||
List on |
The sales channels on which the offer listing is to be offered are displayed here. |
||||||
Errors |
Indicates whether the listing is incorrect. Click to open the overview of listing errors. |
||||||
Template |
The template selected for the listing. |
||||||
Catalogue |
The catalogue selected for the listing. |
||||||
Creation date |
The date and time on which the listing was created. |
||||||
more_vert |
Click here to display more actions.
|
Table 3 offers an overview of the group view of offer listings.
| Column | Explanation | ||||||
|---|---|---|---|---|---|---|---|
Data sync |
This column indicates whether data exchange for the listing group is active or paused. |
||||||
Group name |
Name of the listing group |
||||||
SKU |
SKU of the listing group. |
||||||
Channel |
The sales channel to which the listing group is exported. |
||||||
Errors |
The error overview. |
||||||
Template |
The template selected for the listing group. |
||||||
Catalogue |
The catalogue selected for the listing group. |
||||||
Creation date |
The date and time on which the listing group was created. |
||||||
more_vert |
Click here to display more actions.
|
6.2. Product listings
In the list Product listings menu of the account you gain an overview of your product listings.
Tip: menu You can switch between specific views of product listings and the listing group view via the folder button.
-
menu gives you an overview of all the product listings.
-
folder shows you the listing groups of the product listings. Extend a listing group by clicking chevron_right, to see all listings within the group.
| If you only want to take a look at certain product listings, apply filters and narrow down the listings which are displayed. To do so, click on Filters (tune) at the top of the menu. |
Applying filters:
-
Open the Sales Channels » Accounts » [Open accounts] » Product listings:.
-
Click Filters (tune) at the top of the menu.
-
Select one or multiple filters.
-
Click Search (search).
→ The selected filters are applied and the appropriate product listings are displayed.
→ The filters that were applied are displayed at the top of the menu.
Tip: You can also reset (refresh) the selected filters. Then all product listings will be displayed again.
Table 4 offers an overview of the single listing view of product listings.
| Column | Explanation | ||||||
|---|---|---|---|---|---|---|---|
Data sync |
This column indicates whether data exchange for the product listing is active or paused. |
||||||
Group ID |
The ID of the listing group to which the product listing is assigned. By clicking on the ID, you can open the listing group view. |
||||||
Listing Name |
Name of the listing. |
||||||
Variation ID |
ID of the variation. |
||||||
Channel |
The sales channel to which the listing is exported. |
||||||
Status on Channel |
Displays the listing status on the sales channel, for example if the listing is already listed on the sales channel. Possible status are:
Note: For platforms with multiple sales channels, the number after the status icon indicates on how many sales channels the offer listing has this status. |
||||||
List on |
The sales channels on which the product listing is to be offered are displayed here. |
||||||
Errors |
Indicates whether the listing is incorrect. Click to open the overview of listing errors. |
||||||
Template |
The template selected for the listing. |
||||||
Catalogue |
The catalogue selected for the listing. |
||||||
Creation date |
The date and time on which the listing was created. |
||||||
more_vert |
Click here to display more actions.
|
Table 5 offers an overview of the group view of product listings.
| Column | Explanation | ||||||
|---|---|---|---|---|---|---|---|
Data sync |
This column indicates whether data exchange for the listing group is active or paused. |
||||||
Group name |
Name of the listing group |
||||||
Channel |
The sales channel to which the listing group is exported. |
||||||
Errors |
The error overview. |
||||||
Template |
The template selected for the listing group. |
||||||
Catalogue |
The catalogue selected for the listing group. |
||||||
Creation date |
The date and time on which the listing group was created. |
||||||
more_vert |
Click here to display more actions.
|
6.3. Creating listings
You create and manage offers on Zalando via listings. Carry out the following steps to create listings for Zalando.
| At Zalando, an offer listing must always be created in addition to a product listing. |
-
If the item you want to sell is not listed on the sales channel yet you will need to create a product listing for it first. Creating a product listing sends the product data to the sales channel and allows for the item to be listed.
In order to actually be able to sell the item on the sales channel you will need to additionally create an offer listing. The offer listing contains data related to the sale of the item, such as its price and stock. In other words, a product listing allows you to list an item on a sales channel that did not previously exist on that sales channel, but in order to sell that item on that sales channel you also need an offer listing for that item. -
If the item you want to sell is already listed on the sales channel you only need to create an offer listing. Offer listings send the data related to your offer, such as the price, stock, shipping costs etc., to the sales channel.
In most cases you will only need an offer listing in order to offer a product on a sales channel. Many sales channels do not differentiate between product and offer listings. You only need to send offer listings to these kinds of sales channels.
6.3.1. Creating offer listings
Note: For offers, select the template Offer data.
Offer listings are created in three steps:
-
First, you enter listing details, meaning you select the platform, template, and catalogue for the listing.
-
Next, you select the variations from which the offer listings are created.
-
Lastly, check and confirm your selection and create the listings.
| You can also create offer listings directly from your product listings. Here you can learn how to do that. |
Step 1: Specify listing details:
-
Open the Sales Channels » Accounts menu.
-
Open the account for Zalando.
→ The menu Channel settings opens. -
Open the menu format_list_bulleted Offer listings.
-
Click add arrow_drop_down and select Create offers.
→ The Create offers view opens. -
Select the platform Zalando.
-
Select the template for the catalogue.
Tip: Only templates that are available for the platform Zalando are displayed. -
Select the sales channel on which the listing should be offered.
-
Select a catalogue with your mappings for offer data.
Tip: If you have no fitting catalogue yet, click on add Create catalogue. You will be forwarded to the Data » Catalogues menu and can create a catalogue. -
Optional: Activate Automatically activate listings after creation, if listing data should be automatically transferred to Zalando after the listing is created.
-
Click arrow_forward NEXT.
→ The Select variations view opens. Next, select the variations you want to add to the listing.
Step 2: Select variations:
-
Select the variations you want to create the offer listing for.
Tip: Use the search to filter for variations.
Note: Only variations that are linked to Zalando in the Item » Items » [Open item] » [Open variation] menu are displayed.
Tip: If you want to create offer listings for all available variations, click on Click here to create listings for all [] variations above. You will be automatically redirected to the Preview and confirmation step. Offer listings can be created for a maximum of 50,000 variations at a time. -
Click add ADD TO SELECTED VARIATIONS.
→ The selected variations are displayed in the Selected variations section.
Note: If you check a variation in the Selected variations section, you can remove the variation from the selection by clicking Remove from list. -
Click arrow_forward NEXT.
→ The selected variations will be displayed in a new view. In the last step, you preview and confirm your selection.
Step 3: Preview and confirm selection:
-
Preview your settings in the Listing details section.
-
Preview your selected variations in the Listing preview section. The listings are grouped by items. Extend a listing group (chevron_right) to see which variations are contained in the respective listing group.
-
If everything is set and done, click CREATE OFFER LISTINGS.
Note: If you activated Automatically activate listings after creation a window with a summary of your settings opens. Click check CONFIRM to create the offer listings.
6.3.2. Activating offer listings
After you have created the offer listings, you have to activate the listings so that they can be transferred to Zalando.
To do so, activate the individual listings and the listing group. The listing can only be transferred to the sales channel if both the listing and the listing group are activated.
Note: You can also activate listings immediately after creation by activating the option Automatically activate listings after creation. If you activate the option to automatically activate listings after creation, you still have to activate the data exchange for the listing group.
Activating offer listings:
-
Open the menu Sales Channels » Accounts » [Open Zalando account].
→ The menu Channel settings opens. -
Open the Offer listings menu.
-
In the line of the offer listing you want to activate, click more_vert.
-
Click toggle_on Activate data sync.
Tip: If you want to activate multiple offer listings at once, place a check mark next to the desired offer listings and click toggle_on arrow_drop_down » Activate data sync at the top of the toolbar.
→ The data exchange for the listing is activated. The listing can only be transferred to the sales channel if the listing group is also activated.
Activating a listing group:
-
Open the menu Sales Channels » Accounts » [Open Zalando account].
→ The menu Channel settings opens. -
Open the Offer listings menu.
-
Open the listing group view (folder).
-
In the line of the listing group you want to activate, click more_vert.
-
Click toggle_on Activate data sync.
Tip: If you want to activate multiple listing groups at once, place a check mark next to the desired listing groups and click toggle_on arrow_drop_down » Activate data sync at the top of the toolbar.
→ The data exchange for the listing group is activated.
6.3.3. Creating product listings
Note: For products, select the respective product category as template.
| If you want to offer a new item on Zalando, you must always create an offer listing in addition to the product listing so that the item can be listed on Zalando. |
Product listings are created in three steps:
-
First, you enter listing details, meaning you select the platform, template, and catalogue for the listing.
-
Next, you select the variations from which the product listings are created.
-
Lastly, check and confirm your selection and create the listings.
|
Create product listings using the group function
You can also create product listings directly in the Items menu using the variation group function. You can find more information about the variation group function here. |
Step 1: Specify listing details:
-
Open the Sales Channels » Accounts menu.
-
Open the account for Zalando.
→ The menu Channel settings opens. -
Open the menu format_list_bulleted Product listings.
-
Click on add Create products.
→ The view Create products opens. -
Select the platform Zalando.
-
Select the template for the catalogue.
-
Select a catalogue with your mapping for item data.
Tip: If you have no fitting catalogue yet, click on add Create catalogue. You will be forwarded to the Data » Catalogues menu and can create a catalogue. -
Optional: Activate Automatically activate listings after creation, if listing data should be automatically transferred to Zalando after the listing is created.
-
Click arrow_forward NEXT.
→ The Select variations view opens. Next, select the variations you want to add to the listing.
Step 2: Select variations:
-
Select the variations you want to create the product listing for.
Tip: Use the search to filter for variations.
Note: Only variations that are linked to Zalando in the Item » Items » [Open item] » [Open variation] menu are displayed.
Tip: If you want to create a product listing for all available variations, click on Click here to create listings for all [] variations above. You will be automatically redirected to the Preview and confirmation step. Product listings can be created for a maximum of 50,000 variations at a time. -
Click add ADD TO SELECTED VARIATIONS.
→ The selected variations are displayed in the Selected variations section.
Note: If you check a variation in the Selected variations section, you can remove the variation from the selection by clicking Remove from list. -
Click arrow_forward NEXT.
→ The selected variations will be displayed in a new view. In the last step, you preview and confirm your selection.
Step 3: Preview and confirm selection:
-
Preview your settings in the Listing details section.
-
Preview your selected variations in the Listing preview section. The listings are grouped by items. Extend a listing group (chevron_right) to see which variations are contained in the respective listing group.
-
If everything is set and done, click CREATE PRODUCT LISTINGS.
Note: If you activated Automatically activate listings after creation a window with a summary of your settings opens. Click check CONFIRM to create the product listings.
6.3.4. Activating product listings
After you have created the product listings, you have to activate the listings so that they can be transferred to Zalando.
To do so, activate the individual listings and the listing group. The listing can only be transferred to the sales channel if both the listing and the listing group are activated.
Note: You can also activate listings immediately after creation by activating the option Automatically activate listings after creation. If you activate the option to automatically activate listings after creation, you still have to activate the data exchange for the listing group.
Activating product listings:
-
Open the menu Sales Channels » Accounts » [Open Zalando account].
→ The menu Channel settings opens. -
Open the Product listings menu.
-
In the line of the product listing you want to activate, click more_vert.
-
Click toggle_on Activate data sync.
Tip: If you want to activate multiple product listings at once, place a check mark next to the desired product listings and click toggle_on arrow_drop_down » Activate data sync at the top of the toolbar.
→ The data exchange for the listing is activated. The listing can only be transferred to the sales channel if the listing group is also activated.
Activating a listing group:
-
Open the menu Sales Channels » Accounts » [Open Zalando account].
→ The menu Channel settings opens. -
Open the Product listings menu.
-
Open the listing group view (folder).
-
In the line of the listing group you want to activate, click more_vert.
-
Click toggle_on Activate data sync.
Tip: If you want to activate multiple listing groups at once, place a check mark next to the desired listing groups and click toggle_on arrow_drop_down » Activate data sync at the top of the toolbar.
→ The data exchange for the listing group is activated.
6.4. Viewing listing errors
The Errors tab of the Sales Channels » Accounts » [Open account] » Offer listings / Product listings menu provides an overview of all errors that occurred in PlentyONE when exporting your product and offer listings.
Tip: The overview of listing errors is only displayed if at least one error has occurred when exporting the listings.
Here you can see:
-
the affected listings
-
error details
For each error, you can download a CSV file containing the affected listings by clicking the download button. You can correct the errors directly in the CSV file. You can then re-import the corrected CSV file.
Table 6 contains an overview of listing errors.
| Column | Explanation |
|---|---|
keyboard_arrow_down [Information about the error] |
Information about the error is provided here. It contains the affected field of the data record, a brief description of the error and the number of listings for which this error has occurred. |
download Download data as CSV |
The CSV file with the data records is downloaded. |
Listing name |
The name of the listing. |
Parent SKU |
The parent SKU of the main variation. |
SKU |
The SKU of the sub-variation. |
Variation ID |
The ID of the variation. |
Channel |
The sales channel to which the listing is exported. |
Export activity |
Shows whether the variation is being exported.
|
Status |
The listing’s status on the sales channel. Possible statuses are:
|
Errors |
The error overview. |
Template |
The template selected for the listing. |
Catalogue |
The catalogue selected for the listing. |
7. Adding additional sales channels
If you already sell on Zalando and would now like to offer your items in another country, you have to carry out the following settings:
Note: Zalando must approve the additional sales channel before you can offer your items there.
-
Go through the assistant Account settings - Zalando again to carry out the settings for the new Zalando sales channel. This is done in the step Settings for the sales channel.
-
Activate the order referrer for the new sales channel in the Setup » Orders » Order referrer menu.
-
If necessary, create a sales price for the new sales channel in the Setup » Item » Sales prices menu or activate the referrer Zalando in an existing sales price.
-
In the offer catalogue for Zalando, map the data fields for prices for the new sales channel.
-
Make the offer listings that you want to offer on the new sales channel available for the sales channel. To do so, open the offer listing view in the Sales Channels » Accounts » [Open account] menu and activate the new sales channel in the column List on of an offer listing. To do this, activate the editing mode via the pencil icon (edit) and make sure to save the changes.
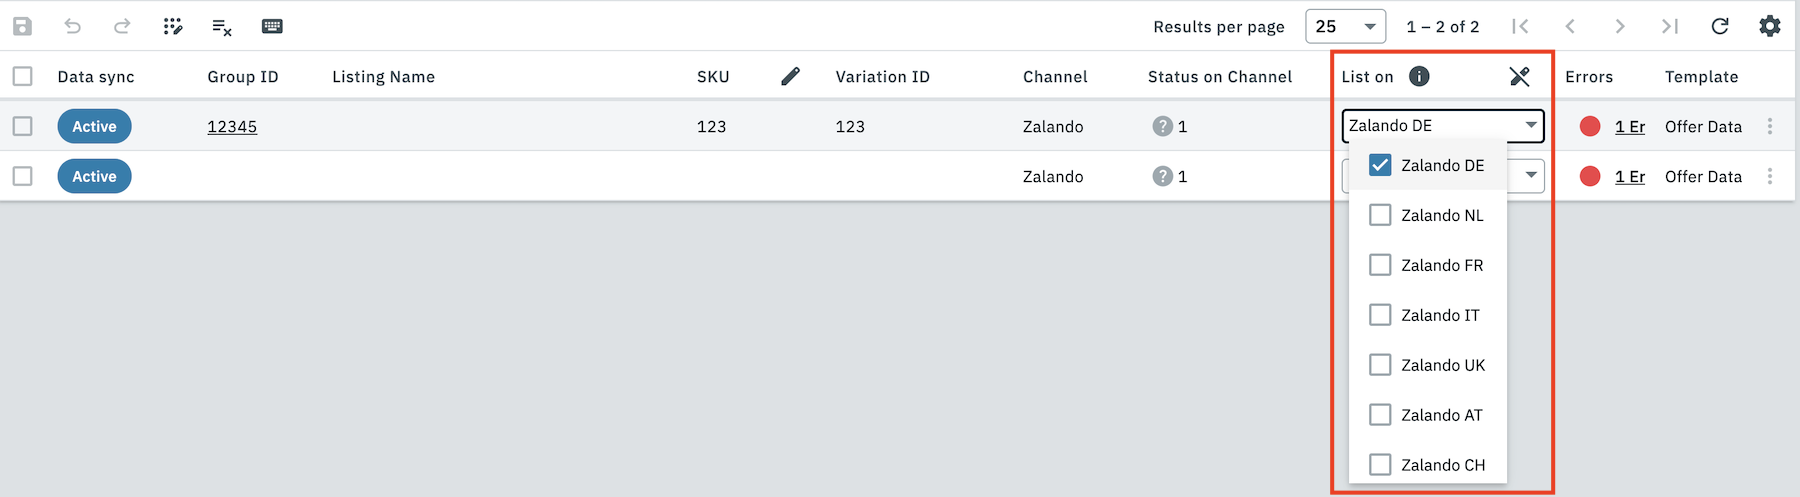
8. Automating order processing
You can automatically notify Zalando about changes to the order status. There are two ways to do this:
-
Option 1: PlentyONE Flow (recommended)
-
Option 2: Event procedures (old method)
8.1. Option 1: PlentyONE Flow (recommended)
Create event-based flows to automatically inform Zalando about changes to the order status. The following actions are available for Zalando in the PlentyONE Flow Studio:
With PlentyONE Flow (short: "Flow"), you can automate workflows for your business processes. Flow provides you with two functions in the Automation menu:
-
In Flow Studio, you create and configure automated workflows. Depending on the trigger type, there are three flow types: event-based, time-based or manual.
-
In the Flow Tracker, you can monitor ongoing or finished workflows.
The central element in both functions is the Canvas – a graphical interface on which the workflows are visualised with Actions and Controls. In Flow Studio the canvas can be edited, in Flow Tracker it is only used for visualisation and is therefore read-only.
-
Is this your first time working with PlentyONE Flow? Then read up on the basic concept of Flow first.
8.1.1. Automatically sending shipping confirmations
A shipping confirmation can only be sent if an order meets the following conditions:
-
A package number must be saved for the order.
Note: Only one package number can be exported per order. If more than one package number is associated with an order, only the first package number is exported. -
The tracking ID of the return label must be saved for the order.
You can save the tracking ID in several different ways:
* Create a return label via the shipping centre.
* Create a return label with a process procedure.
* Add the return label via REST.
* Add the tracking ID of the return to a package at the order via REST.
Create an event-based flow to automatically inform Zalando that you have shipped the items of an order.
-
Go to Automation » Flow Studio.
-
Click Create flow (add).
→ A stepper opens and guides you through the following three steps.-
General
-
Enter a unique name and, if necessary, a description for the new flow.
-
Click Next.
-
-
Trigger
-
Select Event-based as the trigger.
-
Click Next.
-
-
Settings
-
If desired, select a UI from the optional drop-down list Flow available in.
→ The option to manually trigger the flow directly from the selected UI is added to the group functions in that UI.
Note: UIs currently selectable: Order UI. -
From the drop-down list Trigger selection, select the event according to Table 7.
Note: If the trigger event has additional settings, then these are invariably mandatory. Without performing these settings, you will not be able to save the flow. -
Save () the settings.
→ The flow is created.
→ The Flow Studio Canvas appears, on which two elements are already displayed: The trigger type and the placeholder for the next step.
Note: With some event-based flows you cannot save the flow if it consists of only a trigger. In such cases, you need to add at least one further step.
-
-
-
Configure the new flow according to Table 7.
-
Save () the settings.
Note: The selected statuses, controls and filters in Table 7 only serve as an example. Select the status, controls and filters for the flow which best suit your workflow.
| Setting | Option | Selection | |||||||||
|---|---|---|---|---|---|---|---|---|---|---|---|
Trigger selection |
Select an event, for example:
|
||||||||||
Control element |
Branch |
Note: If you want to use multiple filters, add the additional filters as conditions (playlist_add). Select AND as the relationship between the conditions.
|
|||||||||
Actions |
Plugin (Legacy) |
Zalando > Send shipping confirmation to Zalando |
8.1.2. Automatically sending cancellations
Create an event-based flow to automatically inform Zalando about cancellations.
Note: Note that orders marked as shipped can no longer be cancelled.
-
Go to Automation » Flow Studio.
-
Click Create flow (add).
→ A stepper opens and guides you through the following three steps.-
General
-
Enter a unique name and, if necessary, a description for the new flow.
-
Click Next.
-
-
Trigger
-
Select Event-based as the trigger.
-
Click Next.
-
-
Settings
-
If desired, select a UI from the optional drop-down list Flow available in.
→ The option to manually trigger the flow directly from the selected UI is added to the group functions in that UI.
Note: UIs currently selectable: Order UI. -
From the drop-down list Trigger selection, select the event according to Table 8.
Note: If the trigger event has additional settings, then these are invariably mandatory. Without performing these settings, you will not be able to save the flow. -
Save () the settings.
→ The flow is created.
→ The Flow Studio Canvas appears, on which two elements are already displayed: The trigger type and the placeholder for the next step.
Note: With some event-based flows you cannot save the flow if it consists of only a trigger. In such cases, you need to add at least one further step.
-
-
-
Configure the new flow according to Table 8.
-
Save () the settings.
Note: The selected statuses, controls and filters in Table 8 only serve as an example. Select the status, controls and filters for the flow which best suit your workflow.
| Setting | Option | Selection | |||||||||
|---|---|---|---|---|---|---|---|---|---|---|---|
Trigger selection |
Select an event, for example:
|
Select an order status, for example:
|
|||||||||
Control element |
Branch |
Note: If you want to use multiple filters, add the additional filters as conditions (playlist_add). Select AND as the relationship between the conditions.
|
|||||||||
Actions |
Plugin (Legacy) |
Zalando > Send cancellation to Zalando |
8.1.3. Automatically sending returns
Create an event-based flow to automatically inform Zalando about returns.
| Return reasons will only be transmitted if the flow is used in combination with a return order and if the return reasons were mapped in the assistant. |
-
Go to Automation » Flow Studio.
-
Click Create flow (add).
→ A stepper opens and guides you through the following three steps.-
General
-
Enter a unique name and, if necessary, a description for the new flow.
-
Click Next.
-
-
Trigger
-
Select Event-based as the trigger.
-
Click Next.
-
-
Settings
-
If desired, select a UI from the optional drop-down list Flow available in.
→ The option to manually trigger the flow directly from the selected UI is added to the group functions in that UI.
Note: UIs currently selectable: Order UI. -
From the drop-down list Trigger selection, select the event according to Table 9.
Note: If the trigger event has additional settings, then these are invariably mandatory. Without performing these settings, you will not be able to save the flow. -
Save () the settings.
→ The flow is created.
→ The Flow Studio Canvas appears, on which two elements are already displayed: The trigger type and the placeholder for the next step.
Note: With some event-based flows you cannot save the flow if it consists of only a trigger. In such cases, you need to add at least one further step.
-
-
-
Configure the new flow according to Table 9.
-
Save () the settings.
Note: The selected statuses, controls and filters in Table 9 only serve as an example. Select the status, controls and filters for the flow which best suit your workflow.
| Setting | Option | Selection | |||||||||
|---|---|---|---|---|---|---|---|---|---|---|---|
Trigger selection |
Select an event, for example:
|
For Order types, select the type Return. |
|||||||||
Control element |
Branch |
Note: If you want to use multiple filters, add the additional filters as conditions (playlist_add). Select AND as the relationship between the conditions.
|
|||||||||
Actions |
Plugin (Legacy) |
Zalando > Send return to Zalando |
8.2. Option 2: Event procedures (old method)
Set up event procedures to automatically inform Zalando about changes to the order status. The following event procedures are available for Zalando:
8.2.1. Automatically sending shipping confirmations
A shipping confirmation can only be sent if an order meets the following conditions:
-
A package number must be saved for the order.
Note: Only one package number can be exported per order. If more than one package number is associated with an order, only the first package number is exported. -
The tracking ID of the return label must be saved for the order.
You can save the tracking ID in several different ways:
* Create a return label via the shipping centre.
* Create a return label with a process procedure.
* Add the return label via REST.
* Add the tracking ID of the return to a package at the order via REST.
Set up an event procedure to automatically inform Zalando that you have shipped the items of an order.
-
Go to Setup » Orders » Events.
-
Click on Add event procedure ().
→ The Create new event procedure window opens. -
Enter a distinct name for the event procedure.
-
Select the event according to Section 8.2.1.
-
Save () the settings.
-
Carry out the additional settings according to Section 8.2.1.
-
Select the setting Active ().
-
Save () the settings.
Note: The selected statuses and filters in Section 8.2.1 only serve as an example. Select filters and statuses for the event procedure which best suit your workflow.
The data is not transferred in real time when this event procedure is triggered. Instead, the data is registered in a queue. If there are several jobs in the queue, it can take several minutes for the data to be transferred. The advantage? If the target server is unavailable or throttled, several attempts are made to transfer the data.
| Setting | Option | Selection |
|---|---|---|
Event |
Order change: Outgoing items booked |
|
Filter 1 |
Order > Order type |
Order |
Filter 2 |
Order > Referrer |
Select the order referrers for the Zalando sales channels that you want to use this flow for. |
Procedure |
Plugins |
Send shipping confirmation to Zalando |
8.2.2. Automatically sending cancellations
Set up an event procedure to automatically inform Zalando of cancellations.
Note: Note that orders marked as shipped can no longer be cancelled.
-
Go to Setup » Orders » Events.
-
Click on Add event procedure ().
→ The Create new event procedure window opens. -
Enter a distinct name for the event procedure.
-
Select the event according to Table 11.
-
Save () the settings.
-
Carry out the additional settings according to Table 11.
-
Select the setting Active ().
-
Save () the settings.
Note: The selected statuses and filters in Table 11 only serve as an example. Select filters and statuses for the event procedure which best suit your workflow.
| Setting | Option | Selection |
|---|---|---|
Event |
Order change: Status change |
Select a status, for example [8] Cancelled. |
Filter 1 |
Order > Order type |
Order |
Filter 2 |
Order > Referrer |
Select the order referrers for the Zalando sales channels that you want to use this flow for. |
Procedure |
Plugins |
Send cancellation to Zalando |
8.2.3. Automatically sending returns
Set up an event procedure to automatically inform Zalando about returns.
| Return reasons will only be transmitted if the event procedure is used in combination with a return order and if the return reasons were mapped in the assistant. |
-
Go to Setup » Orders » Events.
-
Click on Add event procedure ().
→ The Create new event procedure window opens. -
Enter a distinct name for the event procedure.
-
Select the event according to Table 12.
-
Save () the settings.
-
Carry out the additional settings according to Table 12.
-
Select the setting Active ().
-
Save () the settings.
Note: The selected statuses and filters in Table 12 only serve as an example. Select filters and statuses for the event procedure which best suit your workflow.
| Setting | Option | Selection |
|---|---|---|
Event |
Order generation: New return |
|
Filter 1 |
Order > Order type |
Return |
Filter 2 |
Order > Referrer |
Select the order referrers for the Zalando sales channels that you want to use this flow for. |
Procedure |
Plugins |
Send return to Zalando |
9. Activating the account
After you have saved the settings for Zalando, activate your Zalando account in the assistant Account settings - Zalando. To open the assistant, go to Setup » Assistants » Omni-Channel.
Note: At present, the Zalando account cannot be activated via the account’s tile in the Sales Channels » Accounts menu. You can only activate the account in the assistant Account settings - Zalando.
Activating the account:
-
Go to Setup » Assistants » Omni-Channel.
-
Complete the assistant Account settings - Zalando.
-
Open the desired configuration for Zalando.
-
Open the step Account activation.
-
Activate the toggle button Activate Zalando account.
→ The account is activated and data can be exchanged with Zalando.
10. No longer offering items on Zalando
If you no longer wish to offer a variation on Zalando, you can either remove the availability for the desired Zalando sales channel from the offer listing or you can deactivate the offer listing or the listing group.
Depending on whether you no longer want to offer the listing on Zalando at all or only want to remove it from a specific Zalando sales channel, you have to carry out different settings.
Note: Items cannot be deleted on Zalando. If you remove the availability for a sales channel, your variation will not be deleted on Zalando. It will only be displayed as not in stock.
10.1. Possibility 1: Stop offering a listing on a specific sales channel
If you no longer wish to offer the listing on a specific Zalando sales channel, then remove the availability for this sales channel from the offer listing.
Removing the availability for a sales channel:
-
Open the Sales Channels » Accounts » [Open account] » Offer listings menu.
-
In the List on column, click on the pencil icon (edit).
→ The editing mode for this column is activated. -
In the row of the listing that you no longer wish to offer on the sales channel, expand the drop-down list in the List on column.
-
Remove the check mark from the Zalando sales channel on which the listing should no longer be offered.
-
Save () the settings.
→ The listing data will no longer be exported to this Zalando sales channel.
10.2. Possibility 2: No longer offer the listing on Zalando at all
If you no longer wish to offer the listing on Zalando, deactivate either the offer listing or the listing group.
Deactivating a listing:
-
Open the Sales Channels » Accounts » [Open account] » Offer listings menu.
-
For the listing that you no longer wish to offer on Zalando, click on more_vert and then on toggle_off Pause data sync.
→ The listing data will no longer be exported to Zalando.
Note: Note that all listings in the group will be deactivated if you deactivate the listing group.
Deactivating a listing group:
-
Open the Sales Channels » Accounts » [Open account] » Offer listings menu.
-
Open the listing group view (folder).
-
Click on more_vert in the respective listing group and then on toggle_off Pause data sync.
→ The listing data within this group will no longer be exported to Zalando.
11. Downloading reports
There are a number of reports available for Zalando. Go to the Setup » Markets » Zalando » Settings » Tab: processing reports menu to download the following reports:
| Report | Explanation | ||||
|---|---|---|---|---|---|
Reports |
|||||
Product status reports |
Zalando generates the product status reports are generated once daily during the night. These reports only contain information regarding variations that were successfully exported to Zalando.
|
||||
Price reports |
Zalando generates a price report for each active channel once daily during the night. These reports contain information on the processing status of all price updates that Zalando received in the last seven days. |
||||
11.1. Downloading product status reports
Product status reports contain information regarding the items that were exported to Zalando. These reports are generated by Zalando. As such, these reports only contain information regarding variations that were successfully exported to Zalando. The following reports are available:
-
ProductErrorReport.csv: Contains variations that cannot be sold on Zalando since the last export. The report also contains the first five error codes and an error description. The report is generated once every night. Click on Update file () before downloading the file to get current data from Zalando.
-
ProductLiveReport.csv: Contains variations that can be sold on Zalando since the last export. The report also contains information on the stock and price of the variations on the different Zalando channels (DE, FR, etc.) at the time the file was generated. The report is generated once every night. Click on Update file () before downloading the file to get current data from Zalando.
Downloading a product status report:
-
Go to Setup » Markets » Zalando » Settings.
-
Click on the Processing reports tab.
→ The following files can be downloaded in the Product status reports - Account ID area:-
ProductErrorReport.csv contains the variations that cannot be sold on Zalando since the last export.
-
ProductLiveReport.csv contains the variations that can be sold on Zalando since the last export.
-
-
Optional: By default, the file is updated once every night. To get current data from Zalando before downloading the file, go to the Product status-reports - Account ID area and click on Update file ().
-
Go to the Product status reports - Account ID area. In the row of a processing report click on Download file ().
→ The CSV file is generated. -
Save the CSV file on your computer.
11.2. Downloading price reports
Zalando generates a price report for each active channel once daily during the night. These reports contain information on the processing status of all price updates that Zalando received in the last seven days. As such, the reports may contain several entries for the same EAN.
Downloading price reports:
-
Go to Setup » Markets » Zalando » Settings.
-
Click on the Processing reports tab.
→ In the area Price reports, files are available for all active channels. -
Optional: By default, the file is updated once every night. In the column Actions, click on Update file () to get current data from Zalando before downloading the file.
-
Go to the Price reports area. In the row of a processing report, click on Download file ().
→ The CSV file is generated. -
Save the CSV file on your computer.
Timestamp |
Corresponds to the latest timestamp from the columns Status History and Scheduled Price (1-3) - Status History. |
||||||||||||||||
EAN |
The EAN of the variation whose price has been updated. |
||||||||||||||||
Ignore Warnings? |
Corresponds to the setting Ignore Warnings in the Setup » Assistants » Omni-Channel » Zalando account settings » [Open account] » Step: Prices for [target country] menu at the time the update was transferred. |
||||||||||||||||
Regular Price |
Transferred value of the regular price. |
||||||||||||||||
Regular Price Currency |
Transferred currency of the regular price. |
||||||||||||||||
Promotional Price |
Transferred value of the reduced price. |
||||||||||||||||
Promotional Price Currency |
Transferred currency of the reduced price. |
||||||||||||||||
Status |
Status of the processing. Possible statuses:
|
||||||||||||||||
Status History |
Status change history. For each change, the cell contains a paragraph with the following pattern (placeholders in square brackets):
|
||||||||||||||||
Scheduled Price (1-3) - Start |
Start date of the scheduled price. |
||||||||||||||||
Scheduled Price (1-3) - End |
End date of the scheduled price. |
||||||||||||||||
Scheduled Price (1-3) - Regular Price |
Transferred value of the regular price for the scheduled price. |
||||||||||||||||
Scheduled Price (1-3) - Regular Price Currency |
Transferred currency of the regular price. |
||||||||||||||||
Scheduled Price (1-3) - Promotional Price |
Transferred value of the reduced price. |
||||||||||||||||
Scheduled Price (1-3) - Promotional Price Currency |
Transferred currency of the reduced price. |
||||||||||||||||
Scheduled Price (1-3) - Status |
Status of the processing of the scheduled price. Possible statuses:
|
||||||||||||||||
Scheduled Price (1-3) - Status History |
History of the status change of the scheduled price. For each change, the cell contains a paragraph with the following pattern (placeholders in square brackets):
|
12. Viewing the data log
The Data » Log menu contains a history of processes that run via the Zalando interface.
Note that integrations and identifiers are only shown in the drop-down lists as filters after the process has run at least once.
For Zalando, the following filters are recommended:
-
Identifier » Zalando
-
Go to Data » Log.
-
In the toolbar, click on tune.
-
Select appropriate filters from the drop-down lists.
-
Optional: Select filters for dates and/or times to only show entries from a specific period.
Tip: For information about the filters, refer to the Data log page of the manual. -
Click on Search ().
→ The results are shown. -
Check all entries for the levels warning and error.
Tip: Click on the entry to see details.
Use any filters listed in Table 13 to limit the search results.
| Log entries | Recommended filters | Explanation |
|---|---|---|
Price updates |
|
While the price reports are generated, an error log is also written for all entries that have been in the REJECTED, FAILED or OVERRIDDEN status since the file was last generated (minus one hour as a buffer). |
Price reports |
|
Log entries for errors during generation of price reports |
Stock synchronisation |
|
Log entries for errors during stock updates |