OTTO Market (Setup via Channel Control Centre)
OTTO is a German online marketplace that is well-known for its large selection of fashion products. It also offers a more general product catalogue. When selling items on OTTO Market you are shown as the seller of your products, but communication with customers is managed by OTTO.
|
Channel Control Centre
This page explains the setup process for OTTO Market via the Channel Control Centre in the Sales Channels » Channel Control Centre menu. If your system features the Sales Channels » Accounts menu instead, then you can find instructions on how to set up OTTO Market via that menu here. |
1. Frequency of data exchange
After you have set up OTTO Market in PlentyONE, data is exchanged with the sales channel in the intervals described in Table 1.
| Data | Interval |
|---|---|
Item export |
once per night |
Price synchronisation |
once per night at the time of item export |
Stock synchronisation |
every 15 minutes |
Order import |
every 15 minutes |
Import of return announcements by customers |
once per hour |
Update of category groups/catalogue templates |
daily |
Update of the brands list |
every three hours |
Import of shipping profiles |
daily |
Synchronisation of the processing time |
once per hour |
Synchronisation of shipping profiles |
once per hour |
2. OTTO Market order management
This chapter describes how OTTO Market orders are processed.
2.1. Order import
-
OTTO Market orders are imported into PlentyONE with status [3] Waiting for payment.
-
Orders with the OTTO Market status ANNOUNCED are imported to PlentyONE without address details and with the status [1] Incomplete data. These are orders that can still be cancelled by the customer, or orders with the payment method cash in advance that have not been paid. As soon as the order changes to the status PROCESSABLE at OTTO Market, the address is added to the order and the order is moved to status [4] In preparation for shipping. Orders with the payment method cash in advance are moved to status [3] Waiting for payment.
|
Reserve stock for orders with the payment method cash in advance
Important: No stock is reserved for orders in status [1] Incomplete data by default. To make sure that stock is reserved for these orders, go to Setup » Orders » Settings. Go to the setting Status for order reservation (Reservation of stocks). For the option to, select the status [1] Incomplete data. In the drop-down list to the far right, select the option All orders. |
-
After an order was confirmed by OTTO Market, the order changes to status [5] Shipment process started.
-
A payment is created for the order in PlentyONE and the order is marked as paid.
If customers paid an OTTO Market order per bank transfer, it might take longer to confirm the order than for other payment methods. In PlentyONE, the payment method is always OTTO Payment. -
If customers do not pay for an order, the order will be cancelled by OTTO Market after some time. A cancellation will be sent to PlentyONE. In PlentyONE, the unpaid order automatically changes to the status [8] Cancelled.
Important: You cannot cancel orders in status [1] Incomplete data or [3] Waiting for payment.
2.2. Invoice import
-
Invoices for OTTO Market orders are generated by OTTO Market and automatically imported into PlentyONE after you sent a shipping confirmation to OTTO Market. As such, you cannot create invoices for OTTO Market orders in PlentyONE.
-
Shipping confirmations are sent with the event procedure Send shipping confirmation to OTTO.
-
The invoice documents can be accessed in the Receipts tab of the main order after the shipping confirmation was sent.
Note: As the documents are retrieved every hour, it may take some time until they are visible. -
By default, purchase receipts are imported as normal order documents. If you activate the assistant option Import purchase receipts as external invoices, the purchase receipts are imported with the document type External invoice instead.
Important: If the option Import purchase receipts as external invoices is not activated, the order number is not shown in the order overview and is also not exported as part of the financial accounting export. The invoice number is then only shown shown in the Receipts tab of the order. -
OTTO Market creates invoices when shipping of an item is confirmed. Therefore, invoices are also created for partial deliveries.
2.3. Credit note import
-
Credit notes and partial credit notes for OTTO Market orders are generated by OTTO Market and automatically imported into PlentyONE after you sent a returns confirmation to OTTO Market.
-
Once the return has been confirmed, the credit note documents are available in the Receipts tab of the order.
Note: As the documents are retrieved every hour, it may take some time until they are visible. -
This returns confirmation is sent with the event procedure Send return to OTTO.
-
When you notify OTTO of a return, the components of the individual order items of the refund/return are sent to OTTO. This means that OTTO will refund the complete sales price of any order item. You cannot notify OTTO Market of a partial refund for a particular order item. As such, even if you adjust the price of an order item, this does not affect the refund document that OTTO creates.
-
OTTO Market creates credit notes when the return of an item is confirmed. Therefore, credit notes are also generated for partial returns.
3. Setting up OTTO Market in PlentyONE
First, add OTTO Market as a sales channel and carry out the basic settings to set up the sales channel in PlentyONE. To do so, proceed as described below.
3.1. The Channel Control Centre
In the Channel Control Centre you can find an overview of the sales channels set up in your system.
Table 2 explains the different tiles visible in the Sales Channels » Channel Control Centre menu.
| Component | Explanation | ||||||
|---|---|---|---|---|---|---|---|
Name |
The name of the sales channel. |
||||||
more_vert More |
Click here to display more actions for a sales channel.
|
3.2. Adding the sales channel OTTO Market
Add OTTO Market as a sales channel in the Channel Control Centre.
Adding a sales channel:
-
Open the Sales Channels » Channel Control Centre menu.
-
Click on Add sales channel (add).
→ The menu Add sales channel opens. -
Click on Continue in the tile of OTTO Market.
-
Enter a name for the sales channel.
-
If asked to, select the Client (Shop) from the drop-down list.
-
Click on add Add OTTO Market.
→ The sales channel for OTTO Market is added.
3.3. Carrying out the settings for OTTO Market
Next, carry out the settings for OTTO Market.
Carrying out the settings for OTTO Market:
-
Go to Sales Channels » Channel Control Centre.
-
Click on the tile for OTTO Market.
→ The tab Settings opens. -
Carry out the settings. Pay attention to the explanations given in Table 3.
-
Save () the settings.
| Option | Explanation |
|---|---|
Settings |
|
Client |
Select the client you want to use to manage OTTO Market. |
Activate data exchange |
This toggle allows you to toggle the data exchange with OTTO Market on or off. |
Authorization |
|
Authorization |
Click on the button below, log in to the OTTO Partner Connect site and follow the instructions there in order to authorise your PlentyONE system to manage your OTTO Market data. After you have finished the authorisation process an OAuth token will automatically be sent to your system. This may take a few minutes. Once your system has received the token this section will automatically be updated. |
Data exchange |
|
Order import |
(De-)activates the import of orders into your system. |
Import return requests |
(De-)activates the import of return requests into your system. |
Update stock amounts for variations with no stock limitation |
While this option is enabled any variations with no stock limitation will have their stock count set to the specified value automatically. |
Import purchase receipts as external invoices |
By default, purchase receipts will be imported as normal order documents. When this option is enabled they will be imported as external invoices instead. |
Shipping service provider mapping |
|
Shipping service provider mapping |
Map your PlentyONE shipping service providers to OTTO Market shipping service providers. Your shipping service provider mappings are used for shipping notifications sent to OTTO Market. You can set up shipping service providers in your system in the Setup » Orders » Shipping menu. |
Fallback solution for return shipments |
|
Fallback solution for return shipments |
Select the shipping service provider that is to be used
If return tracking numbers are added to the system via REST API (for example, when you work with an external fulfilment company that is connected via this API), then your mappings in the Shipping service provider mapping section cannot be applied. You can choose a fallback solution for such cases here. |
3.4. Activating the order referrer
Go to Setup » Orders » Order referrer to activate the order referrer. This ensures that orders are assigned to the correct sales channel.
An order referrer tags an order with the sales channel on which the order was generated. Sales channels can be e.g. your online shop or markets on which you sell your items. Each sales channel has an individual order referrer. Some order referrers are available by default in your PlentyONE system. Further order referrers are added e.g. if you install a new plugin. For further information about the order referrer, see the page Order referrer of the PlentyONE manual.
Activating the order referrer for OTTO Market:
-
Go to Setup » Orders » Order referrer.
-
Click Search (search).
-
In the list, navigate to the option OTTO Market with ID 160.1.
-
On the right of the referrer’s line, click Edit (edit).
→ The window Edit referrer opens. -
Activate the option Visible in selection (toggle_on).
-
Click SAVE (save).
→ The referrer is active.

3.5. Defining a sales price
To sell variations on OTTO Market, you need a sales price in which the order referrer OTTO Market is activated. The price that you save for this sales price is the price that will be shown on OTTO Market.
Sales prices define the conditions under which a variation is sold at a specific price and on a specific sales channel. For example, you can sell your items at a lower price in your webshop than on Amazon. Or you can sell products cheaper to B2B customers than to B2C customers.
Two default sales prices are already configured in your PlentyONE system. However, you can also create new sales prices and edit them individually. In addition to default sales prices, you can also create RRPs, special offers, and set prices.
Defining a sales price for OTTO Market:
-
Go to Setup » Item » Sales prices » [Open sales price].
Tip: No sales prices? Then create a sales price first. -
Activate the referrer OTTO Market.
-
Save () the settings.
3.6. Permitting the payment method in a customer class
The payment method Otto Payment is automatically available in your PlentyONE system as soon as an active OTTO Market account exists. No separate configurations are needed for this. You just need to permit the payment method in one or more customer classes.
Customer classes allow you to divide your customer base according to specific criteria. Examples of use for customer classes are:
-
Create two separate customer classes for end customers (B2C) and business customers (B2B) respectively. Depending on the customer class, customers either see net prices or gross prices in your plentyShop.
-
Give discounts to specific customer classes.
For more information about customer classes, head over to the to the Managing contacts page.
Permitting the payment method in a customer class:
-
Go to Setup » CRM » Customer classes.
-
Open the customer class for which you want to permit the payment method.
-
For the setting Allowed payment methods, activate the option Otto Payment.
-
Save () the settings.
3.7. Setting the variation availability
You need to activate the variations you want to sell on OTTO Market and enable them for the relevant sales channel. This is done in the Item » Items » [Open variation] menu.
Making a variation available for OTTO Market:
-
Go to Item » Items » [Open variation].
Tip: To sell all variations of an item on OTTO Market, carry out the settings for the item’s main variation. If the inheritance function is active for the variations, then this activates the availability of all variations of the item. -
In the Availability and visibility section, enable the option Active (toggle_on).
-
Click the Sales channels tab.
-
In the Sales channels section, activate the sales channel OTTO Market in the Status column (toggle_on).
Tip: You can activate multiple sales channels at once. To do so, activate the checkboxes to the left of the desired sales channels. Then activate the toggle above the checkbox column (toggle_on). Click ACTIVATE to confirm the activation. -
Save (save) the settings.
→ The variation is available for OTTO Market.
Use the variation group function to edit multiple variations at once. You select the variations that you want to edit.
Making several variations available for OTTO Market using the variation group function:
-
Go to Item » Items.
-
Select () the variations to be edited.
-
In the toolbar, click on layers » layers Variation group function.
→ The Variation group function window opens. -
Select the action Sales channels from the drop-down list Actions.
→ The action is added to the lower part of the window. -
Select (check_box) the option OTTO Market from the drop-down list Sales channels.
→ The sales channel is added below the Sales channels drop-down list. -
Activate (toggle_on) the toggles to the left of the sales channels.
-
Click EXECUTE & CLOSE to apply the settings.
Batch processing allows you to edit several variations at once. You use filters to limit which variations are edited.
Making several variations available for OTTO Market using batch processing:
-
Navigate to the area Market availability.
-
Activate the checkbox to the left of the option OTTO Market.
-
Activate the checkbox to the right of the option OTTO Market.
-
Navigate to the area Availability.
-
Activate the checkbox to the left of the option Active.
-
Activate the checkbox to the right of the option Active.
-
Click on Apply to apply the settings to the variations.
If you delete the market availability for OTTO Market in the Item » Items » [Open item] » [Open variation] » Area: Sales channels section of a variation, the variation is deactivated on OTTO Market within 15 minutes. If you reactivate the availability of such a variation, the variation is only reactivated on OTTO Market during the nightly item export.
3.8. Setting the availability for images
The availability OTTO Market has to be saved for an image in the Item » Items » [Open item] » Item tab: Images menu so that item images are displayed on OTTO Market.
Note: The minimum dimensions for images uploaded to OTTO Market are 500 x 1000 pixels.
Setting the availability for images:
-
Go to Item » Item » [Open item] » Item tab: Images.
-
Activate the option OTTO Market in the Availability drop-down list.
-
Save () the settings.
→ The variation image is displayed on OTTO Market.
3.9. Check list: Requirements for exporting variations
To export a variation to OTTO Market, this variation has to meet the following requirements:
-
Go to Setup » Orders » Order referrer.
-
Is the option OTTO Market with ID 160.1 active?
-
If necessary, activate this order referrer.
-
Click Save (save).
-
Go to Item » Items » [Open variation].
-
In the Availability and visibility section of the General tab, activate the option Active.
-
Click Save (save).
The variation must be available for the sales channel.
-
Go to Item » Items » [Open variation].
-
Switch to the Sales channels tab.
-
In the section Sales channels, select the option OTTO Market (check_box).
-
Activate the toggle button Activate sales channel (toggle_on).
-
Confirm the pop-up by clicking ACTIVATE.
-
Click Save (save).
→ The variation is available for OTTO Market.
-
Go to Item » Items » [Open variation].
-
Switch to the Stock tab.
-
Expand the Stock (arrow_forward_ios) section.
→ The net stock per warehouse is shown in the Net stock column.
Check the sales price:
-
Go to Setup » Item » Sales prices.
-
For the filter Referrer, select OTTO Market.
-
Click Search (search).
→ The sales price that is active for the referrer is shown. -
Check the settings of the sales price.
-
Make any necessary corrections.
Check the price:
-
Go to Item » Items » [Open variation].
→ The sales prices are listed in the tab Pricing. -
Check the following settings:
-
Is the sales price for the referrer linked?
-
Does the price for the referrer have the correct price?
-
-
Make any necessary corrections.
Check the following character limits:
-
Model name can contain a maximum of 70 characters.
-
Special features can contain a maximum of 70 characters.
-
Set info can contain a maximum of 70 characters.
-
Product description can contain a maximum of 2000 characters.
-
All URLs in the Media assets section can contain a maximum of 2083 characters.
Important: The character limits are checked by OTTO market. Therefore you should check the log messages for the integration Plenty\\Modules\\Otto\\Item\\Commands\\MarketplaceStatusImportCommand in the Data » Log menu. If variation data is not shown on OTTO market as expected, you will find an error message in this menu.
At the least the mandatory fields for the sales channel have to be mapped to PlentyONE data fields. These mandatory fields are different for different product categories. In the catalogue, mandatory fields are marked with an asterisk.
The catalogue that the variation is associated with must be activated.
-
Go to Data » Catalogues.
→ The catalogues are listed. -
Scroll to the OTTO Market catalogue.
-
In the column Active, activate the toggle (toggle_on).
You have confirmed that the above settings are correct but the variation is still not exported? Then check the data log.
-
Go to Data » Log.
-
Use the following filters:
-
Otto itemexport
-
Plenty\Modules\Otto\Item\Services\ItemExportService
-
-
Click Search (search).
-
Check all entries for the levels warning and error.
-
Open the logs containing the message Variation invalid.
→ The the variation ID and the reason for the rejection or the missing characteristic are shown. -
Correct the variation data.
4. Exporting product data
Product data is exported to OTTO Market using catalogues. Catalogues are usually managed via the Data » Catalogues menu. However, you can create catalogues for OTTO Market via the Channel Control Centre as well.
Catalogues are used to export data from your PlentyONE system. There are two different catalogue formats:
-
Marketplace formats are used to export item data to markets.
-
Standard formats are used to export data from your PlentyONE system into a file.
Catalogues with marketplace formats allow you to tailor your item information exactly to the needs of the market. Because here, you assign a suitable PlentyONE data field to each of the data fields of the market. When your variation data is exported to the market, the market’s data fields are then filled with the correct PlentyONE data.
-
Is this your first time working with catalogues? Then read up on the basic concept of catalogues first.
Additionally, to simplify the creation of new catalogues, you can manage them via Channel maps. With Channel maps, you can create cross-category mappings for a sales channel and apply them to catalogues afterwards. All linked catalogues automatically inherit the mapping from the Channel map. This will save you a lot of time as you don’t need to carry out the mappings for each catalogue.
You can find more information on Channel maps in the Channel maps section.
|
Items cannot be deleted at OTTO Market
An item cannot be deleted at OTTO Market, neither by PlentyONE nor by OTTO. It is only possible to mark the item as not available at OTTO Market. Therefore, make extra sure that the correct data fields are mapped in the catalogue prior to transferring your items. |
4.1. Adding catalogue templates
OTTO Market offers an exceedingly large amount of product categories, which is why not all of them are offered as selectable options by default in the Create catalogue menu. Instead, you will first need to manually whitelist the catalogue templates for the product categories in which you want to sell your products before you can select them in the Create catalogue menu. You can whitelist catalogue templates for OTTO Market in the Category whitelist menu in the Channel Control Centre. In order to do so, proceed as follows:
Adding product categories:
-
Go to Sales Channels » Channel Control Centre » [Your OTTO Market sales channel] » Category whitelist.
-
Click on Add categories (add).
-
Select the categories in which you want to offer your products.
Tip: You can use the search bar to find the categories you need more easily. -
Save () the settings.
→ You can now create a catalogue for your selected categories in the Mapping menu.
4.2. Creating a product channel map
To export your items to OTTO Market, create a channel map in the Channel Control Centre. Then link product catalogues to the channel map and map the OTTO Market data fields to item data saved in PlentyONE in the channel map.
Once you have activated the data exchange, product catalogue, listings and variations, your product data is automatically exported to OTTO Market once a day.
First, create a channel map for mapping your product data. To do so, proceed as follows:
Creating a product channel map:
-
Open the menu Sales Channels » Channel Control Centre » [Name of your OTTO Market Sales Channel] » Mapping » Product mapping.
-
Click on Create Channel map (add).
-
Enter a name for the channel map.
-
In the drop-down list Marketplace, select the option OTTO Market.
-
In the drop-down list Catalogue type, select the option Product.
-
In the drop-down list Categories, select the product categories you want to sell on OTTO Market.
-
Click on CREATE CHANNEL MAP.
→ The channel map is created.
Sobald du eine Channel Map für OTTO Market erstellt hast, kannst du als nächstes Kataloge für die verschiedenen Produktkategorien erstellen, die du auf OTTO Market verkaufen willst, und diese Kataloge mit der Channel Map verknüpfen. Gehe hierzu wie folgt vor:
Linking a product catalogue to the channel map:
-
Go to Sales Channels » Channel Control Centre » [Name of your OTTO Market sales channel] » Mapping » Product mapping.
-
In the row of the channel map you want to edit, click on more_vert More and select Connect catalogues.
-
In the drop-down list Select catalogues, click Create catalogue.
-
Enter a name for the catalogue.
-
In the drop-down list Marketplace, select the option OTTO Market.
-
In the drop-down list Export type, select the option Item.
-
In the drop-down list Categories, select the product categories in which you want to sell on OTTO Market.
-
Click CREATE AND CONNECT TO CHANNEL MAP.
→ The catalogue is created and connected to the channel map.
4.3. Particularities for mapping data fields
Every market structures item data differently. As such, there are some particularities for each market when mapping data fields. Table 4 contains mapping information for important data fields for OTTO Market.
| Marketplace data field | PlentyONE data field | ||||||||||
|---|---|---|---|---|---|---|---|---|---|---|---|
Model name |
The model name can contain up to 70 characters. |
||||||||||
Special features |
The special features can contain up to 70 characters. |
||||||||||
Set info |
Set info can contain up to 70 characters. |
||||||||||
Product description |
The product description can contain up to 2000 characters. |
||||||||||
Category group |
OTTO Market publishes current information in the category list “Kategorienliste”. Open the tab "Merkmalsliste" (characteristics list). Note: Via the link, the category list "Kategorienliste" can be downloaded as XLSB file. You can open XLSB files with Excel (version 2007 and newer) and LibreOffice Calc. |
||||||||||
Brand |
Certain brands have to be authorised by OTTO. Those brands must not be sold on OTTO Market if they have not been authorised by OTTO before. For further information on those brands, refer to the OTTO help desk. |
||||||||||
Category |
OTTO Market publishes current information in the category list “Kategorienliste”. Open the tab "Übersicht Categories" (categories overview). This document is only available in German. |
||||||||||
"My Otto" Identification Number |
The "My Otto" Identification Number (MOIN) is a unique product barcode assigned by OTTO Market. From 11/08/2021, OTTO market assigns a unique MOIN to every variation.
The workflow is the same in both cases:
|
||||||||||
Stock |
Note: Items may only be shipped from foreign warehouses after this has been agreed upon with OTTO. Furthermore, items may only be shipped to customers located in Germany, unless otherwise agreed upon with OTTO. There are several ways to export stock data:
Note: If you map no warehouse and no property to the marketplace data field Stock, the sum of the net stock of all sales warehouses is exported to OTTO Market. This is the same as mapping the PlentyONE data field Virtual warehouse. |
||||||||||
Sales price currency; |
OTTO Market can only process the currency EURO. For this reason, these marketplace data fields are filled with the value “EUR” automatically. |
||||||||||
Sales price amount; |
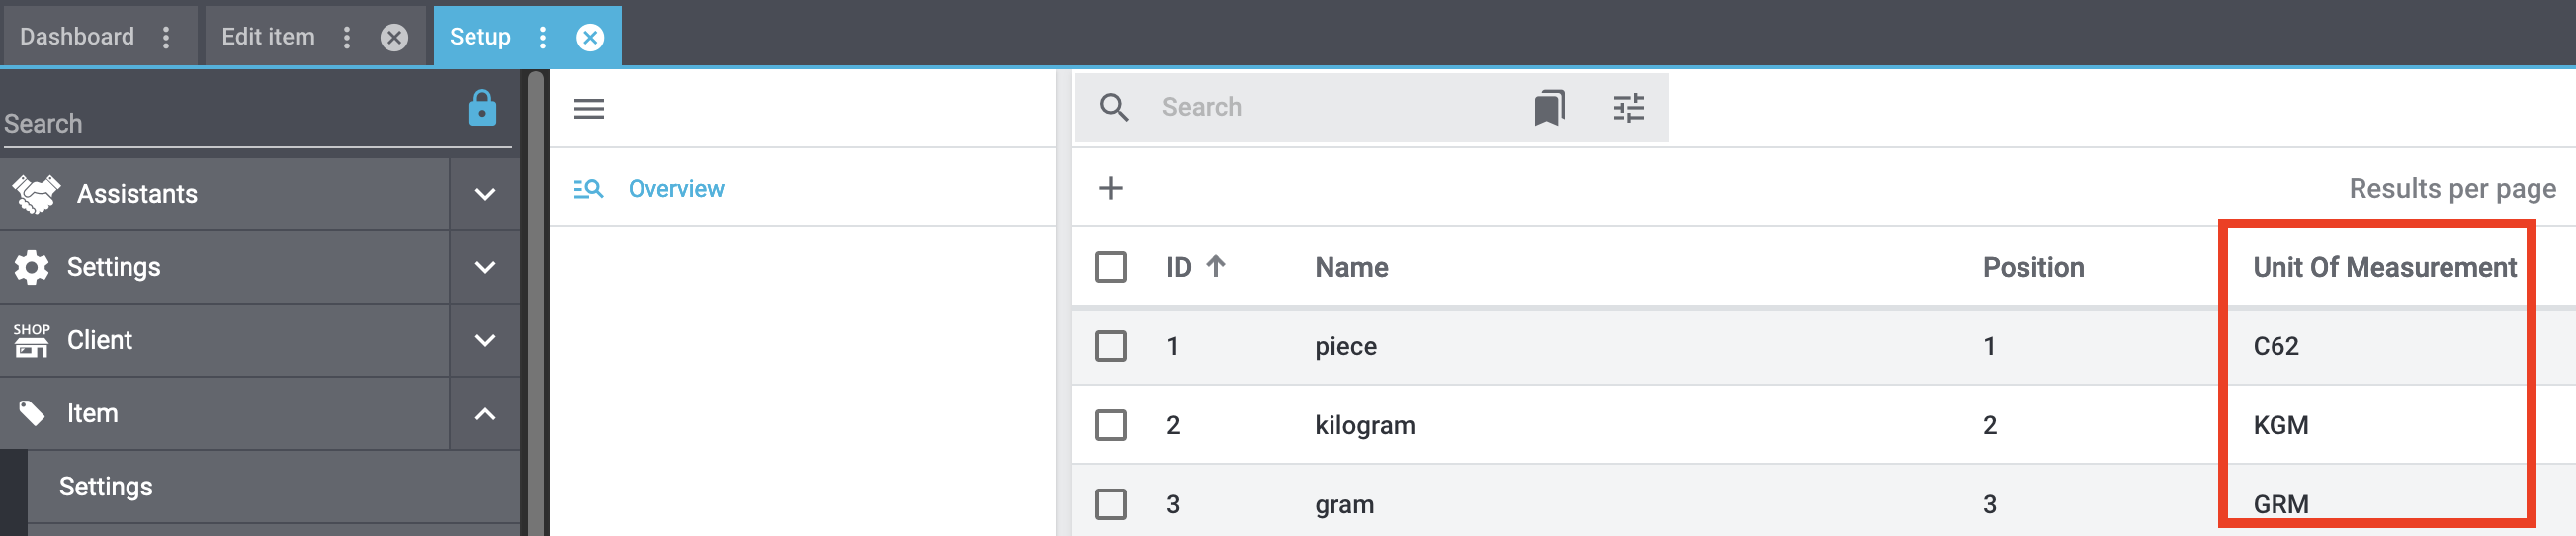
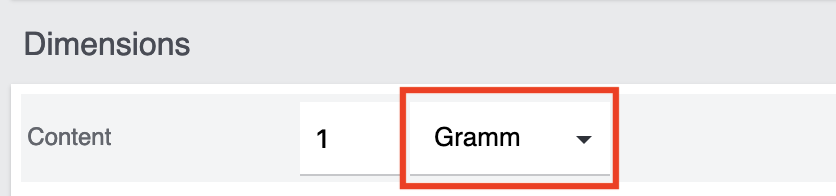
OTTO Market uses these marketplace data fields to calculate the unit price of variations. Important: To export the unit price to OTTO Market, content and unit information must be saved for the variation. To save this information, go to Item » Items » [Open variation] » Area: Content / Dimensions, enter a Quantity and select a Unit. We recommend the following mappings for unit price calculation:
|
||||||||||
Shipping profile |
Select an OTTO shipping profile from the drop-down list and map it to a PlentyONE shipping profile (Shipping profile » [Select shipping profile]). |
||||||||||
Processing time |
Select the processing time from the drop-down list. The processing time is the time from the order intake to the readiness for shipment. |
||||||||||
Media Assets |
|||||||||||
Image |
Recommendation: Map the PlentyONE data field Image » item/catalogs/variation/image.image-image.
This data field exports all images that are made available for the referrer OTTO Market. Note: The minimum dimensions for images uploaded to OTTO Market are 500 x 1000 pixels. |
||||||||||
Other media asset data fields |
Only URLs to files can be exported for media asset data fields. The only exception to this rule is the data field Images (see above). All URLs in the Media assets area can contain up to 2083 characters. Recommended mapping:
|
||||||||||
Length specifications |
Lengths specifications have to be indicated with a dot. Otherwise, the values will not be exported correctly. Example: 2.5 m |
||||||||||

4.3.1. Mapping attributes for electrical devices and WEEE take back
As of 1 January 2022, sellers are legally obliged to offer collection of an equivalent old device when customers buy a new electrical device.
For OTTO market, you can use the attributes Geräteart laut ElektroG (type of electrical device) and WEEE-Reg.-Nr. DE to indicate whether it is an electrical device or whether WEEE take back is possible. Match these attributes with PlentyONE data fields in the Category group related attributes section of the corresponding OTTO market catalogue.
Information about WEEE take back in the order
If the order contains an electrical device and customers request WEEE take back, an OrderItemProperty with the ID 92 is added to the relevant order item of the order and the text "[inkl. Altgerätemitnahme/incl. WEEE take back]" is added to the item name.
4.3.2. Activating the catalogue export
You have set up OTTO Market in PlentyONE and created a catalogue for exporting your item data? Then start the export of your item data. To do so, activate the catalogues which should be exported to OTTO Market in the Data » Catalogues menu.
Activating the catalogue export to OTTO Market:
-
Go to Data » Catalogues.
→ The catalogues are listed. -
Scroll to the OTTO Market catalogue.
-
In the Active column, move the toggle button to the right ().
→ The catalogue is active.
→ The catalogue data is exported to OTTO Market daily.
Tip: Go to Data » Catalogue export status for information about the status of the export.
5. Providing information on manufacturer and EU-responsible person (GPSR)
The General Product Safety Regulation of the EU (GPSR) requires manufacturers and sellers to ensure the product safety of certain goods and to provide certain information for this purpose. This information includes details about the manufacturer and, in the case of manufacturers without an establishment in the EU, details about the responsible person within the EU. The GPSR regulation ensures that products are safe and comply with consumer protection requirements before being placed on the market.
In the following chapters, you will learn how to add information on the manufacturer and the responsible person within the EU in PlentyONE to comply with the GPSR regulation.
5.1. Prerequisites for GPSR compliance
-
In the Setup » Item » Manufacturers menu, fill in the required fields for the EU responsible person for each of your manufacturers.
-
Select the manufacturer at item level to transfer the manufacturer data to OTTO Market.
| Field name | Description |
|---|---|
EU Responsible Name |
Enter the name of the EU-responsible person. |
EU Responsible Street |
Enter the street of the EU-responsible person. |
EU Responsible House No |
Enter the house number of the EU-responsible person. |
EU Responsible Post Code |
Enter the postcode of the EU-responsible person. |
EU Responsible Town |
Enter the town of the EU-responsible person. |
EU Responsible Country |
Enter the country of the EU-responsible person. |
EU Responsible Email |
Enter the email address of the EU-responsible person. |
EU Responsible Phone number |
Enter the telephone number of the EU-responsible person. |
5.2. Mapping in the OTTO Market catalogue
The following table lists the required fields for information on the EU responsible person. Once you’ve entered the details in the Setup » Item » Manufacturers menu and selected the manufacturer at item level, the data will automatically be mapped to the corresponding data fields in the OTTO Market catalogue.
The mandatory fields are located in the Product Safety Distributor section.
Note: In catalogues for food and animal feed products, the mandatory fields for the EU-responsible person are located in the Food Information section.
| Sales channel field | Mandatory? | Recommended PlentyONE mapping |
|---|---|---|
Product safety - Distributor |
||
Product safety - Distributor name |
yes |
|
Product safety - Distributor address |
yes |
Combine the following data fields via Add data source (link):
|
Product safety - Distributor country code |
no |
|
Product safety - Distributor mail address |
no |
|
Product safety - URL for distributor contact data |
no |
|
Product safety - Distributor phone number |
no |
|
Food information |
||
Food information - Name |
yes |
|
Food information - Address |
yes |
|
Food information - Country code |
no |
|
Food information - Mail address |
no |
|
Food information - URL for contact data |
no |
|
Food information - phone number |
no |
|
5.2.1. Optional mapping of the manufacturer
Optionally, you can also add information for a second manufacturer in the Product Safety Manufacturer section.
| Sales channel field | Mandatory? | Recommended PlentyONE mapping |
|---|---|---|
Product safety - Manufacturer name |
no |
|
Product safety - Manufacturer address |
no |
Combine the following data fields via Add data source (link):
|
Product safety - Country code |
no |
|
Product safety - Manufacturer mail address |
no |
|
Product safety - URL for manufacturer contact data |
no |
|
Product safety - Manufacturer phone number |
no |
|
6. Deactivating items on OTTO Market
Variations cannot be sold on OTTO Market if they do not have stock in PlentyONE. As stock data is transferred to OTTO Market every 15 minutes, variations without stock are deleted automatically. If a variation has stock again in PlentyONE, it is offered again on OTTO Market with the next stock export.
If you do not want to sell a variation which is in stock in PlentyONE on OTTO Market, then you have to delete the availability for the market and update the timestamp for market exports.
Deleting the availability:
-
Go to Item » Items » [Open item] » [Open variation] » Area: Sales channels.
-
Delete () the availability OTTO market.
-
Save () the settings.
After you removed the availability, you have to Update the timestamp for market exports using the Item group function. This ensures that a stock of 0 is transferred to OTTO Market.
Updating the timestamp for market exports:
-
Go to Item » Items.
-
Select the items whose timestamps you want to update.
-
Click on Group function (layers) and select Item group function.
→ The Item group function menu is opened. -
Click on the Actions drop-down menu and place a check mark next to Update item timestamp for market exports.
-
Click on Execute.
→ A stock of 0 is transferred to OTTO Market.
→ The variation is deactivated on OTTO Market and cannot be bought any longer.
7. Managing listings
You create and manage offers for OTTO Market via listings. You can access the product and offer listings for OTTO Market by navigating to Sales Channels » Channel Control Centre » [Open OTTO Market sales channel] and then opening the Offer listings or Product listings menu.
7.1. Offer listings
In the list Offer listings menu of the account you gain an overview of your offer listings.
Tip: You can switch between specific views of offers and the listing group view via the menu button and folder.
-
menu gives you an overview of all the offer listings.
-
folder shows you the listing groups of the offer listings. Extend a listing group by clicking chevron_right, to see all listings within the group.
| If you only want to take a look at certain offer listings, apply filters and narrow down the listings which are displayed. To do so, click on Filters (tune) at the top of the menu. |
Applying filters:
-
Go to Sales Channels » Channel Control Centre » [Open sales channel] » Offer listings.
-
Click Filters (tune) at the top of the menu.
-
Select one or multiple filters.
-
Click Search (search).
→ The selected filters are applied and the appropriate offer listings are displayed.
→ The filters that were applied are displayed at the top of the menu.
Tip: You can also reset (refresh) the selected filters. Then all offer listings will be displayed again.
Table 8 offers an overview of the single listing view of offer listings.
| Column | Explanation | ||||||
|---|---|---|---|---|---|---|---|
Data sync |
This column indicates whether data exchange for the offer listing is active or paused. |
||||||
Group ID |
The ID of the listing group to which the offer listing is assigned. By clicking on the ID, you can open the listing group view. |
||||||
Listing Name |
Name of the offer listing. |
||||||
SKU |
SKU of the offer listing. |
||||||
Variation ID |
ID of the variation. |
||||||
Channel |
The sales channel to which the listing is exported. |
||||||
Status on Channel |
Displays the listing status on the sales channel, for example if the listing is already listed on the sales channel. Possible status are:
Note: For platforms with multiple sales channels, the number after the status icon indicates on how many sales channels the offer listing has this status. |
||||||
List on |
The sales channels on which the offer listing is to be offered are displayed here. |
||||||
Errors |
Indicates whether the listing is incorrect. Click to open the overview of listing errors. |
||||||
Template |
The template selected for the listing. |
||||||
Catalogue |
The catalogue selected for the listing. |
||||||
Creation date |
The date and time on which the listing was created. |
||||||
more_vert |
Click here to display more actions.
|
Table 9 offers an overview of the group view of offer listings.
| Column | Explanation | ||||||
|---|---|---|---|---|---|---|---|
Data sync |
This column indicates whether data exchange for the listing group is active or paused. |
||||||
Group name |
Name of the listing group |
||||||
SKU |
SKU of the listing group. |
||||||
Channel |
The sales channel to which the listing group is exported. |
||||||
Errors |
The error overview. |
||||||
Template |
The template selected for the listing group. |
||||||
Catalogue |
The catalogue selected for the listing group. |
||||||
Creation date |
The date and time on which the listing group was created. |
||||||
more_vert |
Click here to display more actions.
|
7.2. Product listings
In the list Product listings menu of the account you gain an overview of your product listings.
Tip: You can switch between specific views of product listings and the listing group view via the folder button.
-
menu gives you an overview of all the product listings.
-
folder shows you the listing groups of the product listings. Extend a listing group by clicking chevron_right, to see all listings within the group.
| If you only want to take a look at certain product listings, apply filters and narrow down the listings which are displayed. To do so, click on Filters (tune) at the top of the menu. |
Applying filters:
-
Go to Sales Channels » Channel Control Centre » [Open sales channel] »Product listings.
-
Click Filters (tune) at the top of the menu.
-
Select one or multiple filters.
-
Click Search (search).
→ The selected filters are applied and the appropriate product listings are displayed.
→ The filters that were applied are displayed at the top of the menu.
Tip: You can also reset (refresh) the selected filters. Then all product listings will be displayed again.
Table 10 offers an overview of the single listing view of product listings.
| Column | Explanation | ||||||
|---|---|---|---|---|---|---|---|
Data sync |
This column indicates whether data exchange for the product listing is active or paused. |
||||||
Group ID |
The ID of the listing group to which the product listing is assigned. By clicking on the ID, you can open the listing group view. |
||||||
Listing Name |
Name of the listing. |
||||||
Variation ID |
ID of the variation. |
||||||
Channel |
The sales channel to which the listing is exported. |
||||||
Status on Channel |
Displays the listing status on the sales channel, for example if the listing is already listed on the sales channel. Possible statuses are:
Note: For platforms with multiple sales channels, the number after the status icon indicates on how many sales channels the offer listing has this status. |
||||||
List on |
The sales channels on which the product listing is to be offered are displayed here. |
||||||
Errors |
Indicates whether the listing is incorrect. Click to open the overview of listing errors. |
||||||
Template |
The template selected for the listing. |
||||||
Catalogue |
The catalogue selected for the listing. |
||||||
Creation date |
The date and time on which the listing was created. |
||||||
more_vert |
Click here to display more actions.
|
Table 11 offers an overview of the group view of product listings.
| Column | Explanation | ||||||
|---|---|---|---|---|---|---|---|
Data sync |
This column indicates whether data exchange for the listing group is active or paused. |
||||||
Group name |
Name of the listing group |
||||||
Channel |
The sales channel to which the listing group is exported. |
||||||
Errors |
The error overview. |
||||||
Template |
The template selected for the listing group. |
||||||
Catalogue |
The catalogue selected for the listing group. |
||||||
Creation date |
The date and time on which the listing group was created. |
||||||
more_vert |
Click here to display more actions.
|
7.3. Creating listings
Offers are transferred to OTTO Market as listings. Carry out the following steps to create listings for OTTO Market.
-
If the item you want to sell is not listed on the sales channel yet you will need to create a product listing for it first. Creating a product listing sends the product data to the sales channel and allows for the item to be listed.
In order to actually be able to sell the item on the sales channel you will need to additionally create an offer listing. The offer listing contains data related to the sale of the item, such as its price and stock. In other words, a product listing allows you to list an item on a sales channel that did not previously exist on that sales channel, but in order to sell that item on that sales channel you also need an offer listing for that item. -
If the item you want to sell is already listed on the sales channel you only need to create an offer listing. Offer listings send the data related to your offer, such as the price, stock, shipping costs etc., to the sales channel.
In most cases you will only need an offer listing in order to offer a product on a sales channel. Many sales channels do not differentiate between product and offer listings. You only need to send offer listings to these kinds of sales channels.
7.3.1. Creating product listings
Product listings are created in three steps:
-
First, you enter listing details, meaning you select the platform, template, and catalogue for the listing.
-
Next, you select the variations from which the product listings are created.
-
Lastly, check and confirm your selection and create the listings.
|
Create product listings using the group function
You can also create product listings directly in the Items menu using the variation group function. You can find more information about the variation group function here. |
Step 1: Specify listing details:
-
Go to Sales Channels » Channel Control Center.
-
Open the Sales Channel for OTTO Market.
→ The General settings menu opens. -
Open the menu format_list_bulleted Product listings.
-
Click on add Create products.
→ The view Create products opens. -
Select the platform OTTO Market.
-
Select the template for the catalogue.
-
Select a catalogue with your mapping for item data.
Tip: If you have no fitting catalogue yet, click on add Create catalogue. You will be forwarded to the Data » Catalogues menu and can create a catalogue. -
Optional: Activate Automatically activate listings after creation, if listing data should be automatically transferred to OTTO Market after the listing is created.
-
Click arrow_forward NEXT.
→ The Select variations view opens. Next, select the variations you want to add to the listing.
Step 2: Select variations:
-
Select the variations you want to create the product listing for.
Tip: Use the search to filter for variations.
Note: Only variations that are linked to OTTO Market in the Item » Items » [Open item] » [Open variation] menu are displayed.
Tip: If you want to create a product listing for all available variations, click on Click here to create listings for all [] variations above. You will be automatically redirected to the Preview and confirmation step. Product listings can be created for a maximum of 50,000 variations at a time. -
Click add ADD TO SELECTED VARIATIONS.
→ The selected variations are displayed in the Selected variations section.
Note: If you check a variation in the Selected variations section, you can remove the variation from the selection by clicking Remove from list. -
Click arrow_forward NEXT.
→ The selected variations will be displayed in a new view. In the last step, you preview and confirm your selection.
Step 3: Preview and confirm selection:
-
Preview your settings in the Listing details section.
-
Preview your selected variations in the Listing preview section. The listings are grouped by items. Extend a listing group (chevron_right) to see which variations are contained in the respective listing group.
-
If everything is set and done, click save CREATE PRODUCT LISTINGS.
Note: If you activated Automatically activate listings after creation a window with a summary of your settings opens. Click check CONFIRM to create the product listings.
7.3.2. Activating product listings
After you have created the product listings, you have to activate the listings so that they can be transferred to OTTO Market.
To do so, activate the individual listings and the listing group. The listing can only be transferred to the sales channel if both the listing and the listing group are activated.
Note: You can also activate listings immediately after creation by activating the option Automatically activate listings after creation. If you activate the option to automatically activate listings after creation, you still have to activate the data exchange for the listing group.
Activating product listings:
-
Go to Sales Channels » Channel Control Center » [Open OTTO Market].
→ The General settings menu opens. -
Open the Product listings menu.
-
In the line of the product listing you want to activate, click more_vert.
-
Click toggle_on Activate data sync.
Tip: If you want to activate multiple product listings at once, place a check mark next to the desired product listings and click toggle_on arrow_drop_down » Activate data sync at the top of the toolbar.
→ The data exchange for the listing is activated. The listing can only be transferred to the sales channel if the listing group is also activated.
Activating a listing group:
-
Go to Sales Channels » Channel Control Center » [Open OTTO Market].
→ The General settings menu opens. -
Open the Product listings menu.
-
Open the listing group view (folder).
-
In the line of the listing group you want to activate, click more_vert.
-
Click toggle_on Activate data sync.
Tip: If you want to activate multiple listing groups at once, place a check mark next to the desired listing groups and click toggle_on arrow_drop_down » Activate data sync at the top of the toolbar.
→ The data exchange for the listing group is activated.
7.3.3. Viewing listing errors
The Errors tab of the Sales Channels » Channel Control Centre » [Open sales channel] » Offer listings / Product listings menu provides an overview of all errors that occurred in PlentyONE when exporting your product and offer listings.
Tip: The overview of listing errors is only displayed if at least one error has occurred when exporting the listings.
Here you can see:
-
the affected listings
-
error details
For each error, you can download a CSV file containing the affected listings by clicking the download button. You can correct the errors directly in the CSV file. You can then re-import the corrected CSV file.
Table 12 contains an overview of listing errors.
| Column | Explanation |
|---|---|
keyboard_arrow_down [Information about the error] |
Information about the error is provided here. It contains the affected field of the data record, a brief description of the error and the number of listings for which this error has occurred. |
download Download data as CSV |
The CSV file with the data records is downloaded. |
Listing name |
The name of the listing. |
Parent SKU |
The parent SKU of the main variation. |
SKU |
The SKU of the sub-variation. |
Variation ID |
The ID of the variation. |
Channel |
The sales channel to which the listing is exported. |
Export activity |
Shows whether the variation is being exported.
|
Status |
The listing’s status on the sales channel. Possible statuses are:
|
Errors |
The error overview. |
Template |
The template selected for the listing. |
Catalogue |
The catalogue selected for the listing. |
8. Automating order processing
You can create event-based flows to automatically inform OTTO Market about changes to the order status. The following actions are available for OTTO Market in the PlentyONE Flow Studio:
-
Automatically inform OTTO Market that an order has been shipped. (How?)
-
Automatically inform OTTO Market that an order has been cancelled. (How?)
-
Automatically inform OTTO Market that a return request has been submitted. (How?)
-
Automatically inform OTTO Market that a return request has been rejected. (How?)
-
Automatically generate return labels for OTTO Market. (How?)
With PlentyONE Flow (short: "Flow"), you can automate workflows for your business processes. Flow provides you with two functions in the Automation menu:
-
In Flow Studio you create and configure automated workflows. Depending on the trigger type, there are three flow types: event- based, time-based or manual.
-
In the Flow Tracker, you can monitor ongoing or finished workflows.
The central element in both functions is the Canvas - a graphical interface on which the workflows are visualised with Actions and Controls. In Flow Studio the canvas can be edited, in Flow Tracker it is only used for visualisation and is therefore read-only.
-
Is this your first time working with PlentyONE Flow? Then read up on the basic concept of Flow first.
8.1. Send shipping confirmations to OTTO Market
Create an event-based flow to automatically inform OTTO Market that an order has been shipped.
-
Go to Automation » Flow Studio.
-
Click Create flow (add).
→ A stepper opens and guides you through the following three steps.-
General
-
Enter a unique name and, if necessary, a description for the new flow.
-
Click Next.
-
-
Trigger
-
Select Event-based as the trigger.
-
Click Next.
-
-
Settings
-
If desired, select a UI from the optional drop-down list Flow available in.
→ The option to manually trigger the flow directly from the selected UI is added to the group functions in that UI.
Note: UIs currently selectable: Order UI. -
From the drop-down list Trigger selection, select the event according to Table 13.
Note: If the trigger event has additional settings, then these are invariably mandatory. Without performing these settings, you will not be able to save the flow. -
Save () the settings.
→ The flow is created.
→ The Flow Studio Canvas appears, on which two elements are already displayed: The trigger type and the placeholder for the next step.
Note: With some event-based flows you cannot save the flow if it consists of only a trigger. In such cases, you need to add at least one further step.
-
-
-
Configure the new flow according to Table 13.
-
Save () the settings.
Note: The selected statuses, controls and filters in Table 13 only serve as an example. Select the status, controls and filters for the flow which best suit your workflow.
| Setting | Option | Selection | |||||||||
|---|---|---|---|---|---|---|---|---|---|---|---|
Trigger selection |
Select a trigger, for example:
|
Select an order status, for example:
|
|||||||||
Controls |
Branch |
|
|||||||||
Actions |
Plugin (Legacy) |
Send shipping information to OTTO |
8.2. Reporting cancellations to OTTO Market
Create an event-based flow to automatically inform OTTO Market that an order has been cancelled.
-
Go to Automation » Flow Studio.
-
Click Create flow (add).
→ A stepper opens and guides you through the following three steps.-
General
-
Enter a unique name and, if necessary, a description for the new flow.
-
Click Next.
-
-
Trigger
-
Select Event-based as the trigger.
-
Click Next.
-
-
Settings
-
If desired, select a UI from the optional drop-down list Flow available in.
→ The option to manually trigger the flow directly from the selected UI is added to the group functions in that UI.
Note: UIs currently selectable: Order UI. -
From the drop-down list Trigger selection, select the event according to Table 14.
Note: If the trigger event has additional settings, then these are invariably mandatory. Without performing these settings, you will not be able to save the flow. -
Save () the settings.
→ The flow is created.
→ The Flow Studio Canvas appears, on which two elements are already displayed: The trigger type and the placeholder for the next step.
Note: With some event-based flows you cannot save the flow if it consists of only a trigger. In such cases, you need to add at least one further step.
-
-
-
Configure the new flow according to Table 14.
-
Save () the settings.
Note: The selected statuses, controls and filters in Table 14 only serve as an example. Select the status, controls and filters for the flow which best suit your workflow.
| Setting | Option | Selection | |||||||||
|---|---|---|---|---|---|---|---|---|---|---|---|
Trigger selection |
Select a trigger, for example:
|
Select an order status, for example:
|
|||||||||
Controls |
Branch |
|
|||||||||
Actions |
Plugin (Legacy) |
Send cancellation to OTTO |
8.3. Report returns to OTTO Market
Create an event-based flow to automatically inform OTTO Market that a return has been requested.
-
Go to Automation » Flow Studio.
-
Click Create flow (add).
→ A stepper opens and guides you through the following three steps.-
General
-
Enter a unique name and, if necessary, a description for the new flow.
-
Click Next.
-
-
Trigger
-
Select Event-based as the trigger.
-
Click Next.
-
-
Settings
-
If desired, select a UI from the optional drop-down list Flow available in.
→ The option to manually trigger the flow directly from the selected UI is added to the group functions in that UI.
Note: UIs currently selectable: Order UI. -
From the drop-down list Trigger selection, select the event according to Table 15.
Note: If the trigger event has additional settings, then these are invariably mandatory. Without performing these settings, you will not be able to save the flow. -
Save () the settings.
→ The flow is created.
→ The Flow Studio Canvas appears, on which two elements are already displayed: The trigger type and the placeholder for the next step.
Note: With some event-based flows you cannot save the flow if it consists of only a trigger. In such cases, you need to add at least one further step.
-
-
-
Configure the new flow according to Table 15.
-
Save () the settings.
Note: The selected statuses, controls and filters in Table 15 only serve as an example. Select the status, controls and filters for the flow which best suit your workflow.
| Setting | Option | Selection | |||||||||
|---|---|---|---|---|---|---|---|---|---|---|---|
Trigger selection |
Select a trigger, for example:
|
Select an order status, for example:
|
|||||||||
Controls |
Branch |
|
|||||||||
Actions |
Plugin (Legacy) |
Send return notification to OTTO |
8.4. Report return rejections to OTTO Market
Create an event-based flow to automatically inform OTTO Market that a return request has been rejected.
-
Go to Automation » Flow Studio.
-
Click Create flow (add).
→ A stepper opens and guides you through the following three steps.-
General
-
Enter a unique name and, if necessary, a description for the new flow.
-
Click Next.
-
-
Trigger
-
Select Event-based as the trigger.
-
Click Next.
-
-
Settings
-
If desired, select a UI from the optional drop-down list Flow available in.
→ The option to manually trigger the flow directly from the selected UI is added to the group functions in that UI.
Note: UIs currently selectable: Order UI. -
From the drop-down list Trigger selection, select the event according to Table 16.
Note: If the trigger event has additional settings, then these are invariably mandatory. Without performing these settings, you will not be able to save the flow. -
Save () the settings.
→ The flow is created.
→ The Flow Studio Canvas appears, on which two elements are already displayed: The trigger type and the placeholder for the next step.
Note: With some event-based flows you cannot save the flow if it consists of only a trigger. In such cases, you need to add at least one further step.
-
-
-
Configure the new flow according to Table 16.
-
Save () the settings.
Note: The selected statuses, controls and filters in Table 16 only serve as an example. Select the status, controls and filters for the flow which best suit your workflow.
| Setting | Option | Selection | |||||||||
|---|---|---|---|---|---|---|---|---|---|---|---|
Trigger selection |
Select a trigger, for example:
|
Create a new order status for rejected return requests for this flow. |
|||||||||
Controls |
Branch |
|
|||||||||
Actions |
Plugin (Legacy) |
Send return rejected notification to OTTO |
8.5. Generate return labels
When OTTO Market orders are imported into your PlentyONE system, return labels must be generated for those orders before the shipping confirmation is sent to OTTO Market. An event-based flow for creating a return label automatically creates a tracking number for a return (retTrackingNumber) which is saved for the order. This is to ensure that a tracking number exists if customers wish to return an item.
To ensure that the tracking number is sent to OTTO Market along with the order confirmation, a return label must be created. At the moment, return labels can be created with DHL, Hermes, and GLS Shipping.
-
Go to Automation » Flow Studio.
-
Click Create flow (add).
→ A stepper opens and guides you through the following three steps.-
General
-
Enter a unique name and, if necessary, a description for the new flow.
-
Click Next.
-
-
Trigger
-
Select Event-based as the trigger.
-
Click Next.
-
-
Settings
-
If desired, select a UI from the optional drop-down list Flow available in.
→ The option to manually trigger the flow directly from the selected UI is added to the group functions in that UI.
Note: UIs currently selectable: Order UI. -
From the drop-down list Trigger selection, select the event according to Table 17.
Note: If the trigger event has additional settings, then these are invariably mandatory. Without performing these settings, you will not be able to save the flow. -
Save () the settings.
→ The flow is created.
→ The Flow Studio Canvas appears, on which two elements are already displayed: The trigger type and the placeholder for the next step.
Note: With some event-based flows you cannot save the flow if it consists of only a trigger. In such cases, you need to add at least one further step.
-
-
-
Configure the new flow according to Table 17.
-
Save () the settings.
Note: The selected statuses, controls and filters in Table 17 only serve as an example. Select the status, controls and filters for the Flow which best suit your workflow.
| Setting | Option | Selection | |||||||||
|---|---|---|---|---|---|---|---|---|---|---|---|
Trigger selection |
Select a trigger, for example:
|
For Order statuses, select a status between Status 1 and Status 2, for example [1.0.1] Accept order, waiting for update. |
|||||||||
Controls |
Branch |
|
|||||||||
Actions |
Order |
Select the flow action that matches your return delivery service provider, for example:
|
9. Viewing the log
The Data » Log menu contains a history of processes that run via the OTTO Market interface.
Note that integrations and identifiers are only shown in the drop-down lists as filters after the process has run at least once.
For OTTO Market, the following filters are recommended:
-
Identifier » Otto Market
-
Go to Data » Log.
-
In the toolbar, click on tune.
-
Select appropriate filters from the drop-down lists.
-
Optional: Select filters for dates and/or times to only show entries from a specific period.
Tip: For information about the filters, refer to the Data log page of the manual. -
Click on Search ().
→ The results are shown. -
Check all entries for the levels warning and error.
Tip: Click on the entry to see details.
10. Price and stock export logs
In the menu Sales Channels » Channel Control Centre » [Open your OTTO Market sales channel] » Data exchange » Price & stock export logs, you can find the logs for price and stock export. The overview shows whether price and stock updates were successfully sent from PlentyONE to OTTO Market or whether errors occurred during data transmission. You can use Filters (tune) to search the log specifically for a certain time period, a specific transmission type (e.g. price or stock), entries with errors or a specific SKU.
Unlike the data log in the Data » Log menu, this overview not only shows whether the processes in PlentyONE were executed successfully. It also directly displays the price and stock values transferred to OTTO Market, as well as additional information about the data transmission. This means you don’t need to open the log files and extract the information from the JSON file.
Important: This log only shows whether the data was transferred to OTTO Market. The log does not contain any information on whether OTTO Market accepted the price or stock updates or has already applied them to your offers.
Table 18 contains an overview of the price and stock export logs.
| Column | Explanation |
|---|---|
Platform |
The OTTO Market platform to which the data was transferred. |
Account |
The ID of your OTTO seller account. |
Export type |
The type of data transmission. Possible values:
|
Transmission ID |
The unique ID of the data transmission. A separate transmission ID is generated for each data transmission to OTTO Market. |
Transmission type |
The type of transferred data. Possible values:
|
SKU |
The SKU of the variation for which data was transferred. |
Value |
The value transferred to OTTO Market for the stock or price. |
Error response |
The error message, if an error occurred during data transmission. |
Transmitted at |
Date and time of the data transmission. |
Retrieving the price and stock export log:
-
Go to Sales Channels » Channel Control Centre » [Open your OTTO Market sales channel] » Data exchange » Price & stock export logs.
-
Optional: Narrow down the search using Filters (tune).
-
Click Search (search).
→ The log entries are displayed.
11. FAQ
This chapter contains answers to frequently asked questions. The information was last updated on 29/03/2022.
11.1. FAQ: General questions and answers
The product title which is displayed on OTTO Market is composed of certain OTTO Market fields that can be mapped in the catalogue. By default the fields that are used for this are Brand, Product category, Model or Product line and Specific characteristics. The exact composition of the product title varies depending on the product title.
In an OTTO catalogue any data fields that have the information Namenbildend indicated in parentheses are additionally used to compose the titles of all items exported via that catalogue.
The product title is split into multiple lines:
-
Line 1: The brand
-
Line 2: The product category and model
-
Line 3: Any special characteristics and any additional data fields tagged as Namenbildend.
The shipping costs for your OTTO Market items need to be configured in the OTTO partner portal. You can enter two kinds of shipping there:
-
Packages
For free shipping, enter the value 0.00. -
Shipping company
For shipments to be carried out by a shipping company, enter a surcharge. This surcharge is then added to the default shipping costs.
Save information about how individual items are to be shipped in the item settings.
The brands and category groups that OTTO Market provides are updated in PlentyONE in the following intervals:
-
Brands: every two hours
-
Category groups: once per day
Brands that you or other sellers register are only available in PlentyONE after the next brand update.
You might want to deactivate your items due to a vacation or for other reasons. To do so, remove the market availability for OTTO Market for the variations.
To deactivate the availability for individual variations, go to Item » Items » [Open variation] » Area: Sales channels.
For multiple variations you can of course use the group function, the import tool or batch processing. You can find a detailed explanation of these tools here.
Important: If you change the main item while the inheritance feature is activated for the availability, you also need to update the timestamp of the market exports. This is also possible using the group function, the import tool or batch processing.
If you have deactivated the market availability, your items are deactivated on OTTO Market within 15 minutes.
Tip: Do not forget to reactivate the market availability when you want to publish your items again.
Items cannot be deleted from the OTTO Market marketplace by a seller. If you want to no longer offer an item on OTTO Market, then you can simply remove its availability in the Items menu. If you absolutely need an item to be deleted in OTTO Market entirely, then you will need to contact OTTO Market directly for this.
You can adjust the SKU manually. However, when you do this, the SKU does not change on OTTO Market. A unique SKU is assigned to your item.
To do so:
-
Take the items offline on OTTO.
Tip: To do so, remove the availability of the item for OTTO Market in the Items menu. -
Update the timestamp for market exports (e.g. using the Item group function)
-
Change the SKU and/or the Parent SKU.
-
Activate the availability again.
→ Your items are exported to OTTO Market with their new SKU in the next nightly item export.
11.2. FAQ: Item data export
Here you can find information on product categorization for OTTO Market. The file provides an overview of the category groups, categories and the associated attributes. This document is only available in German.
In some cases the item export to OTTO Market is successful but an item is still not shown in OPC. The reason could be that OTTO did not accept the variation. Usually, this is because the item data contains an error.
For items to be exported to OTTO, the following basic requirements must be met:
-
In the tab Availability of the variation, the availability OTTO Market must be activated.
-
In the tab Properties of the variation, the property OTTO category group must be linked. The format name of the OTTO catalogue is expected as the value of the property. This mapping assigns the variation to the OTTO catalogue. This OTTO catalogue is identical to the OTTO category group. OTTO expects the name of the format, NOT the name that you saved for the catalogue.
-
The variation is active.
-
The net stock of the variation is positive in the warehouse that is mapped in the catalogue.
-
All mandatory fields are mapped in the catalogue. Mandatory fields in the catalogue are marked with an asterisk.
|
One or more of your variations were not exported? First, go through the checklist: Requirements for exporting variations. |
If your variations meet all requirements and all catalogue mappings are correct, you can consult the log to find out why variations are not exported. You can find out why some of your items are not exported to OTTO Market and therefore are not available on the online market by looking at the following logs.
Searching the logs:
-
Go to Data » Log.
-
From the drop-down list Integration, select the log Plenty\\Modules\\Otto\\Item\\Services\\ItemExportService.
→ All item exports to date are shown. -
In the drop-down list Level, enter first warning and then error and check the results for each.
-
Open the logs containing the message Variation invalid.
→ In the log, you will receive the variation ID and the reason for the rejection or the missing characteristic. -
We have listed possible error messages and solutions below this description.
-
If you cannot find the variation in any of these logs, also use the following filter:
-
Integration: Plenty\\Modules\\Otto\\Item\\Templates\\Mutators\\DefaultSkuMutator
-
Identifier: OTTO Market
-
Requirements: To export the unit price to OTTO, you need to save information regarding the quantity and the unit of that quantity for each variation. Open the variation and save this information in the tab Settings, area Dimensions:
For the option Content, you enter a Content value and select a Content unit.
In the catalogue, the following OTTO Market data fields are necessary to export the unit price:
-
Sales price amount
-
Unit price amount
-
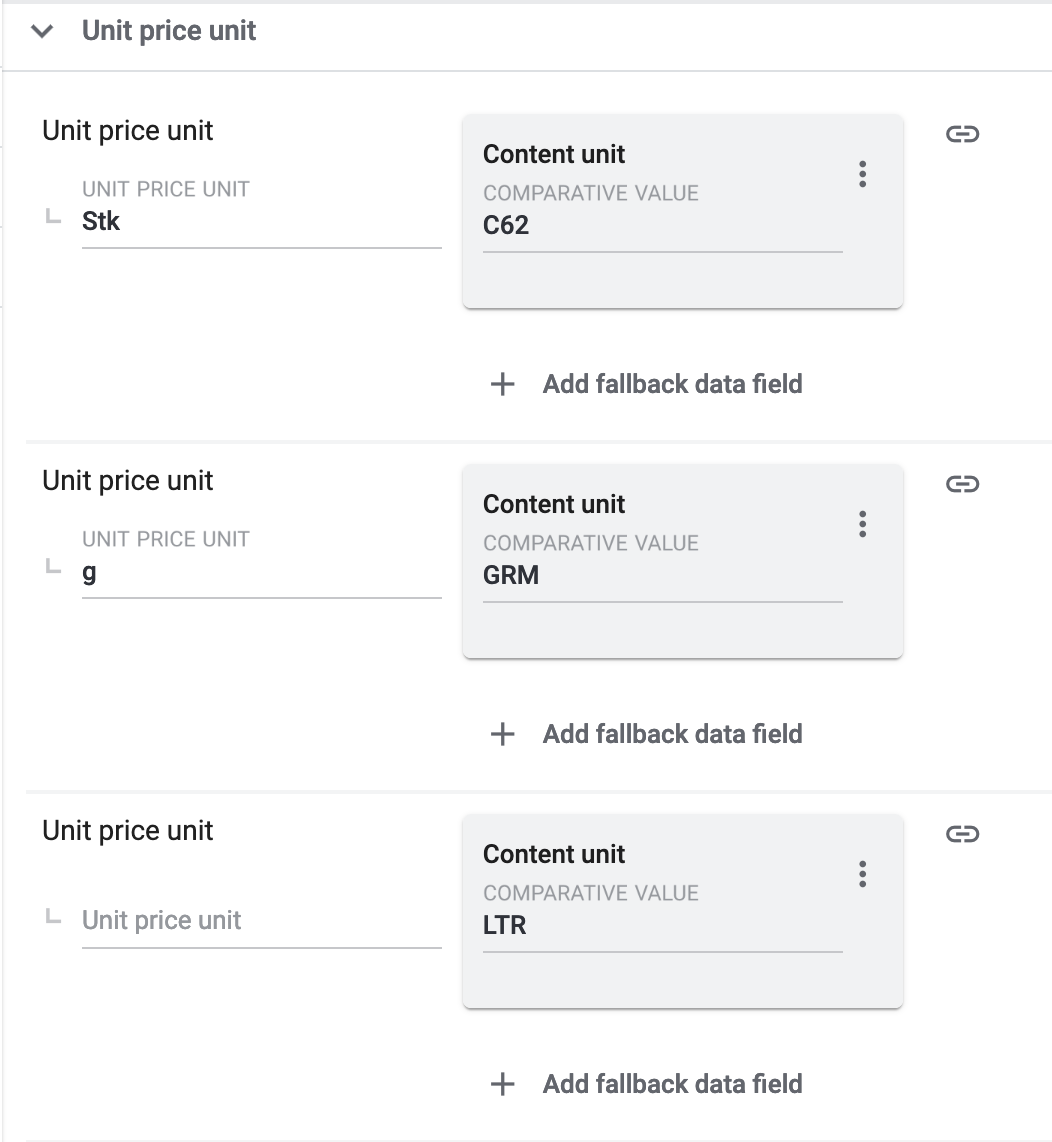
Unit price unit
-
Sales price unit
OTTO calculates the unit price of variations based on this information. The table below provides more details on these data fields.
| OTTO Market data field | Mapping in PlentyONE | Explanation |
|---|---|---|
Sales price amount |
|
The sales price amount is equivalent to the actual quantity or amount of the variation. As such, you need to specify the content of the variation that is saved in the variation’s dimensions. |
Unit price amount |
|
The unit price amount is used to calculate the unit price. OTTO allows the values 1, 100 or 1000. Map this field to a property with values of 1, 100 or 1000. |
Unit price unit |
or
|
The unit price unit relates to the content unit saved in the variation’s dimensions. |
Sales price unit |
or
|
The sales price unit relates to the content value of the variation that is saved in the variation’s dimensions. |
11.3. FAQ: Order processing
In some cases, errors can occur during order processing. Possible causes and frequent errors are described here.
If customers want to pay cash in advance and have not paid yet, OTTO Market assigns the status ANNOUNCED to the order. Orders with this status are imported to PlentyONE without address details and with the status [1] Incomplete data. As soon as the order changes to the status PROCESSABLE at OTTO Market, the address is added tot he order and the order is moved to status [3] Waiting for payment.
Important: No stock is reserved for orders in status [1] Invalid data by default. Use the settings described below to reserve stock for these orders.
Reserving stock for orders with a status of 1:
-
Go to Setup » Orders » Settings.
-
Select the following options for the setting Status for order reservation (Reservation of stocks):
-
Option from: status [1] Incomplete data
-
In the drop-down list to the far right, select the option All orders.
-
-
Save the settings.
→ Stock is reserved for orders with this status.
Note: This setting is applied to all orders, i.e. not just to OTTO Market orders.
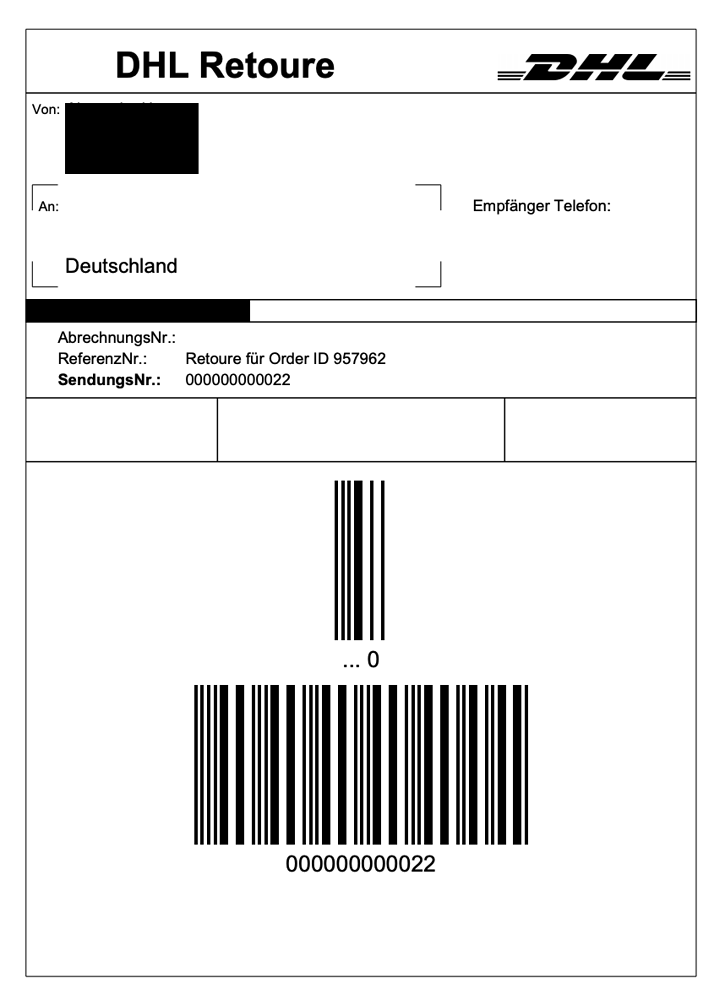
An example of a DHL return label is provided below. The label contains all necessary data.
Problem:
An incomplete order in [1] Incomplete data is cancelled because the customer requests the cancellation. However, the customer still pays the order after a few days. The order is completed, processed and automatically shipped.
Reason and solution:
-
OTTO Market orders in status [1] Incomplete data or [3] Waiting for payment cannot be cancelled by the seller.
-
You can only cancel OTTO Market orders once the orders have reached status [5] Cleared for shipping.
-
OTTO Market automatically cancels incomplete orders after a few days if no payment is received.
The PositionID (example: 715e9369-01e3-4d09-ae91-8688dfa139b2) and the SalesOrderID (example: 4245eac7-4647-4f76-8c48-261afb19aa96) are frequently mentioned in the PlentyONE forum. However, these IDs are not relevant for you as seller. You cannot see these IDs. They serve to identify an order and the order positions in the PlentyONE database.
Orders with the order referrer OTTO Market receive the usual order ID from your PlentyONE system. However, to identify the order, an external order number is saved for the order. With this number, the order can be clearly assigned.
Screenshots illustrating how OTTO Market orders are created in PlentyONE and in the Mein Konto (My account) area at OTTO Market are provided below.
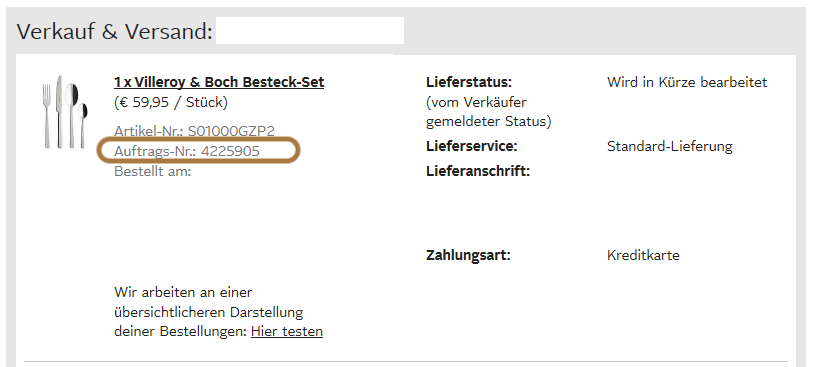
The order number is saved as external order number at the order in PlentyONE.
Find a screenshot of the menu for searching the order with the external order number below:
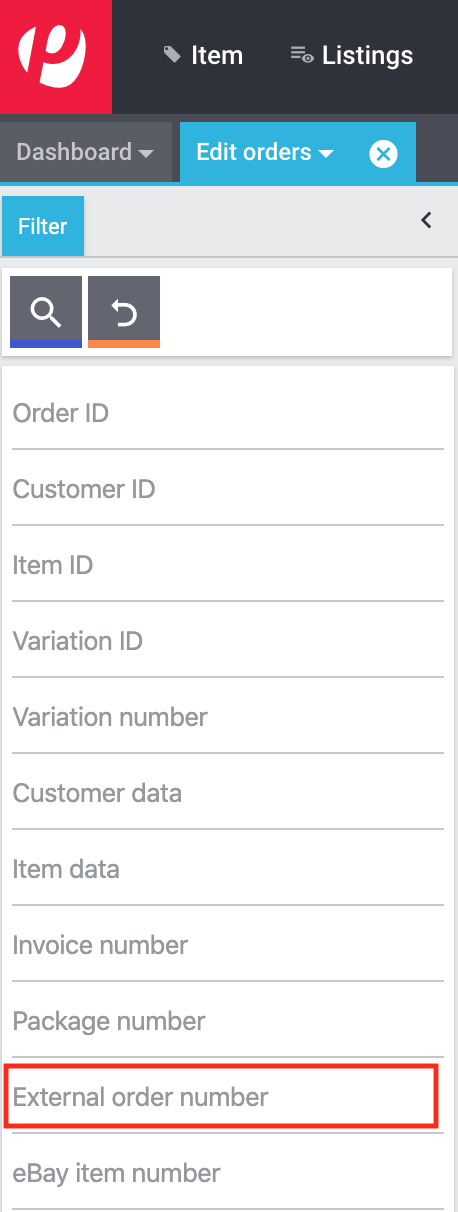
The external order number can be found in the Settings tab of an order (Ext. order number):
If customers have further questions concerning an order, you can find an order by searching for the external order number.
Of course, you can also use the Referrer filter to filter OTTO Market orders.
If no shipping confirmation was sent to OTTO Market, you can check the log for possible causes.
Searching the log:
-
Go to Data » Log.
-
From the drop-down list Identifier, select the option OTTO Market.
-
From the drop-down list Integration, select the log Plenty\\Modules\\Otto\\Order\\Services\\OrderShippingService.
-
Optional: Filter ty the order ID to limit the results:
-
Reference type orderId
-
Reference value your order ID
-
-
In the drop-down list Level, enter first warning and then error and check the results for each.
-
Open the logs containing the message Variation invalid.
→ In the log, you will receive the variation ID and the reason for the rejection or the missing characteristic.
→ The chapter Order processing: Error messages in the log provides information on possible error messages and solutions.
Did you activate the option Import purchase receipts as external invoices in the setup assistant? Then invoices are only imported after a shipping confirmation was sent to OTTO Market.

If this option is active and no invoice document was imported, check the following points:
-
Was the event procedure Send shipping confirmation to OTTO triggered?
-
Does a return label exist for each package number?
-
Are all shipping service providers for OTTO Market linked correctly in the assistant?
-
Is the return service provider configured in PlentyONE the same as the return service provider in OTTO Market’s OPC?
-
Are the addresses of your warehouses correct?
We recommend that you check the log for error messages to find a solution more quickly.
Note that a retroactive invoice import cannot be triggered automatically. In this case, the PlentyONE support needs to import your invoice manually. So post the order ID in the thread for retroactive document imports - invoices.
11.4. Error messages in the log
This chapter provides information and solutions for error messages in the log.
Always check the log if your items were not exported. It provides many error messages so that you can correct the errors yourself. There are several integrations that you should check one after the other.
Find out how here.
-
Go to Data » Log.
-
Filter the results by selecting the following logs one by one for the setting Integration:
-
Plenty\\Modules\\Otto\\Item\\Services\\ItemExportService
-
Integration: Plenty\\Modules\\Otto\\Item\\Templates\\Mutators\\DefaultSkuMutator with the identifier: OTTO Market
-
Plenty\\Modules\\Otto\\Item\\Commands\\ItemReportResultCommand
-
Plenty\\Modules\\Otto\\Item\\Templates\\Mutators\\MediaAssetsMutator
→ All export attempts are shown.
-
-
Check the entries.
Tip: The level tells you if an item was successfully exported or not.
| Level | Explanation |
|---|---|
info |
Log entries with this message usually indicate a successful export. This is an example: 
|
error |
Log entries with this message usually indicate an error during the export. This usually means that your variation is not valid. As such, the variation was not exported. This is an example: 
Messages of this kind can be opened to show more details: 
The example in the screenshot shows an error in the variation with the ID 1167. The problem here is the data field "productDescription.category". |
11.4.1. Error messages in the log: item export
We have listed possible error messages in relation to the item export below.
Check the delivery time mapped in the catalogue in the field Delivery time in days and the variation. In most cases, you can map the availability of your variation:
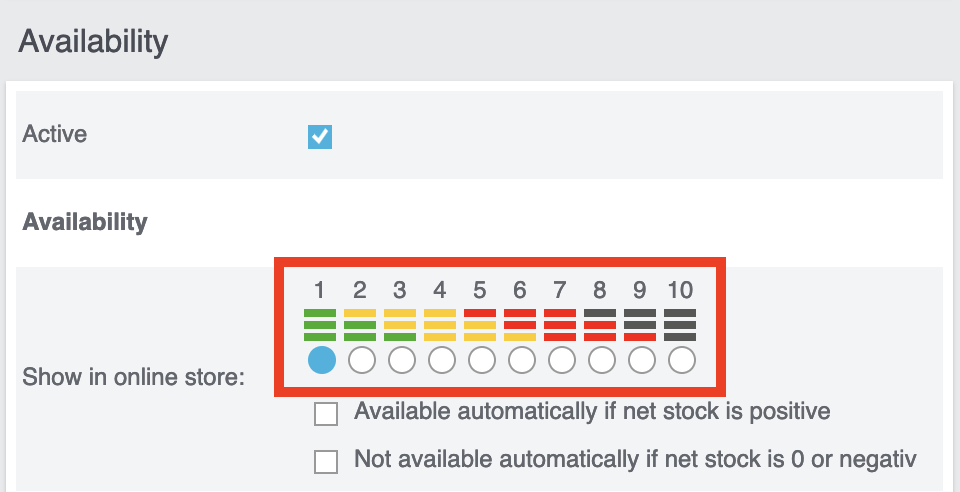
You can find a translation of the individual availability levels in the Setup » Item » Availability menu.
This error indicates that the shipping method is not linked. The shipping method can be defined via two different data fields:
-
via a shipping profile
-
via property
Make sure that the data field saved in the catalogue is linked to the item. For the shipping profile, activate the shipping profile in the item’s tab Global. For the property, activate the property for the desired variation.
-
Check that the variation has a EAN.
-
Check that the barcode mapped in the EAN field of the catalogue matches the barcode type saved for the variation.
-
Go to Setup » Item » Barcode and check that the barcode type is activated for the market OTTO Market.
Both these error messages usually have the same cause. This error indicates that either you did not select a data field as the source in the catalogue or that none of your item images is linked to the referrer OTTO Market.
-
Click on the tab Images of the item.
-
Activate the referrer OTTO market as described in the Setting the availability for images chapter.
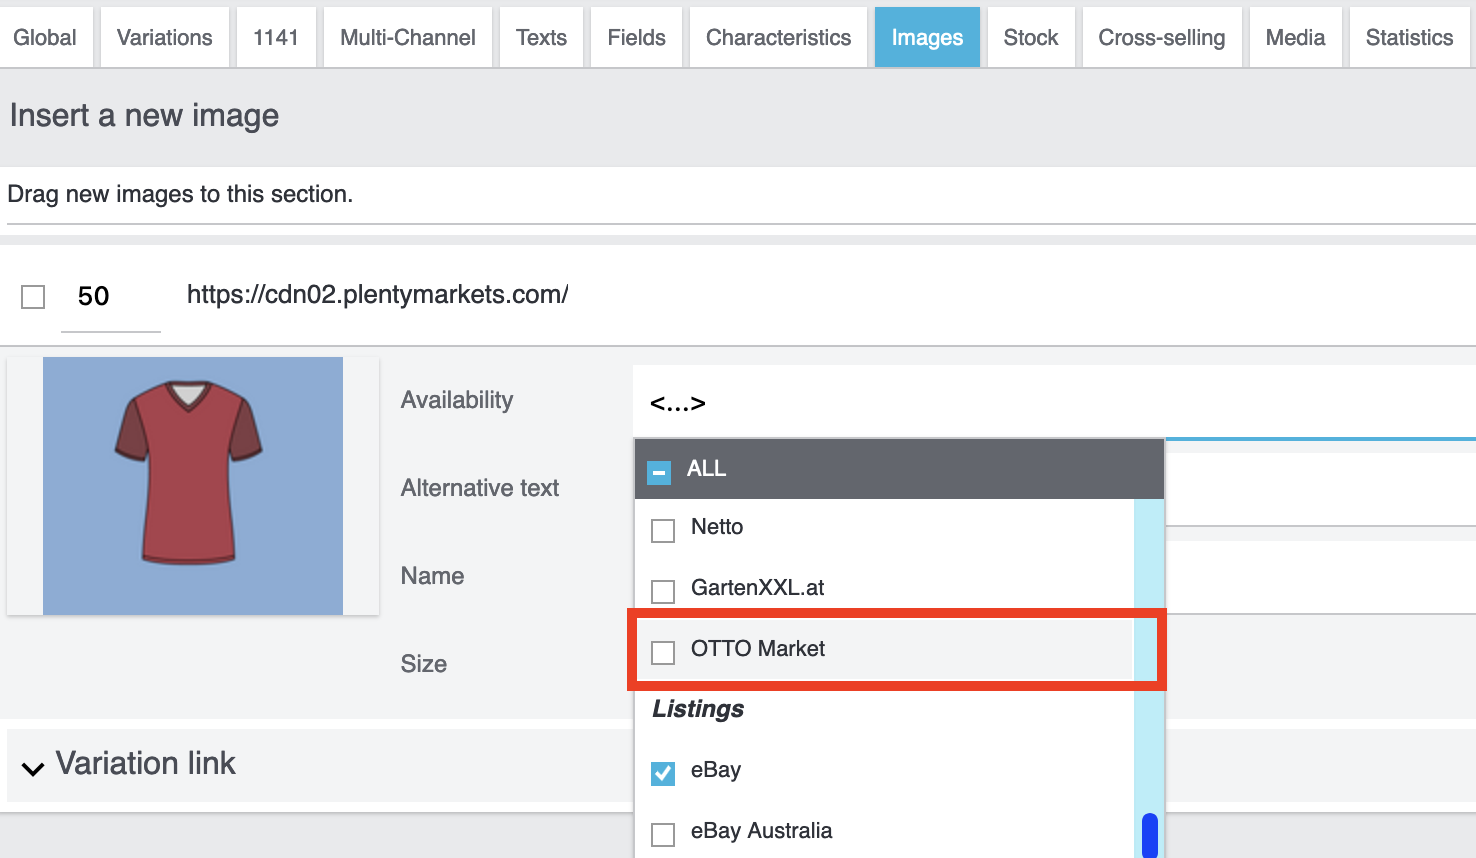
Both these error messages usually have the same cause. Check that the catalogue field Sales price has been mapped to the sales price of the variation. In addition, go to Setup » Item » Sales prices and make sure that the sales price you mapped in the catalogue has been activated for the referrer*OTTO Market*.
This error refers to the VAT rate.
-
The VAT rate must be saved for the variation (Item/Settings in the Costs area).
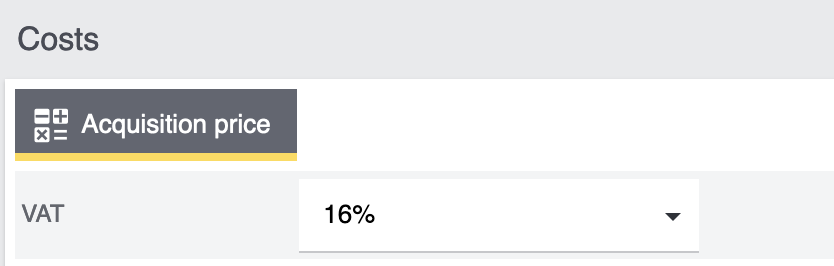
-
The VAT rate must be mapped correctly in the catalogue. For example, the OTTO value (under VAT) and the mapping to the VAT rate of the item must not be missing.
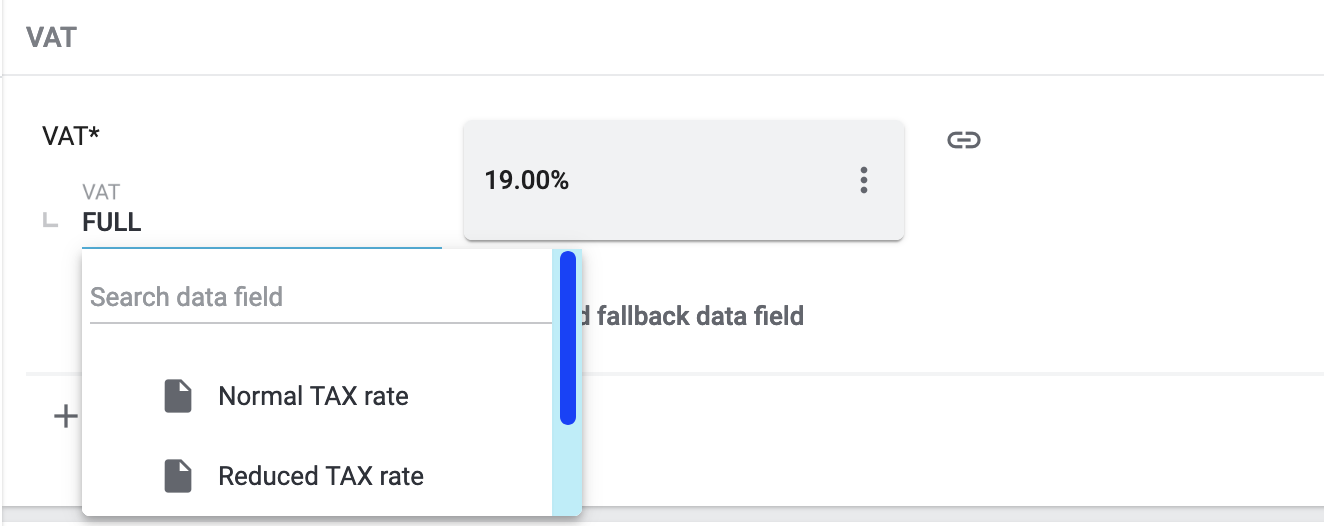
This error indicates that the variation’s brand that should be exported has not been mapped in the catalogue. Make sure that a source is saved for the brand in the catalogue and that the data field is linked to the item.
The brand can be linked to the variation in two different ways:
-
By mapping the Manufacturer that is saved in the tab Global of an item Tip: If you want to map the manufacturer, the catalogue mapping should be Add data field » Manufacturer » [Select manufacturer].
-
By creating a property
Important: Select the OTTO brand from the drop-down list. Do not enter the brand yourself.
Tip: If the brand you need is not available for selection in the OTTO brands field (left side), you can register the brand with OTTO Market. Go to the OTTO Market help desk to find out more. Brands that you or other sellers register are only available in PlentyONE after the next brand update. As such, it can take up to two hours until your newly created brand can be selected in the catalogue.
This error indicates that the category mapping in the catalogue is missing. In the catalogue, check whether at least one category of the desired variation is linked to an OTTO Market category.
-
In the catalogue, check which data field is mapped to the marketplace data field Category. We recommend that you map either already existing categories (Tab: Categories) of your variations or properties (Tab: Properties).
In the catalogue, check the mappings for the data fields Parent-SKU and SKU. Make sure that you have mapped at least two data fields to each of these fields, i.e. one field and one fallback field. You can find a recommendation for a possible mapping here.
The variation does not have positive net stock in the warehouse that is mapped in the catalogue. If no warehouse is mapped in the catalogue, the sum of all sales warehouses is exported. Alternatively, you can map the virtual warehouse.
Find more information on the catalogue mappings for the marketplace data field Stock here [/details]
This error is also indicated as SKU 1234 not generated or 0:sku in the log.
How SKUs should be generated is defined in the catalogue. There is a distinction between the Parent SKU and the Variation SKU. The source selected here should be a data record which exists only once. As such, it is not possible to use the same SKU for different items.
For example, you could use the Item ID and the Variation ID. Both IDs are generated when the item is created and as such only ever exist once.
However, it might happen that the item export is carried out with errors because of missing information in the catalogue. The SKU is created anyway and can now be found in the Availability tab of a variation. During the next export, your system will try again to create an SKU from the sources selected in the catalogue. However, this SKU does not exist. This is why the error happens:
-
Duplicate entry. Combination of the fields variationId, marketId and accountId must be unique
-
SKU 1234 not generated
As such, you need to add a fallback data field to the catalogue. The solution looks like this:
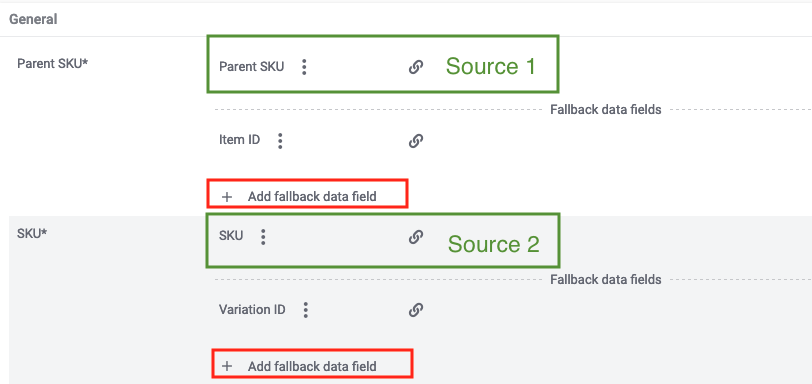
| When adding another data field, it is mandatory to use the Add fallback data field button () on the right-hand side of the catalogue. Do not use the option Add data field () because in this case, your SKUs would be created twice and the error cannot be resolved. |
This adds a second data field. During the next export, the first data field will be retrieved first. However, this data field already contains an SKU. As such, the second data field is ignored. If the first data field does not contain an SKU, then a new SKU will be generated using the second data field.
In this example, the data field Material composition of your catalogue is affected. As such, check your mapping for the marketplace data field Material composition. We recommend mapping a property. Is the property linked to the variation correctly?
In this case, OTTO expects all the information needed to calculate the unit price. Check the answer to the question “I want to export the unit price of my variations to OTTO. How do I do that?”.
In this case, OTTO expects an image that is linked to the referrer OTTO Market. So at least one image must be activated for OTTO Market in the tab Images of the item. You can check that under Availability.
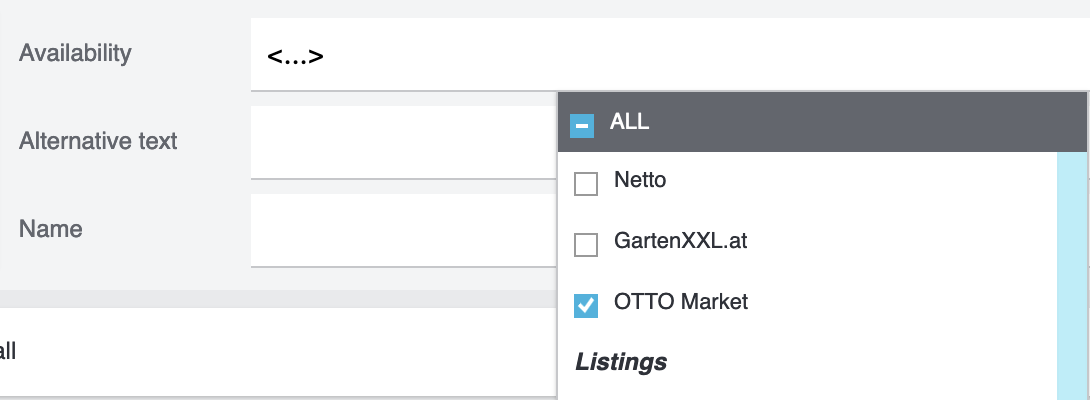
This error message usually indicates that categories were not mapped correctly in the catalogue. For categories, you cannot combine values in the same row of the catalogue. Instead, you need to map the categories as fallback data fields. In other words, the alternative data field should be in the row below the first data field.
If your mappings look like in the screenshot, you need to correct them. Otherwise, the category value is exported twice:
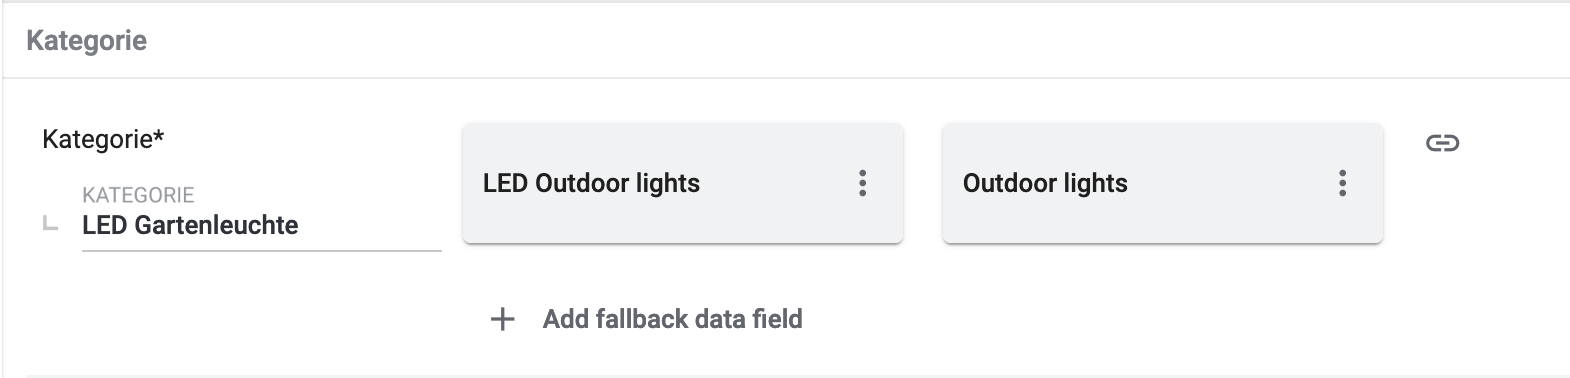
Instead, replicate the mappings below to make sure the category "Outdoor lights" is only exported if the category "LED outdoor lights" is not saved for the item:
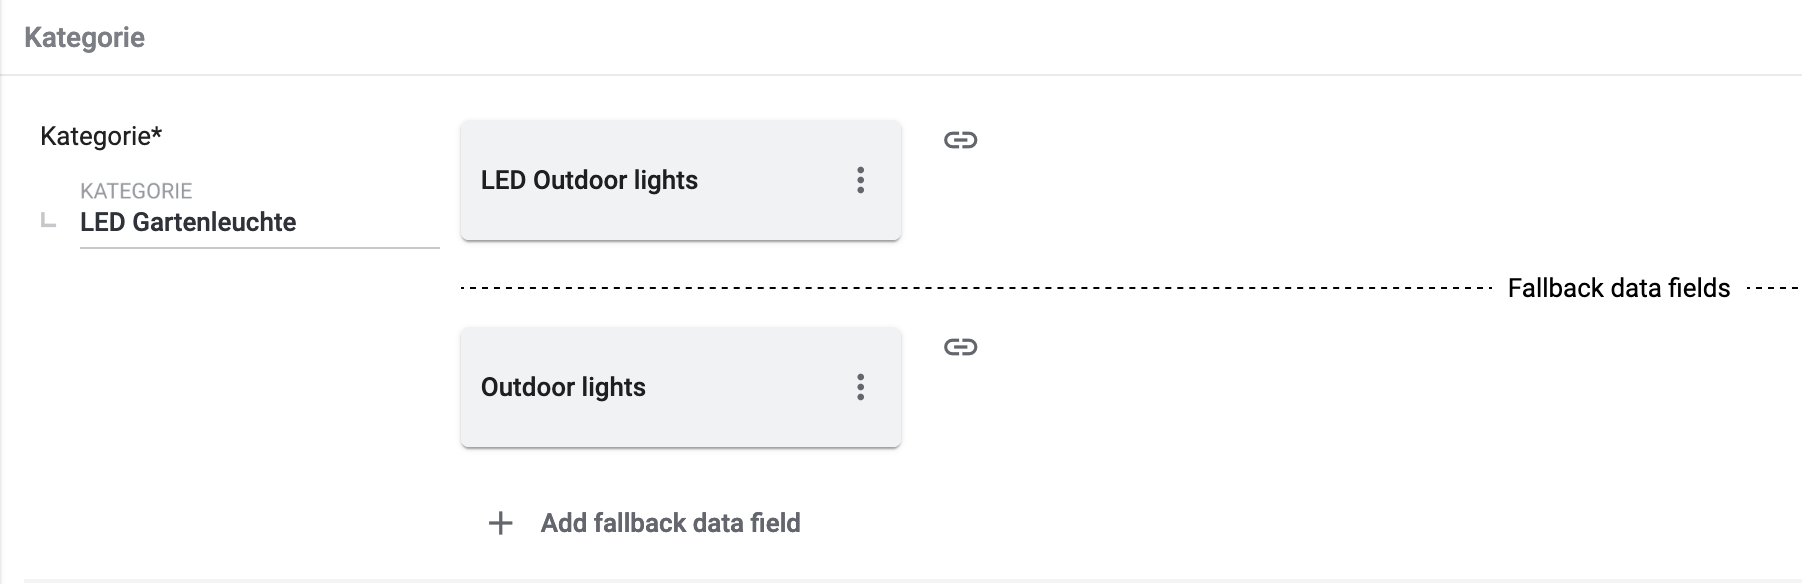
Possible content of the message:
Object
variationId:10792
type:"PRODUCT_DATASHEET"
location:""
Trigger:"cli: artisan catalog:async-export"
Media assets are files. This error refers to the product data sheet (see type). As such, the variation with the ID 10792 is either not linked to the property associated with this catalogue or you did not save a URL.
Important: Files can only be saved by providing an URL. Properties without an URL are not exported.
The price update happens at the same time as the item export. If variations are invalid, prices can not be synchronised. In other words, they are not updated on OTTO Market.
-
Check the log for error messages.
11.4.2. Error messages in the log: order processing
We have listed possible error messages in relation to the order processing below.
This error usually occurs if the order has a tracking number but no return tracking number (return label). Go to Orders » Shipping centre to check this. Return labels are shown in the Return labels tab of the order. If no label exists, a label must be created and a new shipping confirmation must be sent.
To send a new shipping confirmation, the event procedure with the procedure Send shipping confirmation to OTTO must be triggered again. Depending on the event, you might need to undo the event before triggering the event action again.
| A separate return label must be created for each package/package number. |
To send a new shipping confirmation, the event procedure with the procedure Send shipping confirmation to OTTO must be triggered again.
The shipping confirmation that is sent to OTTO Market must contain a valid sender address. If this sender address does not exist or if it is incomplete, an error message is triggered for the shipping confirmation.
Check the following settings:
-
Shipping confirmations will only be sent to OTTO Market if the warehouse address was saved. You can save the address in the settings of a warehouse under Setup » Stock » Warehouse » [Select warehouse] » Settings. You have to save the address for the warehouse that is used in the order.
To send a new shipping confirmation, the event procedure with the procedure Send shipping confirmation to OTTO must be triggered again.
No package number and/or no return label were available at the time the shipping confirmation was sent. Check if the package number and the return label were available when the shipping confirmation was sent.
To send a new shipping confirmation, the event procedure with the procedure Send shipping confirmation to OTTO must be triggered again.
| OTTO Market only allows the return service providers DHL, Hermes and GLS. |
-
Check that the order has a package number and a return tracking number (return label). To check this, go to Orders » Shipping centre » [Search for order] » Tab: Return labels.
-
If no label exists, a label must be created and a new shipping confirmation must be sent.
To send a new shipping confirmation, the event procedure with the procedure Send shipping confirmation to OTTO must be triggered again.
Open the log message to understand which shipping service provider could not be found. There, you’ll find the following message:
-
message:"Carrier ID 123 not mapped in OTTO market config."
This error usually means that the PlentyONE shipping service provider that is saved in the order is not correctly linked to an OTTO Market shipping service provider. The carrier ID specified in the error message is the same as in the menu Setup » Orders » Shipping » Settings » Tab: Shipping service provider.
-
Open the OTTO Market setup assistant. Check if the PlentyONE shipping service provider that is saved in the order is correctly linked to an OTTO market shipping service provider. If necessary, carry out the mapping and save the settings.
To send a new shipping confirmation, the event procedure with the procedure Send shipping confirmation to OTTO must be triggered again.
These errors indicate that you changed an OTTO item attribute. However, OTTO does not accept the change and it is not possible the change the attribute for this item. The indicated attribute can relate to a variation attribute or a title attribute. Other OTTO attributes are important here, too.
| An item cannot be deleted at OTTO Market, neither by PlentyONE nor by OTTO. It is only possible to mark the item as not available at OTTO Market. Therefore, you should always make sure that the correct data fields are mapped in the catalogue prior to transferring your items. |
Check whether shipping service providers were linked to OTTO Market. This is done in the Shipping service provider step of the OTTO Market Basic settings assistant in the Setup » Assistants » Omni-Channel menu.