Amazon (Setup via Sales channels » Channel Control Centre)
Amazon has gone from being the largest internet book store to one of the leading universal shopping centres. Many customers appreciate the large portfolio, rely on the high product quality and expect best service such as fast delivery. With PlentyONE, you have full access to Amazon.
1. Registering with Amazon
Before carrying out the settings in PlentyONE, you have to register as a seller on Amazon. Amazon Seller Central is the central Amazon interface for sellers. On the Amazon UK platform, sellers who sell more than 35 items per month are considered Professional sellers and only have the possibility to upload item lists from this amount on. PlentyONE users need to select the Professional option. It is only possible to use automatic procedures and APIs to manage stock and offers with the Professional option. This option includes a monthly subscription fee as well as additional fees for each item sold. For further information, refer to the Amazon website.
2. Where can I sell my items via Amazon?
| With PlentyONE, you can sell on the platforms Amazon.de, Amazon.ae, Amazon.bel, Amazon.ca, Amazon.co.uk, Amazon.com, Amazon.com.mx, Amazon.es, Amazon.fr, Amazon.ie, Amazon.it, Amazon.nl, Amazon.pl, Amazon.se, and Amazon.tr. |
2.1. European Marketplaces Account
Amazon has unified its European marketplaces. This allows you to create and manage offers on any and all of our Amazon marketplaces in Belgium, France, Germany, Italy, the Netherlands, Poland, Spain, Sweden, and the UK. You decide which products you want to sell in which country. You manage your business from a single seller account interface.
You can find further information on selling within the EU at Amazon.
Your seller account is automatically enabled to allow you to sell on the following Amazon platforms:
-
Amazon.ae
-
Amazon.bel
-
Amazon.de
-
Amazon.co.uk
-
Amazon.es
-
Amazon.fr
-
Amazon.it
-
Amazon.ie (This Amazon platform is not yet fully integrated. Additional information is available here.)
-
Amazon.nl
-
Amazon.pl
-
Amazon.se
-
Amazon.com.tr
|
If you sell on multiple Amazon platforms with a European Marketplaces Account, then set up a new account for each platform in PlentyONE, depending on which options you want to use, and configure each platform separately. The same access data is used for all platforms. |
When you sign up, you will be asked to define your home marketplace. Amazon recommends that you choose your home marketplace as the country from where you will be operating and fulfilling your orders. Refer to the information provided by Amazon.
2.1.1. Amazon.ie
The platform Amazon.ie (Ireland) is not yet fully integrated. At the moment, the following functions are available for Amazon.ie:
-
MFN and FBA orders which were generated on Amazon.ie are imported into PlentyONE.
-
Delivery and billing addresses are formatted correctly when they are imported.
-
After an order was marked as shipped in PlentyONE, a shipping confirmation is sent to Amazon.ie.
-
Invoices are generated in PlentyONE and uploaded to Amazon.ie. Invoice creation is supported in the following cases:
-
without Amazon VCS
-
with Amazon VCS Lite
-
-
The VAT rate is aligned with Ireland.
-
Credit notes which were generated on Amazon.ie are imported into PlentyONE.
3. Frequency of data exchange
After you have set up Amazon in PlentyONE, data is exchanged with the market in the intervals described in Table 1.
| Data | Interval |
|---|---|
Product creation |
once a day during the night |
Offer updates |
every 15 minutes |
Stock changes |
Depending on the Stock changes setting in the Sales channels » Channel Control Centre » [Open your Amazon sales channel] » Settings » [Amazon account] » Tab: Item settings menu, stock updates can be triggered either every 15 minutes or every hour. |
Price synchronisation |
Depending on the Price changes setting in the Sales channels » Channel Control Centre » [Open your Amazon sales channel] » Settings » [Amazon account] » Tab: Item settings menu, price synchronisation can be triggered either every 15 minutes or every hour. |
MFN order import |
every 5 minutes |
Import of pending orders |
every 15 minutes |
4. Setting up the data exchange
In order for the interface to successfully carry out the item export, the order import and the stock synchronisation, certain settings are mandatory. Pay attention to the following list.
| Process | Export via catalogues |
|---|---|
Price update |
Frequency of data exchange:
Required settings:
|
Stock update |
Frequency of data exchange:
Required settings:
|
Offer creation |
Frequency of data exchange:
Required settings:
|
Item creation |
Frequency of data exchange:
Required settings:
|
5. How are items exported to Amazon?
Item data is exported to Amazon via catalogues. For Amazon, data related to listing creation and listing updates is exported via two distinct catalogue types:
-
Item data is exported to Amazon via a product catalogue.
-
Offer data is exported to Amazon via an offer catalogue.
Additionally, you will need to create product listings and offer listings.
5.1. What is an Amazon listing?
An Amazon listing is the complete representation of an item on the Amazon sales channel. It contains all the relevant information that Amazon needs to display and sell the item, such as title, description, images, price, stock, and shipping information.
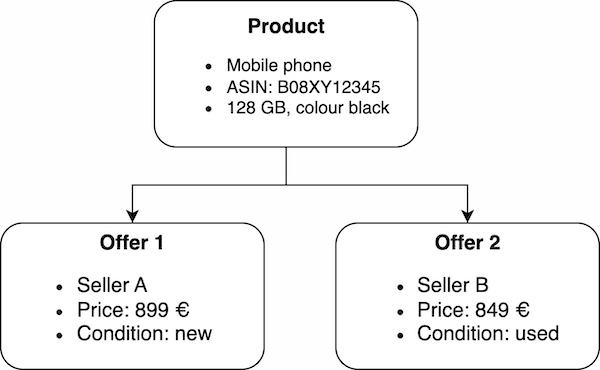
A listing consists of two clearly separated components:
-
Item data (e.g. title, brand, bullet points, technical details) describes the item itself. This data is ASIN-related and therefore the same for all sellers. It is exported to Amazon via a product catalogue combined with a product listing.
-
Offer data (e.g. price, stock, delivery time, condition) is specific to each seller and can differ. It is exported to Amazon via an offer catalogue combined with an offer listing.
-
Create a product catalogue if the item you want to offer is not yet listed on Amazon or if you want to update existing product information. With the product catalogue, you transfer item data to Amazon so that the item can be listed.
To actually sell the item on Amazon, you also need to create an offer catalogue containing seller-specific data such as price and stock. With a product catalogue, you can list an item that is not yet available on Amazon, but to sell the item on Amazon, you also need an offer catalogue for this item. -
Create an offer catalogue if the item you want to sell is already listed on Amazon. With the offer catalogue, you transfer your offer data, such as price, stock, shipping costs, etc., to Amazon.
6. Adding the sales channel
First, add Amazon as a sales channel in PlentyONE. You can do this in the Channel Control Centre via Sales channels » Channel Control Centre.
Adding a sales channel:
-
Open the Sales channels » Channel Control Centre menu.
-
Click Add sales channel (add).
→ The menu Add sales channel opens. -
Click Continue in the tile of Amazon.
-
Enter a name for the sales channel.
-
If asked to, select the Client (Shop) from the drop-down list.
-
Click add Add Amazon.
→ The sales channel for Amazon is added.
7. Carrying out the basic settings
Set up Amazon in your PlentyONE system via the Channel Control Centre.
7.1. Carrying out account settings
Next, carry out the account settings for your newly created Amazon account.
Carrying out account settings:
-
Navigate to Sales channels » Channel Control Centre » [Open your Amazon sales channel].
→ The submenu Settings opens. -
In the list of accounts on the left, click on the account you just created.
→ The Settings tab for this account opens. -
Carry out the settings in the Settings tab. Pay attention to the explanations given in Table 3.
Note: All Access data fields are mandatory. -
Click Save (save).
| Setting | Explanation |
|---|---|
Login details |
|
Amazon platform |
A platform has to be selected when the account is created. The platform cannot be changed afterwards. If you have a European Marketplaces Account, then you can carry out the settings for each platform on which you want to offer your products separately. |
Seller ID |
Enter the seller ID that you have received from Amazon. If you have a European Marketplaces Account, then the same seller ID is used for every platform. |
Allow access |
This button gives PlentyONE access to your Amazon account so that data can be exchanged between Amazon and PlentyONE. You can either allow access now or wait until later when you activate the account.
|
Merchant token |
Enter the merchant token that you can find on Seller Central. |
Email address |
Enter the email address that is used as the user name for the Seller Central account. |
Active |
Place a check mark to activate the interface. |
B2B |
Select to activate this account for Amazon Business. |
Initial settings |
|
Client |
Select which client should be used for orders from Amazon. |
SKU structure |
The SKU (Stock Keeping Unit) is a unique reference number for all items and item variations on Amazon. |
Catalogue was listed with SSW |
|
Generate invoice |
Select whether invoices should be generated by PlentyONE or by Amazon. See also Setting up invoice generation for Amazon orders.
|
|
SKU settings and stock synchronisation
If the same settings for SKU numbers are selected for all platforms, then you can synchronise all sales channels for the European Marketplaces Account with the stock synchronisation. If the settings are not the same, then the synchronisation must be carried out separately for each sales channel. However, for European Marketplaces Accounts, the stock is managed globally. As such, you only need to activate the stock for your home marketplace. Nevertheless, the SKU settings must match. |
7.2. Carrying out item settings
Items are transferred to Amazon via offer and product catalogues. Because many settings are already made in the catalogues, some item settings in the menu Sales channels » Channel Control Centre » [Open your Amazon sales channel] » Settings » [Open Amazon account] » Tab: Item settings are no longer necessary.
Important: Some item settings still need to be configured, even if items are transferred to Amazon via product and offer catalogues.
Table 4 lists the item settings in the Item settings tab that are still mandatory.
Carrying out item settings:
-
Navigate to Sales channels » Channel Control Centre » [Open your Amazon sales channel].
→ The submenu Settings opens. -
In the list of accounts on the left, click on the account you just created.
→ The Settings tab for this account opens. -
Switch to the Item settings tab.
-
Carry out the settings in the Item settings tab. Pay attention to the explanations given in Table 4.
-
Click Save (save).
| Setting | Required for item export via catalogue? | Explanation |
|---|---|---|
Tab: Item settings |
||
Automatic processes |
||
Item export |
No |
The item export is activated via the Active toggle of the respective catalogue in the Data » Catalogues menu. |
Price changes |
Yes |
Specifies whether a price should be transferred when offers are updated (regardless of whether the SKU is known to Amazon). |
Stock changes |
Yes |
Specifies whether stock should be transferred when offers are updated (regardless of whether the SKU is known to Amazon). |
Export filter |
||
Item availability |
No |
This setting is only used in combination with catalogues to determine the maximum shipping time, but not as a filter. |
Export categories |
No |
Which product categories are used is defined via the activated product catalogues. The product category must be added in the Setup » Markets » Amazon » Add catalogue templates menu and a product catalogue for this product category must be created and activated in the Data » Catalogues menu . |
BMVD export categories |
No |
Which product categories are used is defined via the activated product catalogues. The product category must be added in the Setup » Markets » Amazon » Add catalogue templates menu and a product catalogue for this product category must be created and activated in the Data » Catalogues menu . |
Flag 1 |
Yes |
Only variations with the selected flags are exported. |
Flag 2 |
Yes |
Only variations with the selected flags are exported. |
Tags |
Yes |
Only items with at least one of the selected tags are exported. |
Store item |
No |
|
Export settings |
||
Item name |
No |
The item name is assigned in the product catalogue. |
Item description |
No |
The item description is assigned in the product catalogue. |
Allow HTML tags |
Yes |
The following tags are allowed: < br >, < b >, < i >, < p > ,< ul >, < li >, < table >, < tr >, < td >, < th >, < tbody > and < strong >. |
Warehouse selection |
Yes |
This setting is required because the stock is not assigned in the catalogue. |
Warehouse |
Yes |
Select one or more warehouses. This setting is only displayed if you selected the option Select warehouses under warehouse selection. |
Stock buffer |
Yes |
This setting is required because the stock is not assigned in the catalogue. |
Maximum stock |
Yes |
This setting is required because the stock is not assigned in the catalogue. |
Quantity for items that are not limited to the stock |
Yes |
This setting is required because the stock is not assigned in the catalogue. |
Average delivery period |
Yes |
This setting is required because the stock is not assigned in the catalogue. |
Processing time |
Yes |
This setting is required because the stock is not assigned in the catalogue. |
Activate long lead time |
Yes |
This setting is required because the stock is not assigned in the catalogue. |
Manufacturer part number |
No |
The manufacturer part number is assigned in the product catalogue. |
Additional SKU |
Yes |
Activate the data exchange for additional Amazon SKUs. Variations linked to additional SKUs are transferred. No new additional SKUs are created. |
7.3. Carrying out order settings
In the Order settings tab, you carry out settings related to shipping.
| The abbreviation MFN stands for merchant-fulfilled network. This means that the seller takes care of order processing. |
Carrying out order settings:
-
Navigate to Sales channels » Channel Control Centre » [Open your Amazon sales channel].
→ The submenu Settings opens. -
In the list of accounts on the left, click on the account you just created.
→ The Settings tab for this account opens. -
Click on the Order settings tab.
-
Carry out the settings in the Order settings tab. Pay attention to the explanations given in Table 5.
-
Click Save (save).
| Setting | Explanation | ||||||
|---|---|---|---|---|---|---|---|
Ship own orders (MFN) |
|||||||
Order import |
Select whether you want to import order data.
|
||||||
Order import start date |
Enter a date. Only orders starting from this date will be imported into PlentyONE. |
||||||
Notification |
Select whether you want to export shipping confirmations to Amazon.
|
||||||
Order item |
Defines how the item name is displayed in the order item. Select one of the following options:
|
||||||
Incoming payment |
Select Incoming payment booked if the incoming payment should be displayed as booked when MFN and FBA orders are imported. |
||||||
Status for transmitted returns |
Select the order status for returns that were successfully reported to Amazon. |
||||||
Status for untransmitted returns |
Select the order status for returns that were not reported to Amazon. |
||||||
Pending orders |
Select whether you want to import pending orders.
|
||||||
Credit note import |
Select whether Amazon credit notes for MFN and FBA orders should be imported into your PlentyONE system.
Note: This setting applies to both own shipping (MFN) and to shipping by Amazon (FBA). |
||||||
Shipment by Amazon (FBA) |
|||||||
Active |
Place a check mark to activate Amazon FBA. |
||||||
Referrer |
Select whether only orders from Amazon should be processed with FBA or whether orders from other referrers should be processed with FBA as well. |
||||||
Status |
Select the order status for orders that were imported from Amazon. |
||||||
Warehouse |
Select which Amazon FBA warehouse should be used for stock synchronisation with the account. This warehouse is also used to assign the FBA order to the account if no FBA order could be assigned to the country the order originates in. |
||||||
Warehouse for unsellable stock |
Select which Amazon FBA warehouse should be used for unsellable stock for this account. If you do not select a warehouse, the unsellable stock will not be imported. Note: Do not select the same warehouse here that you already selected for the setting Warehouse (FBA warehouse), as stock will be overwritten if you select the same warehouse for both settings. |
||||||
Outgoing items |
Select whether outgoing items should be marked as booked or not. The option Mark as booked does not trigger an item movement. In order to trigger an item movement, select the option Do not mark as booked and set up an event procedure. |
||||||
Returns import |
Do not import returns or select daily import of returns. |
||||||
Include coupons to returns |
Select whether discounts granted by Amazon are considered for returns. A minimum order quantity for the coupon is not taken into consideration.
Important: "Coupons" can be discounts from Amazon Delivery Campaigns, Amazon Campaigns or any other discounts granted by Amazon. It can also be additional costs that Amazon charges. For example, these might be gift wrapping or cases where Amazon applies its own shipping costs. Example:
|
||||||
Stock import |
Select whether the stock should be imported hourly or never.
|
||||||
Status for transmitted orders |
Select the order status for orders that were successfully transferred to FBA. |
||||||
Ignore item discounts from campaigns during import |
Amazon order reports do not specify if any item discounts were granted by the seller or by Amazon. In both cases, the discounted amount is deducted from the order value during the order import. However, if Amazon granted the discount, the order value differs from the amount that Amazon pays you for the order. In such cases, you need to manually adjust the order. Otherwise, you do not pay enough VAT on the order. Select how to deal with item discounts when orders are imported.
|
||||||
Ignore shipping discounts from campaigns during import |
Amazon order reports do not specify if any shipping discounts were granted by the seller or by Amazon. In both cases, the discounted amount is deducted from the order value during the order import. However, if Amazon granted the discount, the order value differs from the amount that Amazon pays you for the order. In such cases, you need to manually adjust the order. Otherwise, you do not pay enough VAT on the order. Select how to deal with shipping discounts when orders are imported.
|
||||||
Item bundles Multichannel |
Which order items do you want to transfer to Amazon for FBA Multi-Channel orders? Background: Which option you select depends on how you store item bundles in the Amazon warehouse. Are all bundle components of item bundles packaged and stored together in the Amazon warehouse? Or does Amazon pick the individual bundle components to create item bundles?
|
||||||
Shipping category |
Select a shipping category.
|
||||||
Additional settings for FBA |
The following settings are located in the Ship own orders (MFN) area at the top of the menu. However, these settings apply to both own shipping (MFN) and to shipping by Amazon (FBA). As such, also select options for these settings:
Note: These settings apply to both own shipping (MFN) and to shipping by Amazon (FBA). |
||||||
7.4. Activating the account
Have you completed all the settings? Then activate the account now to start exchanging data with Amazon.
How you activate the account depends on whether or not you have already granted access when you set up the account in plentymarkets.
- Activating account and allowing access
-
-
Navigate to Sales channels » Channel Control Centre » [Open your Amazon sales channel].
→ The submenu Settings opens. -
In the account overview to the left, click on the account.
→ The Settings tab for this account opens. -
Activate the option Active.
-
Click on the button Allow access.
→ You are forwarded to Amazon. -
Enter the login details of your seller account to log in.
→ The data PlentyONE will have access to is shown. -
Click on Confirm to allow access.
→ In PlentyONE, the window Complete authorization opens. -
Click on Complete.
-
Click Save (save).
-
Activating account if access already is granted:
-
Navigate to Sales channels » Channel Control Centre » [Open your Amazon sales channel].
→ The submenu Settings opens. -
In the account overview to the left, click on the account.
→ The Settings tab for this account opens. -
Activate the option Active.
-
Click Save (save).
8. Activating the order referrer
Go to Setup » Orders » Order referrer to activate the order referrer. This ensures that orders are assigned to the correct sales channel.
An order referrer tags an order with the sales channel on which the order was generated. Sales channels can be e.g. your online shop or markets on which you sell your items. Each sales channel has an individual order referrer. Some order referrers are available by default in your PlentyONE system. Further order referrers are added e.g. if you install a new plugin. For further information about the order referrer, see the page Order referrer of the PlentyONE manual.
Activating the order referrer for Amazon:
-
Go to Setup » Orders » Order referrer.
-
Click Search (search).
-
In the list, navigate to the Amazon platforms.
-
On the right of the referrer’s line, click Edit (edit).
→ The window Edit referrer opens. -
Activate the option Visible in selection (toggle_on).
-
Click SAVE (save).
→ The referrer is active.
9. Variation Family: Parent products and child products on Amazon
A variation family on Amazon is a combination of a parent product, under which various variations (child products) of this product are grouped, for example, a T-shirt in red, green, and blue. The parent product serves as a higher-level placeholder under which the variations are grouped. The parent product cannot be bought. The child products, i.e. the variations of the product, are the products which can actually be bought.
This structure allows customers on Amazon to compare and select different variations of a product on a single product page without having to leave the product page.
Variation themes are the attributes in which the child products differ from each other, for example, the different colours of a T-shirt. Child products can have more than one variation theme. Possible variation themes for a T-shirt are colour or size, for example. Variation themes can be combined, for example colour and size.
Overview: parent products and child products on Amazon
Parent product:
-
Grouping of child products (grouping of different variations of a product)
-
serves as a placeholder and cannot be bought
-
Example: T-shirt
Child product:
-
Variation of the parent product
-
actual purchasable product
-
different child products differ in at least one property, such as size or colour
-
Examples: blue T-shirt in size 12, red T-shirt in size 8
Variation theme:
-
property that distinguishes child products from one another, for example colour or size
-
child products can have more than one variation theme
-
Examples: colour, size
What do I need to consider when offering an item with variations on Amazon?
-
Parent products and child products should have the same item name. For example, if you sell a T-shirt, then the parent product and the child product should both be called “T-shirt”. The child product’s attributes, such as “size 10”, should not be included in the name. Amazon automatically displays the correct attributes, such as colour or size, on the product page if you have correctly mapped variation themes and associated attributes in the product catalogue.
-
The item name is mapped in the product catalogue. To do so, you can use a property or map the data field Item text » Name 1. How to map the item name is described here.
-
-
To display your variations in different colours and sizes on a product page on Amazon, you must map variation themes in the product catalogue. How to do this is described here.
-
If an error occurs during the item export and a variation cannot be created, this variation is skipped during the export and the item export continues. The corresponding item will continue to be listed on Amazon if it was created previously.
10. Preparing Items for sale on Amazon
You can now get started on preparing your variations for the export to Amazon.
10.1. Setting the variation availability
You need to activate the variations you want to sell on Amazon and enable them for the relevant country-specific sales channel(s). This is done in the Item » Items » Open variation] menu.
|
Use group function or batch processing
You can edit the availability of several variations at once by using either the variation group function or batch processing. |
Activating the variation availability for an Amazon sales channel:
-
Go to Item » Items » [Open variation].
Tip: To sell all variations of an item on the Amazon sales channel, carry out the settings for the item’s main variation. If the inheritance function is active for the variations, then this activates the availability of all variations of the item. -
In the Availability and visibility section, enable the option Active (toggle_on).
-
Click the Sales channels tab.
-
In the Sales channels section, activate the Amazon sales channels in the Status column (toggle_on).
-
Also activate the option WEB-API (toggle_on).
Tip: You can activate multiple sales channels at once. To do so, activate the checkboxes to the left of the desired sales channels. Then activate the toggle above the checkbox column (toggle_on). Click ACTIVATE to confirm the activation. -
Click Save (save).
→ The variation is activated and enabled for the selected Amazon sales channel(s). -
In the navigation on the left, open the item for your variation.
-
Click the Sales channels tab.
-
Carry out the settings in the Amazon section. Pay attention to the explanations given in Table 6.
-
Click Save (save).
→ The settings are saved.
| Setting | Explanation |
|---|---|
FBA Fulfillment |
Should the item be sold via FBA? If so, then select the appropriate Amazon marketplace from the drop-down list.
|
Product Type |
Select the appropriate Amazon product type from the drop-down list. You can think of the product type as the Amazon category under which this item should appear. When you transmit your items to Amazon, you’ll transmit one product type at a time, i.e. one category at a time. Note: You can download an overview of Amazon product types here. The table lists the product types and their corresponding IDs. |
Amazon FBA |
Should the item be sold via FBA? If so, then select this option (). Note: By doing so, the FBA stock of this item can be imported into PlentyONE and Amazon Multi-Channel orders that are shipped with FBA can be booked. |
|
Variation availability for MFN and FBA
In order to set up variations for MFN as well as FBA, enable both sales channels. Taking Amazon Germany as an example, these are the sales channels Amazon Germany and Amazon FBA Germany. |
10.2. Defining SKU manually
Add SKUs manually for specific referrers in the Item » Items » [Open variation] » Section: SKU menu if needed. If you have already started selling your items on Amazon and now you want to start selling them with PlentyONE, you have to assign already existing Amazon SKUs in this menu.
|
An Amazon SKU must be assigned to the item in the order to ensure that associated returns can be created and imported. Without a matching Amazon SKU, Amazon cannot identify the item in the event of a return, and the return will not be created. |
Adding SKU:
-
Go to Item » Items » [Open variation].
-
In the SKU section, click Add SKU (add).
→ The window Add SKU opens. -
From the drop-down list Referrer, select the option Amazon.
-
From the drop-down list Account, select the corresponding Amazon account.
-
Click Apply.
→ A new entry is created in the SKU section -
Enter the SKU in the SKU field.
-
Enter the parent SKU in the Parent-SKU field.
-
Save (save) the settings.
→ The SKU is saved and displayed.
SKUs can still be changed afterwards. However, note that Amazon might be unable to assign the items if you make changes to SKUs.
|
Parent SKU
Parent SKUs can be saved for both items and variations. The manual maintenance of SKUs enables you to assign the Parent SKU of entirely different item variations to variations of an item. For example, you can assign the Parent SKU of a variation which belongs to an entirely different item 5 times to an item with 5 variations. These variations are listed on Amazon as variations of the item with the Parent SKU they are assigned to. |
10.3. Defining additional SKUs manually
Add SKUs manually for specific referrers in the Item » Items » [Open variation] » Section: Additional SKU menu if needed.
Adding SKU:
-
Go to Item » Items » [Open variation].
-
In the Additional SKU section, click Add additional SKU (add).
→ The window Add additional SKU opens. -
From the drop-down list Referrer, select the option Amazon.
-
From the drop-down list Account, select the corresponding Amazon account.
-
Click Apply.
→ A new entry is created in the Additional SKU section -
Enter the SKU in the SKU field.
Note: Avoid SKUs with special characters (e.g. spaces, umlauts or commas). Special characters can cause encoding problems during transmission, so Amazon can no longer match the SKU correctly. -
Save (save) the settings.
→ The SKU is saved and displayed.
Tip: SKUs can still be changed afterwards.
Activating the stock update and price update for additional SKUs
Additional SKUs are automatically included in the Amazon order import. Activate the stock update and price update for additional SKUs manually in the Setup » Markets » Amazon » Settings » Tab: Item settings menu.
The stock update and price update for additional SKUs is carried out along with the normal stock update and price update at the interval that you have selected within Setup » Markets » Amazon » Settings » Tab: Item settings for the options Price changes and Stock synchronisation in the Automatic processes area.
During the stock update for additional SKUs, FBA stock is also updated.
Activating the stock and price update:
-
Go to Setup » Markets » Amazon » Settings » Tab: Item settings.
-
In the Export settings area, activate Stock update and Price update for the Additional SKU option, depending on which options you want to activate. ALL activates both the stock update and the price update.
-
Save () the settings.
10.4. Linking ASIN with variations
An ASIN (= Amazon Standard Identification Number) is a unique product identification number on Amazon which simplifies selling items on Amazon. In order to quickly and comfortably sell items that have already been listed on Amazon, an ASIN should be saved for every variation.
If an ASIN is saved for a variation, then only price, stock, and GTIN need to be saved for the variation to sell the item on Amazon.
|
Save a GTIN for your variations
The barcode GTIN13 is required to search for ASINs on Amazon and to import them into PlentyONE. Therefore, make sure that a barcode (GTIN13) is saved for your variations. Otherwise, ASINs cannot be found. |
|
Go through the Amazon ASIN import assistant
First, go through the Amazon ASIN import assistant in order to import matching ASINs for your variations into your PlentyONE system. This is done in the Setup » Assistants » Omni-Channel menu. Also use the assistant to define if and how ASINs should be linked to variations. |
The menu Sales channels » Channel Control Centre » [Open your Amazon sales channel] » ASIN matching provides an overview of the ASINs imported into your system. All imported ASINs are displayed here, including ASINs which are linked with a variation and ASINs which have not yet been linked. You can also link ASINs individually or with the group function in this menu.
ASINs are imported into your PlentyONE system stepwise. Therefore, not all variations that can be linked with variations are displayed immediately.
Additionally, every 5 minutes, the system searches Amazon for matching ASINs for GTINs that have not yet been processed. Each run processes up to 5 GTINs for which no ASIN search has been performed yet.
-
If Amazon finds a matching ASIN, it is automatically saved for the corresponding variation.
-
If Amazon does not find a matching ASIN, an error is saved for the GTIN. After a certain period of time, GTINs with an error are automatically deleted from the table. This ensures that GTINs for which no matching ASIN was initially found can be checked again during a subsequent search run.
| Setting | Explanation |
|---|---|
GTIN |
The GTIN saved for the variation. |
Item name |
The item name of the variation. |
Attribute name |
The attributes saved for the variation. |
Platform |
The Amazon platform on which the variation is listed. |
ASINs |
The ASINs that were found for the variation. There can be more than one matching ASINs for a variation. |
Preview |
Opens a preview of the Amazon product page. |
Errors |
Errors which might occur during the ASIN import are displayed here. The following errors can occur: |
Link |
Displays whether the ASIN is linked to a variation (check mark) or not (X). |
10.5. Linking variations to Amazon categories
You have to save some information in your PlentyONE categories in order for your items to automatically be assigned to the existing categories when exporting them to Amazon. The so called Browse Tree Guides (BTG) from Amazon provide you with classification information. This information is provided in table format (MS Excel) and contains unique classification numbers, the so called Browse Node IDs, which you will have to assign to your online store categories. The lists are available in the help centre of the Seller Central or via this link.
Using the official Browse Tree Guides for the Amazon platform that you want to sell your products on ensures that your items can be found quickly and easily in the Amazon catalogue. The Browse Node IDs form the basis for the item/product assignment in the navigation as well as in the product search. Due to the large amount of items offered on Amazon, an explicit assignment of your items into these Browse Node IDs determines whether a customer will find your product in the corresponding category or not. Therefore, we recommend that you take some time when carrying out this next step and that you select the Browse Node IDs carefully.
You can set up category links via Sales channels » Channel Control Centre » [Open Amazon sales channel] » Category link. In PlentyONE, you can link each item category with up to two Amazon classification numbers from the Browse Tree Guides.
It is absolutely necessary that you link the entered values separately line by line.
The category links are only taken into consideration for the default categories, which were selected for a variation under Item » Items » [Open variation] » Tab: Categories.
Linking Amazon categories:
-
Use this link to access the help centre within Seller Central.
-
Select the desired classification list, e.g. apparel.
-
Look up the desired category name in the node path column (e.g. blouse).
-
Navigate to Sales channels » Channel Control Centre » [Open your Amazon sales channel] » Category link in your PlentyONE system.
-
Enter the corresponding Browse Node ID from the list into the table.
-
Click on the gear-wheel icon that corresponds to the category that you want to link.
|
Exporting the Browse Node ID
The Browse Node ID that was assigned when selecting the category is inserted into the RecommendedBrowseNode1 field during the data export. The RecommendedBrowseNode2 field is only used for categories that are linked multiple times. |
11. Mandatory attributes for Amazon
Some attributes are mandatory for certain Amazon product types. If these mandatory attributes are not linked, then you can no longer list new products or update existing products which are linked to the listed product types on Amazon. We therefore recommend to check which Amazon product types you use.
11.1. Overview of new Amazon product types
Here you can download a list of the mandatory attributes for Amazon:
This list shows you which attributes are required for the respective product type. Here’s how the list is structured:
| Column | Explanation |
|---|---|
Product Type |
The Amazon product type, for example ABDOMINAL_EXERCISER, ABIS_BOOK, ACCESSORY. |
MP |
The Amazon marketplace code (= the Amazon platform), for example DE = amazon.de. |
Attribute Name |
The technical name of the attribute. |
Attribute Label |
A user-friendly label for a better understanding of the attribute. |
|
Use new Amazon product types for item import
If you use the import tool to import items into PlentyONE via a CSV file, then you have to add a new column for the new Amazon product types in the import file. |
12. Creating properties
Next, create properties for the mandatory attributes of the Amazon product types you use in your PlentyONE system.
For further information, refer to the Characteristics and properties page.
-
First, go to Setup » Settings » Properties » Configuration and check whether you already created properties corresponding to the mandatory attributes. Create new properties, if necessary.
Creating a property:
-
Go to Setup » Settings » Properties » Configuration.
-
Click on Create property.
-
Customise the settings to meet your needs.
-
Click Save (save).
12.1. Requirements for exporting properties to Amazon
In order for a property to be transferred to Amazon, it must be linked to the desired variation and assigned in the offer or product catalogue for Amazon.
-
Open the variation in the Item » Items » [Open variation] menu.
-
Open the Properties tab in the navigation bar on the left-hand side.
-
Click Add properties (add).
→ The window Add properties opens.
Tip: Use the search to search for the property. -
Place a check mark next to the desired property.
-
Click APPLY.
-
Enter additional information depending on the property type. If the property is a selection property, for example, you must also select a suitable value from the drop-down list.
-
Click Save (save).
-
Go to Data » Catalogues.
-
Open the Amazon catalogue for which the property is to be used.
-
Assign the property to the desired Amazon data field.
-
Click Save (save).
13. Creating catalogues
Item and offer data is exported to Amazon using catalogues. Go to Data » Catalogues to create catalogues for Amazon. Afterwards, link the Amazon data fields with item data saved in PlentyONE in the catalogue.
After you activate the catalogue, the catalogue data is automatically exported to Amazon in regular intervals.
There are two types of catalogues for Amazon:
-
Item data is transferred to Amazon via a product catalogue.
-
Offer data is transferred to Amazon via an offer catalogue.
Tip: For more information on the difference between products and offers and useful tips regarding when to use an offer or a product catalogue, check out the overview.
Catalogues are used to export data from your PlentyONE system. There are two different catalogue formats:
-
Marketplace formats are used to export item data to markets.
-
Standard formats are used to export data from your PlentyONE system into a file.
Catalogues with marketplace formats allow you to tailor your item information exactly to the needs of the market. Because here, you assign a suitable PlentyONE data field to each of the data fields of the market. When your variation data is exported to the market, the market’s data fields are then filled with the correct PlentyONE data.
-
Is this your first time working with catalogues? Then read up on the basic concept of catalogues first.
|
Data is exported to Amazon if the catalogue is activated
As soon as you activate an offer or a product catalogue and do not use the Test mode any longer, the data in this catalogue is exported to Amazon. This may lead to data being overwritten on Amazon. |
13.1. Creating product catalogues
| If you only want to offer items that already exist on Amazon, you do not need to create a product catalogue beforehand. |
You have to add the Amazon product types (= product categories) that you use for Amazon before you create product catalogues. This is done in the Sales channels » Channel Control Centre » [Open your Amazon sales channel] » Category whitelist menu. After adding the product types, you can create product catalogues for the product types that you added.
13.1.1. Adding Amazon product types
Go to Sales channels » Channel Control Centre » [Open sales channel for Amazon] » Category whitelist to add the Amazon product types (= product categories) you want to use for Amazon.
Note: Your Amazon account must be connected to Amazon and must be active. Otherwise, you cannot add product types.
Adding Amazon product types:
-
Go to Sales channels » Channel Control Centre » [Open sales channel for Amazon] » Category whitelist.
-
Click Add product types (add).
→ The Add product types window opens. -
Enter the Seller ID of your Amazon account.
-
Select the Amazon product type from the Product types drop-down list.
-
Click SAVE (save).
→ The product type is added. You can now create a product catalogue for this Amazon product type in the Data » Catalogues menu.
Note: You don’t need to add the product type separately for each sales channel (e.g. Amazon.de, Amazon.fr). The product type is automatically available for all sales channels using the selected seller ID.
|
Updating product types
If the data fields provided by Amazon for already added product types have changed, you can update the product types. To do so, click Sync all activated templates (sync) in the top toolbar of the Category whitelist menu. This retrieves the latest data fields from Amazon for all activated product types. |
13.1.2. Creating a product catalogue
Item data is exported to Amazon using catalogues. To export your items to Amazon, create a product catalogue in the Data » Catalogues menu. Afterwards, link the Amazon data fields with item data saved in PlentyONE in the catalogue.
After you activate the product catalogue, the catalogue data is automatically exported to Amazon within 24 hours after a value has been changed on the variation.
To simplify the creation of new catalogues, you can now create Channel maps for Amazon. With Channel maps, you can create cross-category mappings for a marketplace and apply them to catalogues afterwards. All linked catalogues automatically inherit the mapping from the Channel map. This will save you a lot of time as you don’t need to carry out the mappings for each catalogue.
You can find more information on how to create Channel maps in the Channel maps section.
Note: There is a separate catalogue format for each Amazon product type. Different item data is exported in each format, depending on which information Amazon requires for a product category.
Product catalogues are also account-specific. This means that you have to create a separate catalogue for each product type and each sales channel (Amazon.de, Amazon.fr) that you want to sell your items on.
Creating a product channel map:
-
Open the menu Sales channels » Channel Control Centre » [Name of your Amazon sales channel] » Mapping » Product mapping.
-
Click on Create Channel map (add).
-
Enter a name for the channel map.
-
In the drop-down list Marketplace, select the option Amazon.
-
In the drop-down list Catalogue type, select the option Product-[sales channel].
-
In the drop-down list Categories, select the product categories you want to sell on Amazon.
-
Click on CREATE CHANNEL MAP.
→ The channel map is created.
Once you have created a product channel map for Amazon you can proceed to create catalogues for the different product types you want to sell on Amazon and link them to the channel map. To do so, proceed as follows:
Linking a product catalogue to the channel map:
-
Go to Sales channels » Channel Control Centre » [Name of your Amazon sales channel] » Mapping » Product mapping.
-
In the row of the channel map you want to edit, click on more_vert More and select Connect catalogues.
-
In the drop-down list Select catalogues, click Create catalogue.
-
Enter a name for the catalogue.
-
In the drop-down list Marketplace, select the option Amazon.
-
In the drop-down list Export type, select the option Listing.
-
In the drop-down list Categories, select the product categories in which you want to sell on Amazon.
-
Click CREATE AND CONNECT TO CHANNEL MAP.
→ The catalogue is created and connected to the channel map.
Format setting for Amazon catalogues
The Format setting in the Amazon catalogue settings affects only the structure and formatting of the catalogue preview, but has no impact on how the automatic data exchange works in the background. You can either select JSON (PUT) or JSON (PATCH) as format.
The format in the settings of an Amazon catalogue determines which data structure is used for the transfer of the JSON file, regardless of whether PlentyONE executes the transfer via a feed or directly via HTTP.
The following methods are available:
-
PUT (“Create or replace”): Creates a new data record or replaces an existing data record completely.
-
PATCH (“partial update”): Creates or updates only the mapped data fields. Fields that are not transferred remain unchanged and are not deleted.
The format selected in the catalogue settings is irrelevant for data exchange with Amazon. Products and offers are automatically transferred using the following methods:
Export type |
Data |
Method |
Behaviour |
Offer export |
New offer listings |
PUT |
Creates the offer anew or replaces it completely. |
Offer export |
Updating existing offer listings |
PATCH |
Updates only the offer data which was changed (for example price or stock). |
Product export |
New and existing product listings |
PATCH |
Only updates the specific product fields, without overwriting or deleting existing data. |
13.1.3. Mapping data fields in the product catalogue
After you have created a catalogue, map the sales channel’s data fields to item data saved in PlentyONE. This chapter describes how you map data fields and what particularities apply for item exports to Amazon.
-
The market expects product data that cannot be saved in the PlentyONE item menu? Then create a property for this data. Link this property with your variations. The actual values are saved as property values for this property. Is this your first time working with properties? Then read up on the principles of properties first.
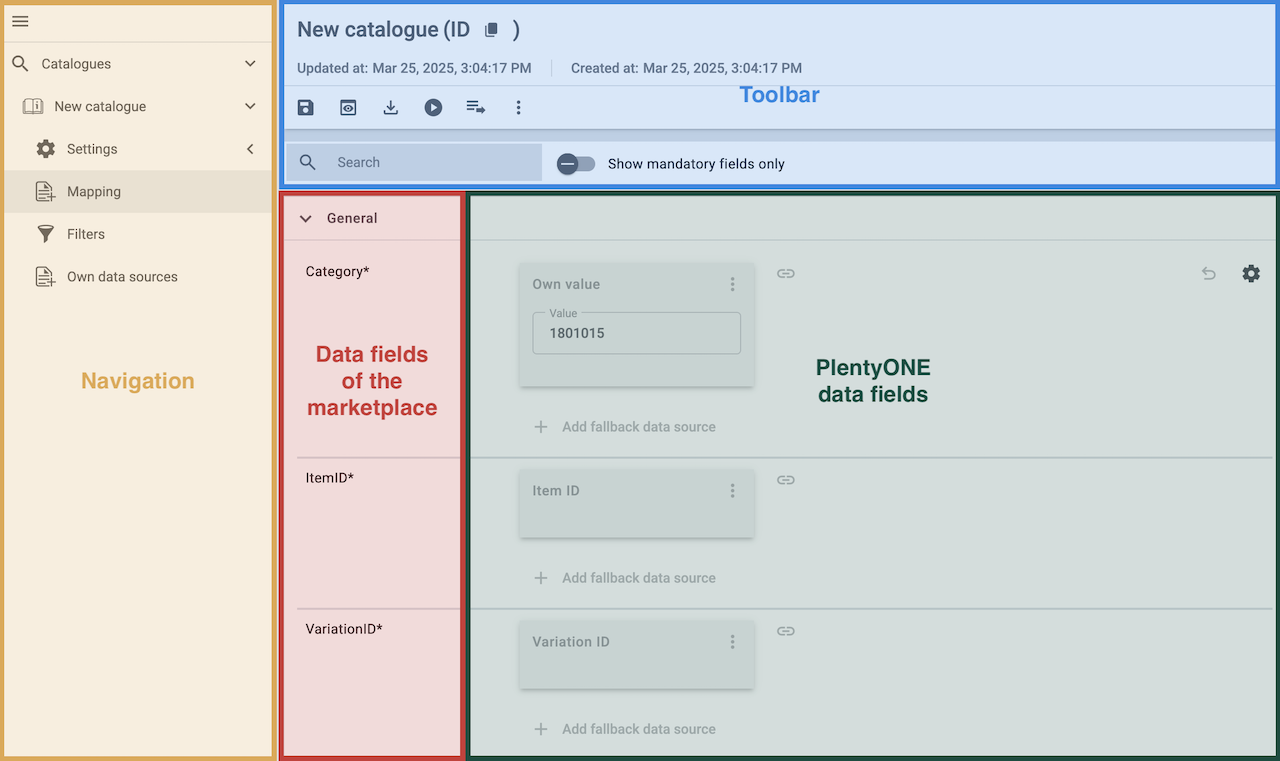
| Availability | Explanation |
|---|---|
Navigation |
When you open a catalogue, the view Mapping is shown. On the very left is the navigation.
|
Toolbar |
The toolbar provides actions for the catalogue. For example, save your mappings, restore an older version of the catalogue or hide or show optional marketplace data fields. |
Marketplace data field |
To the right of the navigation, all data fields available for the market are listed. Mandatory fields are marked with an asterisk (✱). |
PlentyONE data fields |
On the right side of the catalogue, you map the marketplace data fields to appropriate PlentyONE data fields. In the screenshot above, a few of the fields are already mapped. |
Mapping catalogue fields:
-
Go to Sales channels » Channel Control Centre.
-
Click on the tile of your Amazon sales channel.
-
Click on the catalogue you want to edit.
→ The Mapping tab opens.
→ In the left-hand column, the market’s data fields are listed.
Tip: Mandatory fields are flagged with an asterisk (*).
→ In the right column, you map the PlentyONE data fields. Any PlentyONE data fields that you already mapped are also shown in this column. -
Map suitable PlentyONE data fields to the market data fields.
For each marketplace data field, you have a number of mapping options. Expand the info boxes below to get more information about each of these mapping options.-
Simple 1:1 mapping
-
Simple 1:1 mapping with properties
-
Complex 1:1 mapping
-
1:1 mapping with fallback data fields
-
1:n mapping
-
Own value mapping
-
Mapping with mathematical calculations
-
-
Save () the catalogue.
→ The mappings are saved.
In a simple 1:1 mapping, you map a PlentyONE data field to the marketplace data field. If no suitable setting exists in PlentyONE, you can map a property instead.
As such, simple 1:1 mappings allow you to:
-
I want to fill this marketplace data field with the data from this PlentyONE setting.
-
If the data field is empty for a variation, no value is exported for this variation.
Creating a simple 1:1 mapping:
-
Next to the marketplace data field, click on + Add data field.
→ To the left, the list of available PlentyONE data fields are shown in groups. -
Click on the group you need.
→ The PlentyONE data fields of the group are shown. -
Click on the plus to the right of the PlentyONE data field you want to select.
→ The PlentyONE data field is added to the right. -
Click on Confirm.
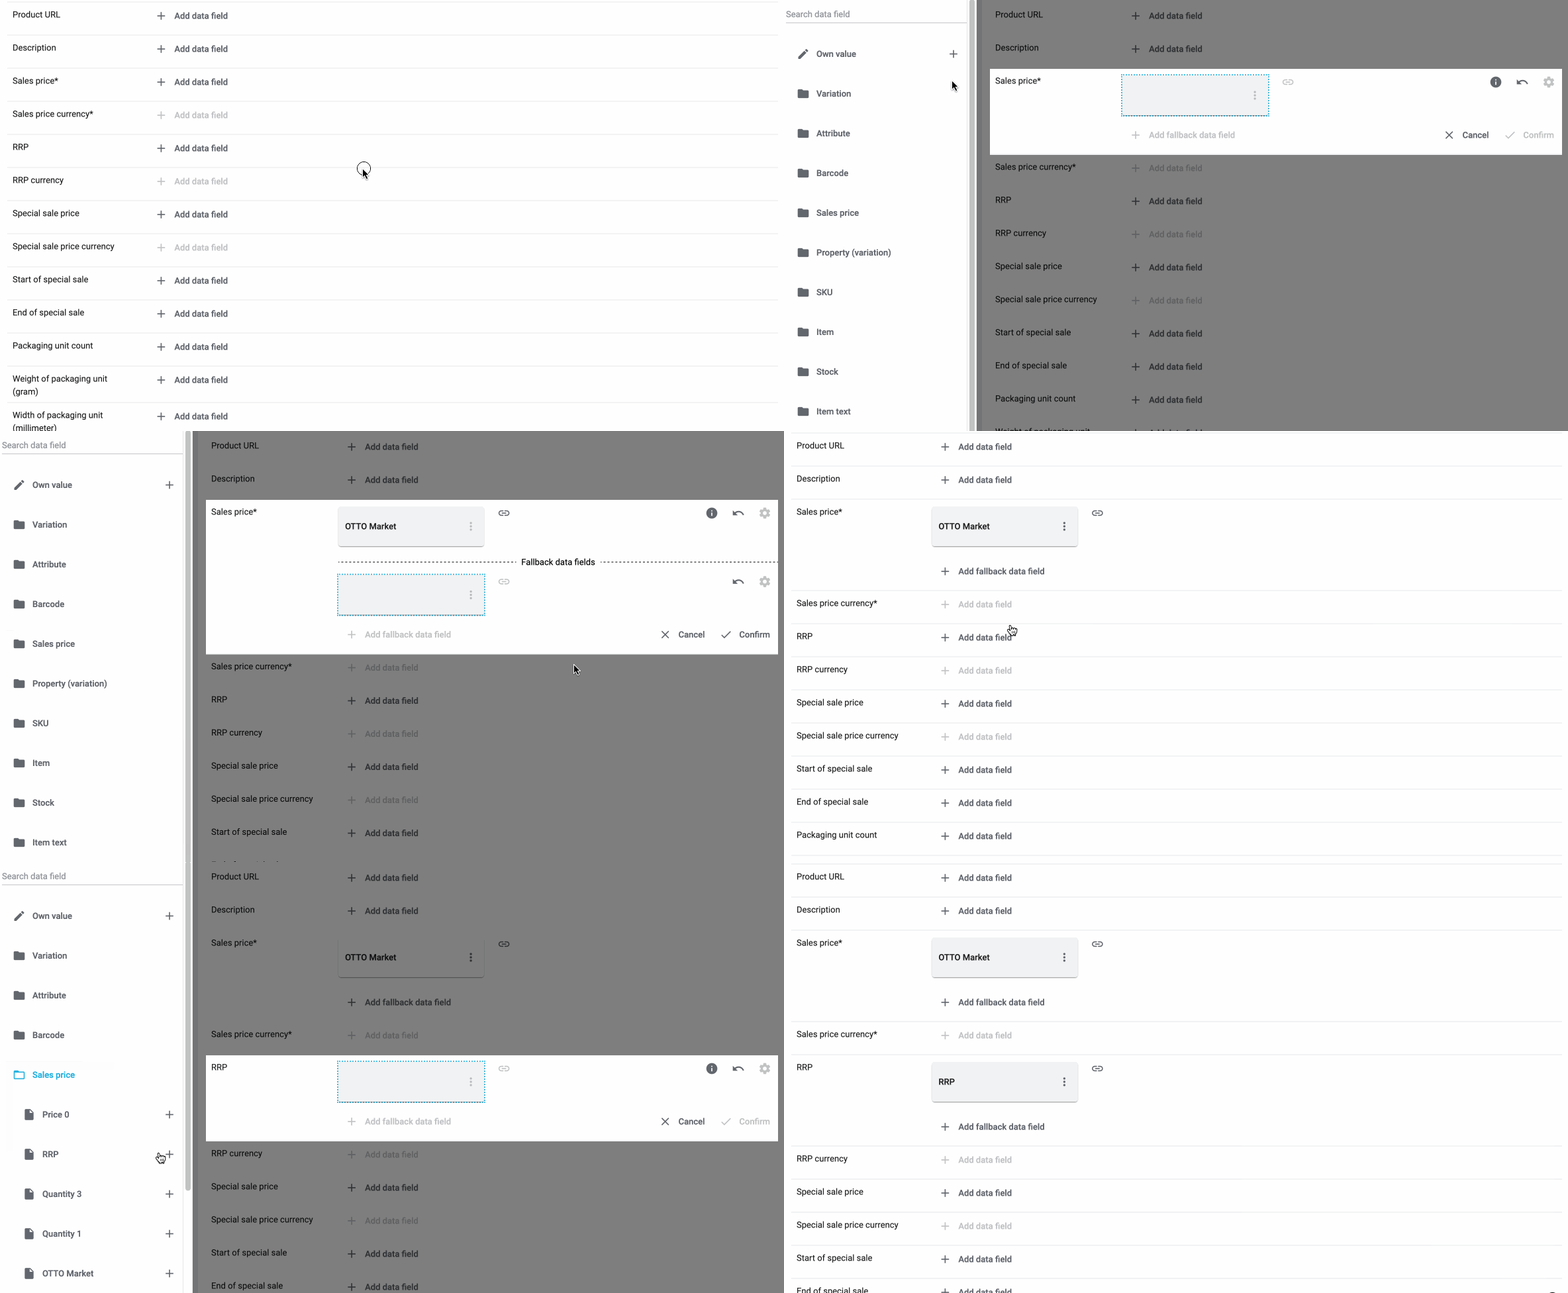
Example: Sales price and RRP for Otto Market
This gif shows you how to map the marketplace data fields Sales price and RRP for Otto Market to PlentyONE data fields:
Reminder: In a simple 1:1 mapping, you map a PlentyONE data field to the marketplace data field. However, what can you do if PlentyONE does not offer a suitable data field? Then it’s the properties' moment to shine. Properties allow you to save any kind of information in your properties.
-
Is this your first time working with properties? Then read up on the principles of properties first.
Creating a property:
-
Create a property with the necessary values.
Tip: Find out how to do that here.
Creating a simple 1:1 mapping with properties:
-
Next to the marketplace data field, click on + Add data field.
→ To the left, the list of available PlentyONE data fields are shown in groups. -
Expand the group Property.
→ The property groups are shown. -
Expand the group you need.
-
Click on the Plus sign on the right of the property you want.
-
From the drop-down list Language, select the language in which you send the data to the market.
-
Click on Confirm.
→ The property is mapped to the marketplace data field.
Like with the simple 1:1 mappings, you map a PlentyONE setting or property to a marketplace data field. Complex mappings are necessary whenever a marketplace data field has more than one possible value. Instead of mapping data fields, for complex mappings you map individual values of these data fields. For example, you cannot simply map the PlentyONE data field Shipping profile to the marketplace data field Shipping method. Why? The market cannot know which of your shipping profiles in PlentyONE corresponds to which of their shipping methods.
| Do not enter own values for complex mappings. All values that you enter must be saved for the variations, either in a setting or as a property value. This also applies if the value Comparative value is shown. You still need to enter exactly the value of the setting or property that you mapped. |
In complex mappings, the value of the market is always exported. Only when you map an own value, the own value that you enter is exported.
You can recognise complex mappings from the field that is shown below the name of the marketplace data field. Click on the field to show the values available for the marketplace data field.

Examples for complex 1:1 mappings are:
-
Categories
-
Brands
-
Shipping setting
Important: For complex mappings, do not map own values or properties of the type None.
Creating a complex 1:1:n mapping:
-
Click on the field for the marketplace data field.
→ A list of the available values is shown. -
Select the value that you want to map a PlentyONE data field to.
→ The value is mapped. -
Next to the marketplace data field, click on + Add data field.
→ To the left, the available PlentyONE data fields are listed in groups. -
Click on a group.
→ The PlentyONE data fields of the group are shown. -
Click on the PlentyONE data field for which you want to map values.
Important: Do not map own values or properties of the type None. -
Your next steps depend on the PlentyONE data field you selected:
-
Alternative 1: The available values for the PlentyONE data value are shown on the left.
-
Next to the value you want to select, click on the plus.
→ The value is added to the field on the right. -
Click on Confirm.
-
-
Alternative 2: The PlentyONE data field is inserted and the field Comparative value is shown.
-
In the field Comparative value, enter a value that is saved in the setting or the property of the mapped PlentyONE data field.
-
Click on Confirm.
-
-
Alternative 3: The PlentyONE data field is inserted and a drop-down list is shown.
-
Select a value from the drop-down list.
-
Click on Confirm.
→ The value of the marketplace data field is exported, not the value of the PlentyONE data field.
Exception: Only when you map an own value, the own value that you enter is exported.
-
-
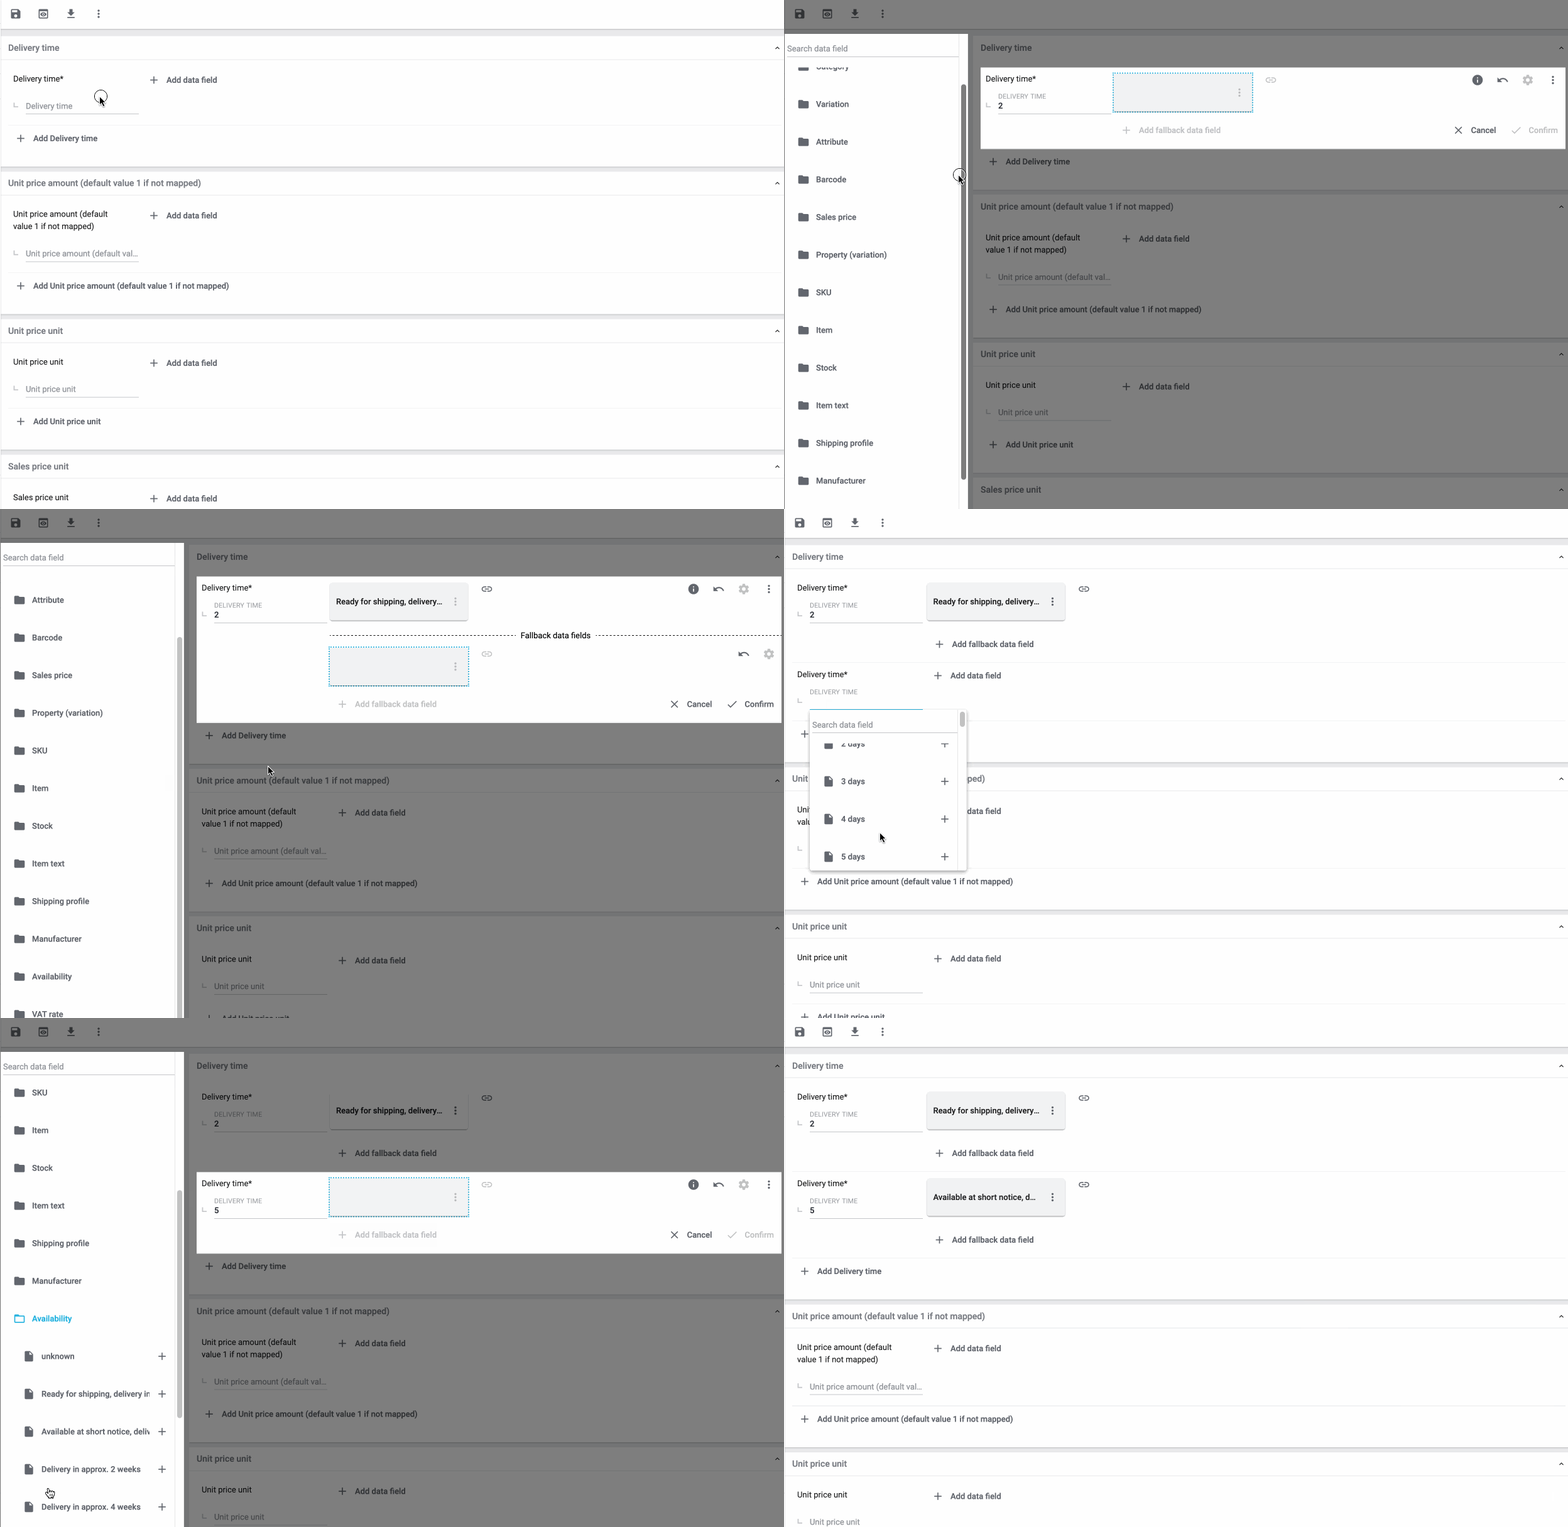
Example: Delivery time in days for Otto Market
This gif shows you how to map suitable PlentyONE values to the values of the marketplace data fields Delivery time in days for Otto Market:
In a 1:1 mapping with one or more fallback data fields, you map a PlentyONE data field to the marketplace data field. In addition, you specify one or more fallback data fields. This ensures that the system keeps looking if the first PlentyONE data field is missing or empty.
So this mapping specifies:
-
I want to fill the marketplace data field with the data from the selected PlentyONE setting.
-
If that data field is missing or empty for a variation, the first fallback data field is checked. The value of that fallback data field is exported instead.
-
If the first fallback data field is also missing or empty for the variation, the second fallback data field is checked. If a value is found, the value of the second fallback data field is exported for the variation etc.
Two separate fallback conditions are available:
Null (default) |
The fallback data field is used if the data field above is mapped in the catalogue but not linked to the variation. The condition "Null" is useful when you want to map fallback data fields for the following types of PlentyONE data fields:
Important: When you add a fallback data field, the fallback condition "null" is selected automatically. To apply the fallback condition "leer", you need to change the default setting. |
Empty |
The fallback data field is used if the data field above is mapped in the catalogue and linked to the variation, but is empty. The condition "Empty" is useful when you want to map fallback data fields for the following type of PlentyONE data fields:
Important: When you add a fallback data field, the fallback condition "null" is selected automatically. To apply the fallback condition "leer", you need to change the default setting. |
Note: Even if you assign one or more fallback data fields, the value of only one of those fields is exported. For each variation, the mapped PlentyONE data fields are checked in the order in which you mapped them. This means that if the first data field does not provide a value for a variation, the first fallback data field is exported etc.
Creating a 1:1 mapping with fallback data fields:
-
Next to the marketplace data field, click on + Add data field.
→ To the left, the list of available PlentyONE data fields are shown in groups. -
Click on the group you need.
→ The PlentyONE data fields of the group are shown. -
Click on the plus to the right of the PlentyONE data field you want to select.
→ The PlentyONE data field is added to the right. -
In the list of PlentyONE data fields, click on the plus icon next to the PlentyONE data field that you want to map.
→ The fallback data field is added with the fallback condition "null". -
Alternative 1: To add the fallback data field with the fallback condition "null":
-
Click on Confirm.
→ The fallback data field is exported if the data field above is not linked to the variation.
-
-
Alternative 2: To add the fallback data field with the fallback condition "empty":
-
To the left of the fallback data field, click on the cog ().
→ The window Data column settings is shown. -
For the setting Fallback condition, select the option Empty.
-
Click on Save.
→ The fallback data field is added with the fallback condition "empty". -
Click on Confirm.
→ The fallback data field is exported if the data field above is empty for the variation.
-
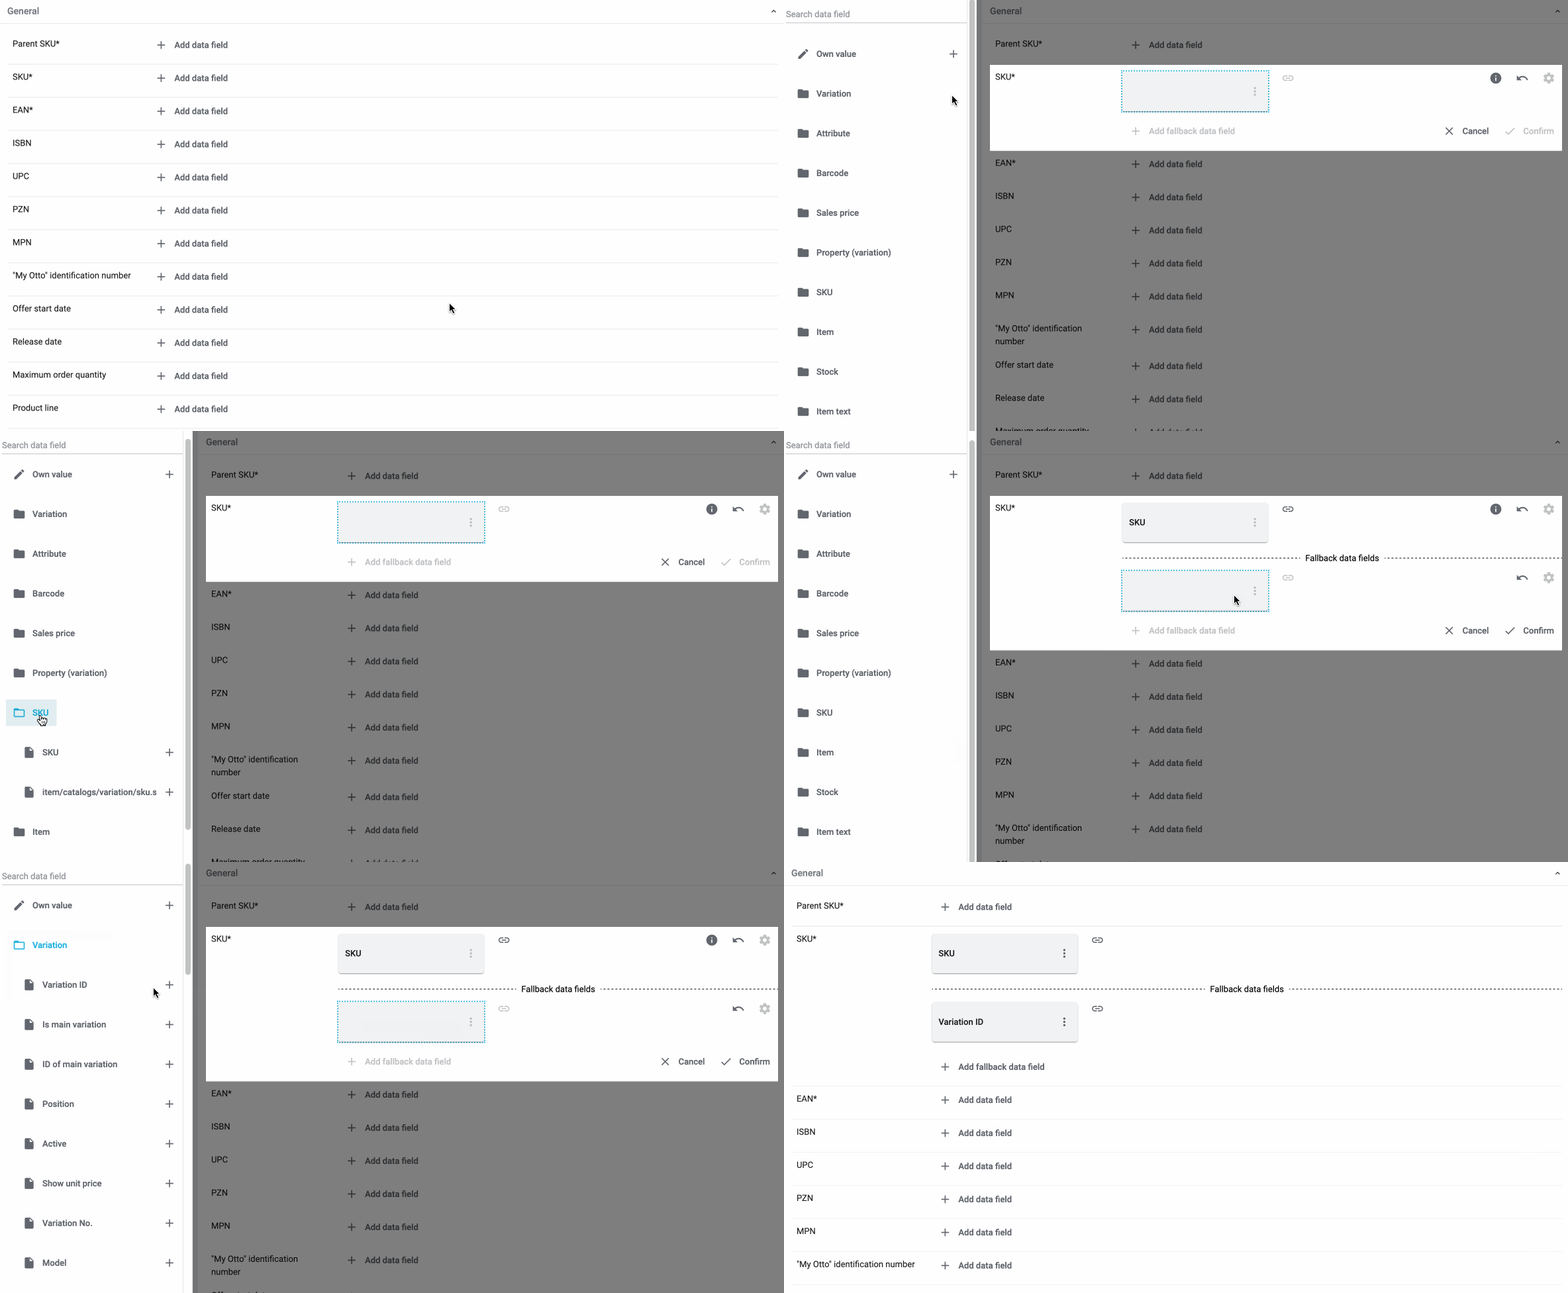
Example: Fallback data field for SKU for Otto Market
This GIF shows you the mapping for the OTTO Market marketplace data field SKU. The PlentyONE data field SKU is mapped to this marketplace data field. The PlentyONE data field Variation ID is mapped as the fallback data field. The fallback condition "null" is applied automatically.
Result: The fallback data field Variation ID is exported if the data field SKU is not linked to the variation.
In a 1:n mapping, you map several PlentyONE data fields to the marketplace data field. You can link these data fields with a separator.
So this mapping specifies:
-
I want to combine these PlentyONE data fields during export so that the marketplace data field is filled with the data of these two or more PlentyONE settings.
Creating a 1:n mapping:
-
Next to the marketplace data field, click on + Add data field.
→ To the left, the list of available PlentyONE data fields are shown in groups. -
Click on the group you need.
→ The PlentyONE data fields of the group are shown. -
Click on the plus to the right of the PlentyONE data field you want to select.
→ The PlentyONE data field is added to the right. -
Click on Confirm.
-
To the right of the mapped PlentyONE data field, click on Add data field ().
→ To the left, the list of available PlentyONE data fields again are shown in groups. -
Map one or several additional PlentyONE data fields to the marketplace data field as described above.
-
Click on Confirm.
-
To the very right of the row, click on Settings ().
-
Select a separator from the drop-down list Separator or add a custom separator.
-
Click on Save.
-
Save () the catalogue.
→ The mappings are saved.
→ During the export, the content of the PlentyONE data fields is combined and exported as one field.
You are sure that you want to export the same value for all variations of a catalogue for a marketplace data field? Then specify an own value. This own value is then exported for all variations.
So this mapping specifies:
-
For this marketplace data field, I want to export the value that I entered in the field Own value for all variations of this catalogue. The value you enter is always exported. The value overwrites the market value also in complex mappings where usually the value of the market is exported. As such, make sure you enter an own value that the market accepts for this marketplace data field.
Creating an own value mapping:
-
Next to the marketplace data field, click on + Add data field.
→ To the left, the list of available PlentyONE data fields are shown in groups. -
Click on the plus next to Own value at the top of the list.
→ The field for the own value is added to the view. -
Enter a value into the input field.
→ This value is exported for all variations.
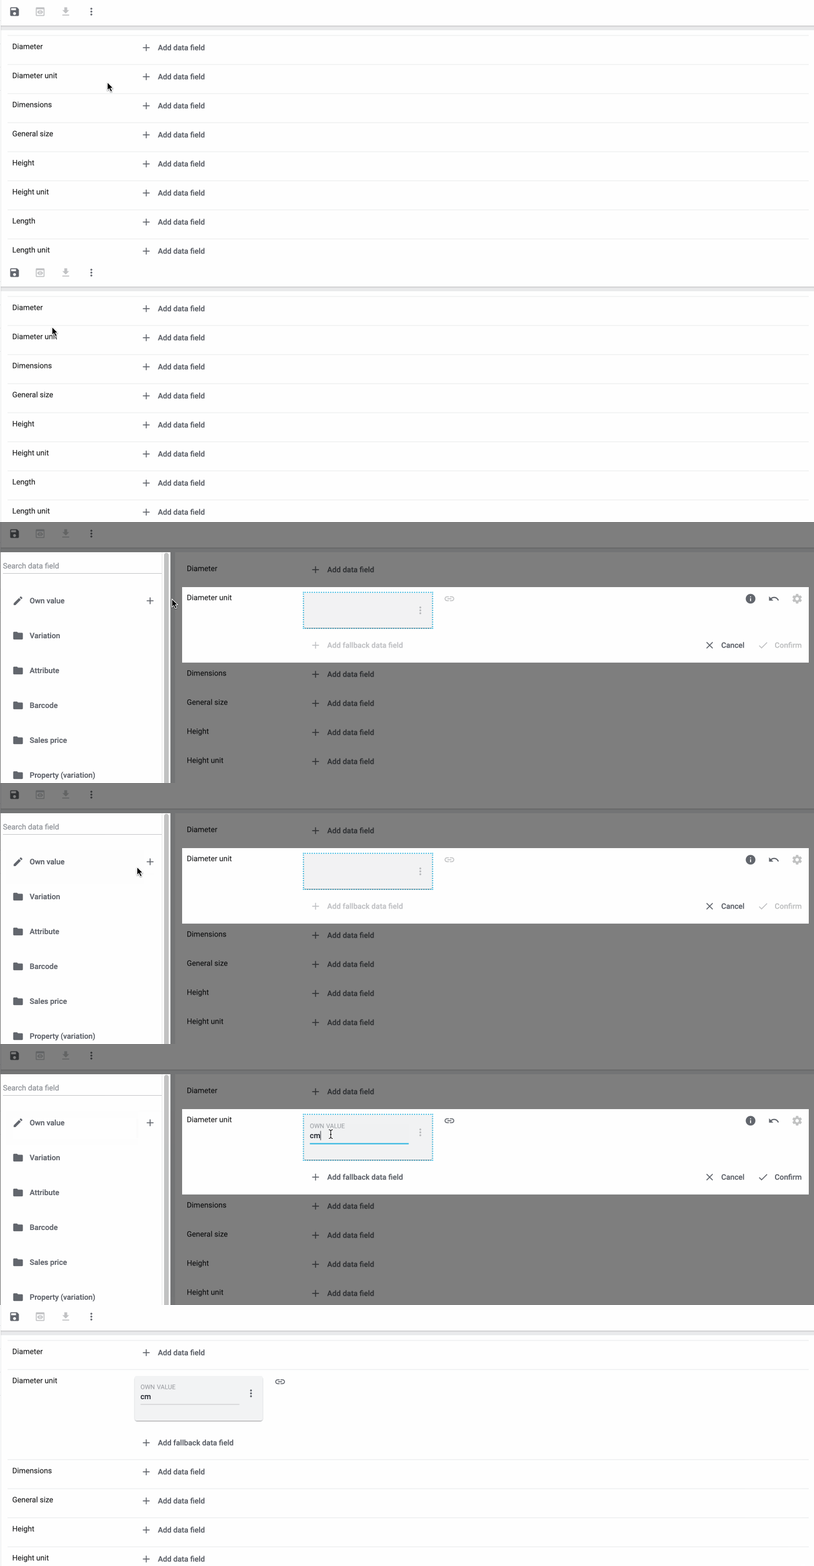
Example: Diameter information
You want to export diameter information for some of your variations. The diameter is saved in centimetres for all your variations. Instead of creating a property for the unit and linking this property to the variations, you can enter the own value cm.
This is an example of how you can map an own value for the diameter unit:
Mathematical calculations allow you to change numerical values automatically during the export.
-
This function only works for data fields that contain numerical values.
-
This functionality is new and not available for all catalogue formats.
So this mapping specifies:
-
I want the numerical value of a PlentyONE data field to be recalculated during the export. Basic arithmetic operations are available for the formulas.
Recalculating numerical values:
-
Next to the marketplace data field, click on + Add data field.
→ To the left, the list of available PlentyONE data fields are shown in groups. -
At the very top of the list, click on the plus icon next to Formula (calculate).
→ The data field Formula is added to the field on the right. -
Click into the data field.
→ The window Modify value is shown. -
Enter a numerical value or select a PlentyONE data field at the bottom right of the window to add it to the calculation (add).
Tip: Use the search function. This helps you to find data fields quickly. -
Optional: If the symbol more_vert is shown in the data field, select the correct assignment for the data field.
Tip: A number tells you how many assignments are necessary for the data field.-
Click on the icon more_vert.
-
In the window shown, select the assignments from the drop-down list.
-
Save the settings.
-
-
Enter numbers and mathematical operators with the on-screen calculator or the keyboard.
-
Save the settings.
→ The entered formula is displayed in the overview.
→ The calculation will be carried out in the next export.
13.1.4. Particularities for mapping data fields in the product catalogue
Every market structures item data differently. As such, there are some particularities for each market when mapping data fields. This chapter contains mapping information for important data fields for Amazon.
13.1.4.1. Updates required: Amazon product metadata changes
| Amazon makes changes to product metadata at irregular intervals. |
These changes include new or updated mandatory attributes, adjustments to product types, and changes to the data fields available in product catalogues. Such changes may require existing product catalogues to be updated or additional data fields to be mapped.
Amazon publishes information about these updates on an official documentation page:
We recommend checking the SP-API product metadata updates and your product catalogues regularly and adjusting your product catalogues as necessary to ensure that all required data continues to be transferred to Amazon correctly.
13.1.4.2. Mapping the item name
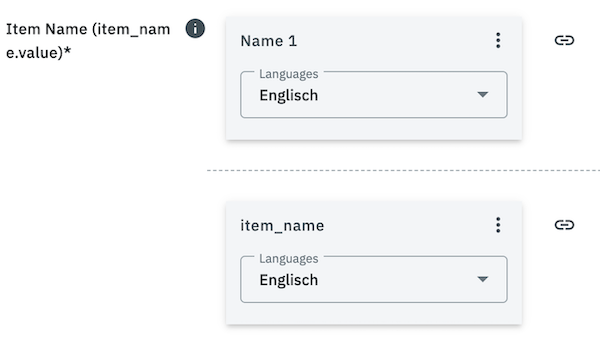
The item name is mapped in the Amazon product catalogues using the data field Item name (item_name.value) within the group item_name.
Note: If you offer variations of an item on Amazon, use a generic item name that can be used for all variations. A variation’s attributes, such as the colour of a T-shirt, should not be included in the item name. The attributes of a variation will be automatically added by Amazon. More information on variation families on Amazon can be found here.
The following mappings are possible for the item name. Note that the mappings are recommendations only. Depending on how you manage your item data, other mappings may be more appropriate than the recommendations given here.
-
Item text » Name 1, Name 2, or Name 3
-
Property of the type Text
13.1.4.3. Mapping bullet points
Use the data field bullet_point in the Amazon product catalogues to add short descriptive texts to your items which will be shown as bullet points next to the product image.
To export multiple bullet points to Amazon, click add Add fallback data source and add more bullet points. Those bullet points are not treated as a fallback data source, but also exported to Amazon and listed as bullet points.
13.1.4.4. Exporting an image list
You can export a list of item or variation images to Amazon via the data field main_product_image_locator. To do this, map the image list as follows:
-
Image » Variation images » Image list, image information Full image URL
Note: If you map the data field Variation images, then only images that are linked with at least one variation will be exported.
or
-
Image » Item images » Image list, image information Full image URL
Note: If you map the data field Item images, then only images that are not linked with any variation will be exported.
or
-
Image » All images » Image list, image information Full image URL
Note: If you map the data field All images, then all images will be exported, regardless of whether the images are linked to a variation or not. -
Under Maximum number of images, enter the number of images you want to export from the image list.
The image URLs from the image list are automatically mapped to the next available data fields other_product_image_locator_1 to other_product_image_locator_8.
Example: The image list is mapped to the data field main_product_image_locator and contains three images:
-
The URL of the first image is mapped to the data field main_product_image_locator,
-
the URL of the second image to other_product_image_locator_1,
-
the URL of the third image to other_product_image_locator_2.
Note: If a subsequent data field is already mapped, this data field is skipped. The image URL is then mapped to the next available empty other_product_image_locator data field instead.
Important: Only as many images are mapped as the number of available following other_product_image_locator data fields. Excess images from the image list are not added.
Tip: If you map another image list in the fallback data source in addition to the image list in the main data source, both image lists are combined into a single list. From this combined list, as many images are transferred to Amazon as the number of available following other_product_image_locator data fields in the catalogue. Excess images are not transferred.
Single images from the fallback data source are not combined with the image list from the main data source. They are only transferred if no mapped single image or image list is found in the main data source.
13.1.4.5. Linking categories
You can map suitable Amazon browse categories to your items using the recommended_browse_nodes data field. This ensures your items appear in the relevant category when customers browse this category on Amazon.
If you don’t map this data field, the category links from the menu Sales channels » Channel Control Centre » [Open your Amazon sales channel] » Category link will be used for your item instead.
Note: Browse categories are mapped using so-called Browse Node IDs. Each category path has its own unique Browse Node ID. You can find an up-to-date list of these IDs in the
Browse Tree Guides (BTG) in the Amazon Seller Central.
For data field mapping in the product catalogue, we recommend creating a property of the type Selection for browse categories. Add the required Browse Node IDs as individual selection values.
13.1.4.6. Assigning variation themes
With variation themes, you can display multiple product variations, such as different sizes or colours, on a single product detail page. This allows your customers to see all the available options at a glance. The variation themes available depend on the respective product category.
You assign variation themes in the data field group variation_theme as follows:
Mapping a variation theme with a single attribute:
-
Go to Data » Catalogues.
-
Open the product catalogue for Amazon.
-
Scroll to the data field group variation_theme.
-
For the data field Variation Theme Name, select the appropriate variation theme from the drop-down list under Export as.
Example:COLOUR_NAME
Note: After selecting the variation theme, the field Export as may display a different label. This is normal. The options in the drop-down list are primarily for better orientation and usually show a translation of the actual value. The data field displays the actual value transmitted. -
Click add Add data source.
-
Select the appropriate attribute with the addition is linked.
Example: Attribute » Colour » Attribute Colour is linked.
Note: The selected variation theme is only transmitted if the corresponding attribute is linked to your variation. -
Click Save (save).
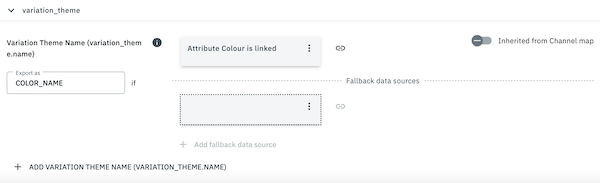
Note that you must also link the data fields in the product catalogue that correspond to the variation theme so that the data can be transferred to Amazon. For example, if you use the variation them COLOUR_NAME, then you also have to map the data field for COLOUR.
You can also select a variation theme that combines multiple attributes. These are indicated by a forward slash separating the individual attribute names.
Example: COLOUR_NAME/SIZE_NAME
Mapping a variation theme with multiple attributes:
-
Go to Data » Catalogues.
-
Open the product catalogue for Amazon.
-
Scroll to the data field group variation_theme.
-
For the data field Variation Theme Name, select the appropriate combination of attributes from the drop-down list under Export as.
Example:COLOUR_NAME/SIZE_NAME
Note: After selecting the variation theme, the field Export as may display a different label. This is normal. The options in the drop-down list are primarily for better orientation and usually show a translation of the actual value. The data field displays the actual value transmitted. -
Click add Add data source.
-
Select the appropriate attribute with the addition is linked for the first attribute of the variation theme.
Example: Attribute » Colour » Attribute Colour is linked forCOLOUR_NAME. -
Click link Add data source.
-
Select the appropriate attribute with the addition is linked for the second attribute of the variation theme.
Example: Attribute » Size » Attribute Size is linked forSIZE_NAME. -
Repeat steps 7–8 if the variation theme includes additional attributes.
Important:-
The variation theme is only transmitted if all of its attributes are linked to the variation.
-
Do not add the second and all subsequent attributes via Add fallback data source.
-
If you map multiple variation themes with a different number of attributes, arrange them in order of their attribute count. Start with the variation theme that contains the most attributes and continue to the theme with the fewest attributes.
-
-
Click Save (save).
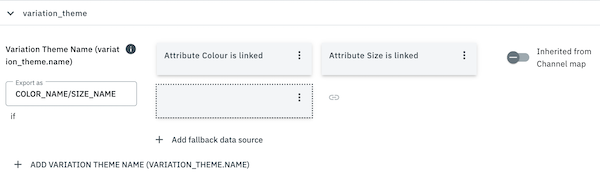
Note that you must also link the data fields in the product catalogue that correspond to the variation theme so that the data can be transferred to Amazon. For example, if you use the variation themes COLOUR_NAME and SIZE_NAME, then you also have to map the data fields for COLOUR and SIZE.
13.1.5. Activating the catalogue export
| Product catalogues (Product TYPE Product) are activated for all Amazon accounts by default. |
Creating a catalogue:
-
Go to Sales channels » Channel Control Centre.
-
Click on the Amazon tile.
-
Click Create catalogue (add).
-
Enter a name for the catalogue.
-
In the drop-down list Marketplace, select the option Amazon.
-
In the drop-down list Export type, select the option Listing.
-
In the drop-down list Amazon Account, select the Amazon account for which the catalogue is to be created.
-
In the drop-down list Sales Channel, select the Amazon sales channel.
-
In the drop-down list Category, select the option the Amazon product type.
-
Save () the settings.
→ The catalogue is created.
→ The catalogue is opened for editing.
Other catalogue settings
Other catalogue settings are optional. Once you carried out the settings described on this page, your catalogue is automatically exported to Amazon. That means you can ignore the catalogue settings for Format settings, Export settings and Download settings.
The Format settings, Export settings, and Download settings allow you to create a file with the variation data contained in the catalogue. However, this file does not contain information about whether the data export to Amazon was successful.
13.2. Creating an offer catalogue
Offer data is exported to Amazon using catalogues. To export your items to Amazon, create an offer catalogue in the Data » Catalogue menu. Afterwards, link the Amazon data fields with item data saved in PlentyONE in the catalogue.
After you activate the offer catalogue, the catalogue data is automatically exported to Amazon within 15 minutes after a value has been changed on the variation.
To simplify the creation of new catalogues, you can now create Channel maps for Amazon. With Channel maps, you can create cross-category mappings for a marketplace and apply them to catalogues afterwards. All linked catalogues automatically inherit the mapping from the Channel map. This will save you a lot of time as you don’t need to carry out the mappings for each catalogue.
You can find more information on how to create Channel maps in the Channel maps section.
Creating an offer channel map:
-
Open the menu Sales channels » Channel Control Centre » [Name of your Amazon sales channel] » Mapping » Offer mapping.
-
Click on Create Channel map (add).
-
Enter a name for the channel map.
-
In the drop-down list Marketplace, select the option Amazon.
-
In the drop-down list Catalogue type, select the option Offer-[sales channel].
-
In the drop-down list Categories, select the product categories you want to sell on Amazon.
-
Click on CREATE CHANNEL MAP.
→ The channel map is created.
Once you have created a Channel map for Amazon, you can link catalogues to this Channel map. To do so, proceed as follows:
Linking an offer catalogue to the channel map:
-
Open the menu Sales channels » Channel Control Centre » [Name of your Amazon sales channel] » Mapping » Offer mapping.
-
In the row of the channel map you want to edit, click on more_vert More and select Connect catalogues.
-
In the drop-down list Select catalogues, click on Create catalogue.
-
Enter a name for the catalogue.
-
In the drop-down list Marketplace, select the option Amazon.
-
In the drop-down list Export type, select the option Listing.
-
In the drop-down list Amazon Account, select the Amazon account for which the catalogue is to be created.
-
In the drop-down list Sales Channel, select the Amazon sales channel.
-
In the drop-down list Category, select Offer.
-
Click on CREATE AND CONNECT TO CHANNEL MAP.
→ The catalogue is created and connected to the channel map.
Format setting for Amazon catalogues
The Format setting in the Amazon catalogue settings affects only the structure and formatting of the catalogue preview, but has no impact on how the automatic data exchange works in the background. You can either select JSON (PUT) or JSON (PATCH) as format.
The format in the settings of an Amazon catalogue determines which data structure is used for the transfer of the JSON file, regardless of whether PlentyONE executes the transfer via a feed or directly via HTTP.
The following methods are available:
-
PUT (“Create or replace”): Creates a new data record or replaces an existing data record completely.
-
PATCH (“partial update”): Creates or updates only the mapped data fields. Fields that are not transferred remain unchanged and are not deleted.
The format selected in the catalogue settings is irrelevant for data exchange with Amazon. Products and offers are automatically transferred using the following methods:
Export type |
Data |
Method |
Behaviour |
Offer export |
New offer listings |
PUT |
Creates the offer anew or replaces it completely. |
Offer export |
Updating existing offer listings |
PATCH |
Updates only the offer data which was changed (for example price or stock). |
Product export |
New and existing product listings |
PATCH |
Only updates the specific product fields, without overwriting or deleting existing data. |
13.2.1. Mapping data fields in the offer catalogue
After you have created a catalogue, map the sales channel’s data fields to item data saved in PlentyONE. This chapter describes how you map data fields and what particularities apply for item exports to Amazon.
|
Not all mandatory fields are identified in the offer catalogue
At the moment, not all mandatory fields and dependencies between data fields can be displayed in the offer catalogue for Amazon. |
-
The market expects product data that cannot be saved in the PlentyONE item menu? Then create a property for this data. Link this property with your variations. The actual values are saved as property values for this property. Is this your first time working with properties? Then read up on the principles of properties first.
| Availability | Explanation |
|---|---|
Navigation |
When you open a catalogue, the view Mapping is shown. On the very left is the navigation.
|
Toolbar |
The toolbar provides actions for the catalogue. For example, save your mappings, restore an older version of the catalogue or hide or show optional marketplace data fields. |
Marketplace data field |
To the right of the navigation, all data fields available for the market are listed. Mandatory fields are marked with an asterisk (✱). |
PlentyONE data fields |
On the right side of the catalogue, you map the marketplace data fields to appropriate PlentyONE data fields. In the screenshot above, a few of the fields are already mapped. |
Mapping catalogue fields:
-
Go to Sales channels » Channel Control Centre.
-
Click on the tile of your Amazon sales channel.
-
Click on the catalogue you want to edit.
→ The Mapping tab opens.
→ In the left-hand column, the market’s data fields are listed.
Tip: Mandatory fields are flagged with an asterisk (*).
→ In the right column, you map the PlentyONE data fields. Any PlentyONE data fields that you already mapped are also shown in this column. -
Map suitable PlentyONE data fields to the market data fields.
For each marketplace data field, you have a number of mapping options. Expand the info boxes below to get more information about each of these mapping options.-
Simple 1:1 mapping
-
Simple 1:1 mapping with properties
-
Complex 1:1 mapping
-
1:1 mapping with fallback data fields
-
1:n mapping
-
Own value mapping
-
Mapping with mathematical calculations
-
-
Save () the catalogue.
→ The mappings are saved.
In a simple 1:1 mapping, you map a PlentyONE data field to the marketplace data field. If no suitable setting exists in PlentyONE, you can map a property instead.
As such, simple 1:1 mappings allow you to:
-
I want to fill this marketplace data field with the data from this PlentyONE setting.
-
If the data field is empty for a variation, no value is exported for this variation.
Creating a simple 1:1 mapping:
-
Next to the marketplace data field, click on + Add data field.
→ To the left, the list of available PlentyONE data fields are shown in groups. -
Click on the group you need.
→ The PlentyONE data fields of the group are shown. -
Click on the plus to the right of the PlentyONE data field you want to select.
→ The PlentyONE data field is added to the right. -
Click on Confirm.
Example: Sales price and RRP for Otto Market
This gif shows you how to map the marketplace data fields Sales price and RRP for Otto Market to PlentyONE data fields:
Reminder: In a simple 1:1 mapping, you map a PlentyONE data field to the marketplace data field. However, what can you do if PlentyONE does not offer a suitable data field? Then it’s the properties' moment to shine. Properties allow you to save any kind of information in your properties.
-
Is this your first time working with properties? Then read up on the principles of properties first.
Creating a property:
-
Create a property with the necessary values.
Tip: Find out how to do that here.
Creating a simple 1:1 mapping with properties:
-
Next to the marketplace data field, click on + Add data field.
→ To the left, the list of available PlentyONE data fields are shown in groups. -
Expand the group Property.
→ The property groups are shown. -
Expand the group you need.
-
Click on the Plus sign on the right of the property you want.
-
From the drop-down list Language, select the language in which you send the data to the market.
-
Click on Confirm.
→ The property is mapped to the marketplace data field.
Like with the simple 1:1 mappings, you map a PlentyONE setting or property to a marketplace data field. Complex mappings are necessary whenever a marketplace data field has more than one possible value. Instead of mapping data fields, for complex mappings you map individual values of these data fields. For example, you cannot simply map the PlentyONE data field Shipping profile to the marketplace data field Shipping method. Why? The market cannot know which of your shipping profiles in PlentyONE corresponds to which of their shipping methods.
| Do not enter own values for complex mappings. All values that you enter must be saved for the variations, either in a setting or as a property value. This also applies if the value Comparative value is shown. You still need to enter exactly the value of the setting or property that you mapped. |
In complex mappings, the value of the market is always exported. Only when you map an own value, the own value that you enter is exported.
You can recognise complex mappings from the field that is shown below the name of the marketplace data field. Click on the field to show the values available for the marketplace data field.
Examples for complex 1:1 mappings are:
-
Categories
-
Brands
-
Shipping setting
Important: For complex mappings, do not map own values or properties of the type None.
Creating a complex 1:1:n mapping:
-
Click on the field for the marketplace data field.
→ A list of the available values is shown. -
Select the value that you want to map a PlentyONE data field to.
→ The value is mapped. -
Next to the marketplace data field, click on + Add data field.
→ To the left, the available PlentyONE data fields are listed in groups. -
Click on a group.
→ The PlentyONE data fields of the group are shown. -
Click on the PlentyONE data field for which you want to map values.
Important: Do not map own values or properties of the type None. -
Your next steps depend on the PlentyONE data field you selected:
-
Alternative 1: The available values for the PlentyONE data value are shown on the left.
-
Next to the value you want to select, click on the plus.
→ The value is added to the field on the right. -
Click on Confirm.
-
-
Alternative 2: The PlentyONE data field is inserted and the field Comparative value is shown.
-
In the field Comparative value, enter a value that is saved in the setting or the property of the mapped PlentyONE data field.
-
Click on Confirm.
-
-
Alternative 3: The PlentyONE data field is inserted and a drop-down list is shown.
-
Select a value from the drop-down list.
-
Click on Confirm.
→ The value of the marketplace data field is exported, not the value of the PlentyONE data field.
Exception: Only when you map an own value, the own value that you enter is exported.
-
-
Example: Delivery time in days for Otto Market
This gif shows you how to map suitable PlentyONE values to the values of the marketplace data fields Delivery time in days for Otto Market:
In a 1:1 mapping with one or more fallback data fields, you map a PlentyONE data field to the marketplace data field. In addition, you specify one or more fallback data fields. This ensures that the system keeps looking if the first PlentyONE data field is missing or empty.
So this mapping specifies:
-
I want to fill the marketplace data field with the data from the selected PlentyONE setting.
-
If that data field is missing or empty for a variation, the first fallback data field is checked. The value of that fallback data field is exported instead.
-
If the first fallback data field is also missing or empty for the variation, the second fallback data field is checked. If a value is found, the value of the second fallback data field is exported for the variation etc.
Two separate fallback conditions are available:
Null (default) |
The fallback data field is used if the data field above is mapped in the catalogue but not linked to the variation. The condition "Null" is useful when you want to map fallback data fields for the following types of PlentyONE data fields:
Important: When you add a fallback data field, the fallback condition "null" is selected automatically. To apply the fallback condition "leer", you need to change the default setting. |
Empty |
The fallback data field is used if the data field above is mapped in the catalogue and linked to the variation, but is empty. The condition "Empty" is useful when you want to map fallback data fields for the following type of PlentyONE data fields:
Important: When you add a fallback data field, the fallback condition "null" is selected automatically. To apply the fallback condition "leer", you need to change the default setting. |
Note: Even if you assign one or more fallback data fields, the value of only one of those fields is exported. For each variation, the mapped PlentyONE data fields are checked in the order in which you mapped them. This means that if the first data field does not provide a value for a variation, the first fallback data field is exported etc.
Creating a 1:1 mapping with fallback data fields:
-
Next to the marketplace data field, click on + Add data field.
→ To the left, the list of available PlentyONE data fields are shown in groups. -
Click on the group you need.
→ The PlentyONE data fields of the group are shown. -
Click on the plus to the right of the PlentyONE data field you want to select.
→ The PlentyONE data field is added to the right. -
In the list of PlentyONE data fields, click on the plus icon next to the PlentyONE data field that you want to map.
→ The fallback data field is added with the fallback condition "null". -
Alternative 1: To add the fallback data field with the fallback condition "null":
-
Click on Confirm.
→ The fallback data field is exported if the data field above is not linked to the variation.
-
-
Alternative 2: To add the fallback data field with the fallback condition "empty":
-
To the left of the fallback data field, click on the cog ().
→ The window Data column settings is shown. -
For the setting Fallback condition, select the option Empty.
-
Click on Save.
→ The fallback data field is added with the fallback condition "empty". -
Click on Confirm.
→ The fallback data field is exported if the data field above is empty for the variation.
-
Example: Fallback data field for SKU for Otto Market
This GIF shows you the mapping for the OTTO Market marketplace data field SKU. The PlentyONE data field SKU is mapped to this marketplace data field. The PlentyONE data field Variation ID is mapped as the fallback data field. The fallback condition "null" is applied automatically.
Result: The fallback data field Variation ID is exported if the data field SKU is not linked to the variation.
In a 1:n mapping, you map several PlentyONE data fields to the marketplace data field. You can link these data fields with a separator.
So this mapping specifies:
-
I want to combine these PlentyONE data fields during export so that the marketplace data field is filled with the data of these two or more PlentyONE settings.
Creating a 1:n mapping:
-
Next to the marketplace data field, click on + Add data field.
→ To the left, the list of available PlentyONE data fields are shown in groups. -
Click on the group you need.
→ The PlentyONE data fields of the group are shown. -
Click on the plus to the right of the PlentyONE data field you want to select.
→ The PlentyONE data field is added to the right. -
Click on Confirm.
-
To the right of the mapped PlentyONE data field, click on Add data field ().
→ To the left, the list of available PlentyONE data fields again are shown in groups. -
Map one or several additional PlentyONE data fields to the marketplace data field as described above.
-
Click on Confirm.
-
To the very right of the row, click on Settings ().
-
Select a separator from the drop-down list Separator or add a custom separator.
-
Click on Save.
-
Save () the catalogue.
→ The mappings are saved.
→ During the export, the content of the PlentyONE data fields is combined and exported as one field.
You are sure that you want to export the same value for all variations of a catalogue for a marketplace data field? Then specify an own value. This own value is then exported for all variations.
So this mapping specifies:
-
For this marketplace data field, I want to export the value that I entered in the field Own value for all variations of this catalogue. The value you enter is always exported. The value overwrites the market value also in complex mappings where usually the value of the market is exported. As such, make sure you enter an own value that the market accepts for this marketplace data field.
Creating an own value mapping:
-
Next to the marketplace data field, click on + Add data field.
→ To the left, the list of available PlentyONE data fields are shown in groups. -
Click on the plus next to Own value at the top of the list.
→ The field for the own value is added to the view. -
Enter a value into the input field.
→ This value is exported for all variations.
Example: Diameter information
You want to export diameter information for some of your variations. The diameter is saved in centimetres for all your variations. Instead of creating a property for the unit and linking this property to the variations, you can enter the own value cm.
This is an example of how you can map an own value for the diameter unit:
Mathematical calculations allow you to change numerical values automatically during the export.
-
This function only works for data fields that contain numerical values.
-
This functionality is new and not available for all catalogue formats.
So this mapping specifies:
-
I want the numerical value of a PlentyONE data field to be recalculated during the export. Basic arithmetic operations are available for the formulas.
Recalculating numerical values:
-
Next to the marketplace data field, click on + Add data field.
→ To the left, the list of available PlentyONE data fields are shown in groups. -
At the very top of the list, click on the plus icon next to Formula (calculate).
→ The data field Formula is added to the field on the right. -
Click into the data field.
→ The window Modify value is shown. -
Enter a numerical value or select a PlentyONE data field at the bottom right of the window to add it to the calculation (add).
Tip: Use the search function. This helps you to find data fields quickly. -
Optional: If the symbol more_vert is shown in the data field, select the correct assignment for the data field.
Tip: A number tells you how many assignments are necessary for the data field.-
Click on the icon more_vert.
-
In the window shown, select the assignments from the drop-down list.
-
Save the settings.
-
-
Enter numbers and mathematical operators with the on-screen calculator or the keyboard.
-
Save the settings.
→ The entered formula is displayed in the overview.
→ The calculation will be carried out in the next export.
13.2.2. Particularities for mapping data fields in the offer catalogue
Every market structures item data differently. As such, there are some particularities for each market when mapping data fields. This chapter contains mapping information for important data fields for Amazon.
13.2.2.1. Behaviour of unassigned data fields in the offer catalogue
With the setting Delete data fields that are not mapped in the offer catalogue for Amazon, you can define whether data fields that are not mapped in the offer catalogue should be exported to Amazon as “Delete”. If you activate this setting, then all data fields that are not mapped will be deleted on Amazon.
Note: This setting is deactivated by default.
13.2.2.2. Deleting mappings for complex data fields in the Amazon offer catalogue
Some data fields with complex mappings in the Amazon offer catalogue have to be mapped with an empty own value to delete the data on Amazon.
The following data fields with complex mappings in the Amazon offer catalogue have to be mapped with an empty own value to delete the data on Amazon.
| Group | Data field |
|---|---|
epr_product_packaging |
EPR Product Packaging Main Material |
externally_assigned_product_identifier |
External Product ID Type |
ghs_chemical_h_code |
GHS Chemical H Code |
hazmat |
Hazmat Aspect |
merchant_suggested_asin |
Merchant Suggested ASIN |
num_batteries |
Battery Type |
purchasable_offer |
Audience |
uvp_list_price |
UVP List Price Currency |
|
Do not delete data field mappings
For the data fields listed above, the mapped value of the complex mapping in the Export as field must not be deleted. Otherwise, Amazon will not know which data should be deleted. For these data fields, you have to map an empty own value to delete the data on Amazon. |
An example of how to map the data field EPR Product Packaging Main Material in the group epr_product_packaging with an empty own value is provided below. This data field will then be exported to Amazon as “Delete”.
Mapping an empty own value:
-
Go to Data » Catalogues.
-
Open the offer catalogue for Amazon.
-
Expand the group epr_product_packaging (chevron_right).
-
Navigate to the data field EPR Product Packaging Main Material.
Note: The value within the field Export as has to be mapped and must not be deleted. Otherwise, Amazon will not know which data to delete. -
Click add Add data source.
-
Add the data source Own value (add). Leave the field Value empty.
-
Click Save (save).
→ The data field will be deleted on Amazon during the next export.
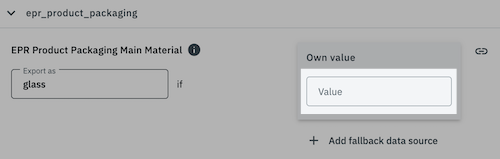
13.2.2.3. Mapping the target group
Use the data field Audience in the Amazon offer catalogue to define a target group for the catalogue. The data field Audience can be mapped in the following groups within the offer catalogue:
-
purchasable_offer (offer for all customers on Amazon)
-
purchasable_offer_fba (offer for all customers on Amazon with FBA)
-
purchasable_offer_mfn_b2b (offer for Amazon Business customers / B2B)
-
purchasable_offer_fba_b2b (offer for Amazon Business customers / B2B with FBA)
Note: These data fields are automatically mapped with the correct values.
The following values are pre-mapped:
-
The data fields purchasable_offer_mfn_b2b and purchasable_offer_fba_b2b are mapped with this value:
-
Own value with the value B2B
-
-
The data fields purchasable_offer und purchasable_offer_fba are mapped with this value:
-
Own value with the value ALL
-
13.2.2.4. Mapping the manufacturing country
The data field Country of origin within the group country_of_origin in the Amazon offer catalogue indicates the manufacturing country of an item. You can use those data sources to map the manufacturing country:
-
Map the Manufacturing country ID.
or
-
Map the Manufacturing country ISO-code.
Note: PlentyONE recommends to map the Manufacturing country ID, as this mapping is less prone to errors.
Mapping the manufacturing country ID:
-
Go to Data » Catalogues.
-
Open the offer catalogue for Amazon.
-
Expand the group country_of_origin (chevron_right).
-
In the field Export as, select the manufacturing country from the drop-down list.
-
Click add Add data source and add the data source Item » Manufacturing country ID.
→ The data source Manufacturing country ID is added. -
Enter the ID of the manufacturing country as Comparative value for Manufacturing country ID, for example
12for the United Kingdom.
Tip: Use the country IDs in PlentyONE. The list of PlentyONE country IDs is available here. -
Click Save (save).
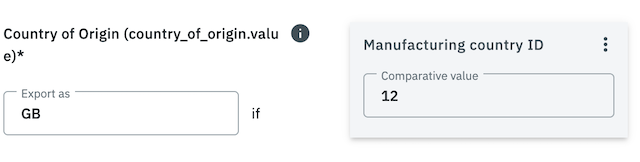
Mapping the manufacturing country ISO code:
-
Go to Data » Catalogues.
-
Open the offer catalogue for Amazon.
-
Expand the group country_of_origin (chevron_right).
-
In the field Export as, select the manufacturing country from the drop-down list.
-
Click add Add data source and add the data source Item » Manufacturing country ISO-code.
→ The data source Manufacturing country ISO-code is added. -
Enter the ISO code of the manufacturing country as Comparative value for Manufacturing country ISO-code, for example
GBfor the United Kingdom. -
Click Save (save).
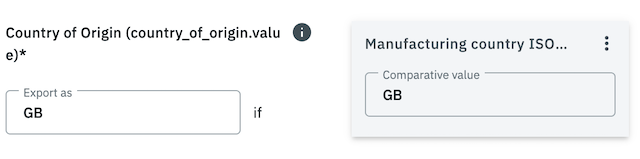
13.2.3. Deactivate creation of new offers on Amazon
In the offer catalogues for Amazon, you can define that existing offers on Amazon should only be updated and no new offers should be created on Amazon. This is done with the setting Deactivate creation of new offers (existing offers will continue to be updated) in the settings of an offer catalogue. This setting must be activated or deactivated separately for each offer catalogue.
Note: This setting is deactivated by default.
| If you activate the setting Deactivate creation of new offers (existing offers will continue to be updated) in an offer catalogue, then no new offers will be created on Amazon. This means that if your offer catalogue contains an offer which does not yet exist on Amazon, the offer will not be created, even if the offer catalogue is activated. |
Deactivate creation of new offers on Amazon:
-
Go to Data » Catalogues.
-
Open the offer catalogue for Amazon (export type Listing).
-
Open the settings Settings tab of the catalogue.
-
Check the setting Deactivate creation of new offers (existing offers will continue to be updated.
-
If offers should only be updated on Amazon and no new offers should be created, then this setting must be activated.
-
If new offers should be created on Amazon, this setting must be deactivated.
-
-
Click Save (save).
|
Price and stock updates are not affected
The processes for updating prices and stock (the settings Price changes and Stock changes in the Sales channels » Channel Control Centre » [Open your Amazon sales channel] » [Open account] » Settings » Tab: Item settings menu) are not affected by the setting for deactivating the creation of new offers on Amazon. If those settings are activated, then prices and stock will continue to be updated on Amazon. |
13.2.4. Activating the catalogue export
Creating a catalogue:
-
Go to Sales channels » Channel Control Centre.
-
Click on the Amazon tile.
-
Click Create catalogue (add).
-
Enter a name for the catalogue.
-
In the drop-down list Marketplace, select the option Amazon.
-
In the drop-down list Export type, select the option Listing.
-
In the drop-down list Amazon Account, select the Amazon account for which the catalogue is to be created.
-
In the drop-down list Sales Channel, select the Amazon sales channel.
-
In the drop-down list Category, select the option Offer.
-
Save () the settings.
→ The catalogue is created.
→ The catalogue is opened for editing.
Other catalogue settings
Other catalogue settings are optional. Once you carried out the settings described on this page, your catalogue is automatically exported to Amazon. That means you can ignore the catalogue settings for Format settings, Export settings and Download settings.
The Format settings, Export settings, and Download settings allow you to create a file with the variation data contained in the catalogue. However, this file does not contain information about whether the data export to Amazon was successful.
14. Creating a preview of the export data
Once you have created a catalogue for Amazon and mapped the data fields in the catalogue, you can create and download a preview of the export data. You have the option of narrowing down the displayed export data with filters.
Important: The filters only affect the preview of the export data and have no influence on the actual catalogue export to Amazon. If you want to use filters to limit the actual catalogue export, then use the export filters Flag 1, Flag 2 and Tags in the Item settings of your Amazon account. They apply to both product and offer catalogues.
Applying filters for the preview:
-
Go to Data » Catalogues.
-
Open the catalogue for Amazon.
-
Open the filter_alt Filter tab in the navigation bar on the left.
-
In the Custom filters section, select the desired filters from the Select filter drop-down list.
-
Click add Add filter. The available filters are explained in Table 13.
→ The filter is added. -
Depending on the filter, enter the desired IDs or select options from the drop-down list.
-
Click Save (save).
| Filter | Explanation |
|---|---|
Variation IDs |
Enter one or more Variation IDs to filter for items with this variation ID. Separate multiple IDs using commas. |
Item IDs |
Enter one or more Item IDs to filter for items with this item ID. Separate multiple IDs using commas. |
Has tags |
Select one or more tags from the drop-down list to filter for items with this tag. |
Without tags |
Select one or more tags from the drop-down list to filter for variations without this tag. |
Creating and downloading a preview of the export data:
-
Go to Data » Catalogues.
-
Open the catalogue for Amazon.
-
In the toolbar at the top, click Preview (preview).
→ A window with the preview of the export data opens. -
Optional: Click Download () in the preview window to save the preview as a file.
→ The preview of the export data is downloaded.
15. Testing the catalogue export
After you have created a catalogue for Amazon and mapped the data fields in the catalogue, you can test the catalogue export. To do so, open the catalogue’s settings.
After testing the export you can check the reports in the menus Sales channels » Channel Control Centre » [Open your Amazon sales channel] » Data exchange » Data export and Data » Log to identify why a catalogue was not accepted by Amazon and if you need to map more data fields in the catalogue.
Note: However, note that the test mode only includes a technical validation and no content check.
Prerequisites:
-
The new product type for the variation is linked at item level in the menu Item » Items » [Open item] » Section: Amazon.
-
For product catalogues:
-
You have added the Amazon product types for which you want to create product catalogues under Sales channels » Channel Control Centre » [Open your Amazon sales channel] » Category whitelist.
-
You have created a product catalogue for the corresponding product type.
-
-
For offer catalogues:
-
You have created an offer catalogue.
-
Testing the catalogue export:
-
Go to Data » Catalogues.
-
Open the catalogue for Amazon.
-
Open the settings Settings tab in the navigation bar on the left.
-
Activate the option Test mode in the section Amazon settings.
-
Click Save (save).
-
Go to Data » Catalogues.
→ The catalogues are listed. -
Scroll to the Amazon catalogue.
-
In the Active column, move the toggle button to the right ().
→ The catalogue is active.
→ A test export is sent to Amazon within 15 minutes. The test export includes all updates since the last export.
You can view and download the reports for the test export in either of these menus:
-
In the menu Sales channels » Channel Control Centre » [Open your Amazon sales channel] » Data exchange » Data export » Area: Reports for catalogue export.
-
In the menu Data » Log.
-
Search for the integration Plenty\\Modules\\Amazon\\Item\\Listings\\Services\\HTTPDataSenderService and the identifier DataSenderService.
-
16. Manually managing the data exchange
In the menu Sales channels » Channel Control Centre » [Open your Amazon sales channel] » Data exchange you can manually export data. For example, you can only export specific product and offer catalogues, or manually trigger a price and stock update.
16.1. Manually exporting catalogues
In the Sales channels » Channel Control Centre » [Open your Amazon sales channel] » Data exchange » Data export menu, you can manually export product catalogues and offer catalogues to Amazon. This can be helpful if you have created a new catalogue which you want to export to Amazon immediately without having to wait for the automatic offer or product export.
Note: The same catalogue can only be exported every 5 minutes.
Manually exporting a catalogue:
-
Navigate to Sales channels » Channel Control Centre » [Open your Amazon sales channel] » Data exchange » Data export.
-
In the section Export catalogue to Amazon, select the catalogue that should be exported to Amazon from the drop-down list. You can export product catalogues and offer catalogues.
-
If you want to export an offer catalogue, then select from the drop-down list Export type (offer) whether you want to create offers or update existing offers.
Note: If you want to export a product catalogue, then do not select anything here. Products are always created and updated automatically. -
Click Export catalogue (settings_b_roll).
→ The catalogue is exported to Amazon.
16.2. Manually triggering price and stock updates
In the Sales channels » Channel Control Centre » [Open Amazon sales channel] » Data exchange » Self-Service menu, you can manually trigger a price and stock update for specific SKUs. This bypasses the regular intervals for price and stock changes (every 15 minutes or hourly). Instead, the current price and stock data from the relevant offer catalogue is prioritised and transmitted to Amazon.
This can be useful, for example, if you need to update stock levels for fast-selling items or correct prices as quickly as possible.
Important:
-
To manually trigger a price and stock update, you need a correctly configured and activated offer catalogue for the relevant SKUs.
-
A maximum of 50 SKUs can be processed per request.
-
A manual price and stock update can only be triggered once per minute. After execution, the EXECUTE button is disabled for 60 seconds.
Manually triggering a price and stock update:
-
Go to Sales channels » Channel Control Centre » [Open your Amazon sales channel] » Data exchange » Self service.
-
Select the option Offer export from the Action drop-down list.
-
Select your Amazon account from the Account drop-down list.
-
Enter up to 50 comma-separated SKUs in the SKUs input field.
-
Click EXECUTE.
→ The system maps the specified SKUs to the corresponding variation IDs and automatically extends the request to include all linked variations (e.g. MFN, FBA or Multi-ASIN).
→ The current price and stock data for the specified SKUs is prioritised and transmitted to Amazon.
Important: Execution is asynchronous. This means that the price and stock update is not transmitted to Amazon immediately but is instead processed with priority during the next few minutes.
Tip: Once the update has been triggered, a status message is displayed. You can check the status of the transmission and the price and stock data sent to Amazon in the Price and stock export log.
17. Creating listings
Offers are transferred to Amazon as listings. Carry out the following steps to create listings for Amazon.
-
If the item you want to sell is not listed on the sales channel yet you will need to create a product listing for it first. Creating a product listing sends the product data to the sales channel and allows for the item to be listed.
In order to actually be able to sell the item on the sales channel you will need to additionally create an offer listing. The offer listing contains data related to the sale of the item, such as its price and stock. In other words, a product listing allows you to list an item on a sales channel that did not previously exist on that sales channel, but in order to sell that item on that sales channel you also need an offer listing for that item. -
If the item you want to sell is already listed on the sales channel you only need to create an offer listing. Offer listings send the data related to your offer, such as the price, stock, shipping costs etc., to the sales channel.
In most cases you will only need an offer listing in order to offer a product on a sales channel. Many sales channels do not differentiate between product and offer listings. You only need to send offer listings to these kinds of sales channels.
17.1. Creating product listings
Product listings are created in three steps:
-
First, you enter listing details, meaning you select the platform, template, and catalogue for the listing.
-
Next, you select the variations from which the product listings are created.
-
Lastly, check and confirm your selection and create the listings.
|
Create product listings using the group function
You can also create product listings directly in the Items menu using the variation group function. You can find more information about the variation group function here. |
Step 1: Specify listing details:
-
Go to Sales channels » Channel Control Centre.
-
Open the account for Amazon.
→ The General settings menu opens. -
Open the menu format_list_bulleted Product listings.
-
Click on add Create products.
→ The view Create products opens. -
Select the platform Amazon.
-
Select the template for the catalogue.
-
Select a catalogue with your mapping for item data.
Tip: If you have no fitting catalogue yet, click on add Create catalogue. You will be forwarded to the Data » Catalogues menu and can create a catalogue. -
Optional: Activate Automatically activate listings after creation, if listing data should be automatically transferred to Amazon after the listing is created.
-
Click arrow_forward NEXT.
→ The Select variations view opens. Next, select the variations you want to add to the listing.
Step 2: Select variations:
-
Select the variations you want to create the product listing for.
Tip: Use the search to filter for variations.
Note: Only variations that are linked to Amazon in the Item » Items » [Open item] » [Open variation] menu are displayed.
Tip: If you want to create a product listing for all available variations, click on Click here to create listings for all [] variations above. You will be automatically redirected to the Preview and confirmation step. Product listings can be created for a maximum of 50,000 variations at a time. -
Click add ADD TO SELECTED VARIATIONS.
→ The selected variations are displayed in the Selected variations section.
Note: If you check a variation in the Selected variations section, you can remove the variation from the selection by clicking Remove from list. -
Click arrow_forward NEXT.
→ The selected variations will be displayed in a new view. In the last step, you preview and confirm your selection.
Step 3: Preview and confirm selection:
-
Preview your settings in the Listing details section.
-
Preview your selected variations in the Listing preview section. The listings are grouped by items. Extend a listing group (chevron_right) to see which variations are contained in the respective listing group.
-
If everything is set and done, click save CREATE PRODUCT LISTINGS.
Note: If you activated Automatically activate listings after creation a window with a summary of your settings opens. Click check CONFIRM to create the product listings.
17.2. Activating product listings
After you have created the product listings, you have to activate the listings so that they can be transferred to Amazon.
To do so, activate the individual listings and the listing group. The listing can only be transferred to the sales channel if both the listing and the listing group are activated.
Note: You can also activate listings immediately after creation by activating the option Automatically activate listings after creation. If you activate the option to automatically activate listings after creation, you still have to activate the data exchange for the listing group.
Activating product listings:
-
Go to Sales channels » Channel Control Centre » [Open Amazon].
→ The General settings menu opens. -
Open the Product listings menu.
-
In the line of the product listing you want to activate, click more_vert.
-
Click toggle_on Activate data sync.
Tip: If you want to activate multiple product listings at once, place a check mark next to the desired product listings and click toggle_on arrow_drop_down » Activate data sync at the top of the toolbar.
→ The data exchange for the listing is activated. The listing can only be transferred to the sales channel if the listing group is also activated.
Activating a listing group:
-
Go to Sales channels » Channel Control Centre » [Open Amazon].
→ The General settings menu opens. -
Open the Product listings menu.
-
Open the listing group view (folder).
-
In the line of the listing group you want to activate, click more_vert.
-
Click toggle_on Activate data sync.
Tip: If you want to activate multiple listing groups at once, place a check mark next to the desired listing groups and click toggle_on arrow_drop_down » Activate data sync at the top of the toolbar.
→ The data exchange for the listing group is activated.
17.3. Creating offer listings
Offer listings are created in three steps:
-
First, you enter listing details, meaning you select the platform, template, and catalogue for the listing.
-
Next, you select the variations from which the offer listings are created.
-
Lastly, check and confirm your selection and create the listings.
Step 1: Specify listing details:
-
Go to Sales channels » Channel Control Centre.
-
Open the account for Amazon.
→ The General settings menu opens. -
Open the menu format_list_bulleted Offer listings.
-
Click add arrow_drop_down and select Create offers.
→ The Create offers view opens. -
Select the platform Amazon.
-
Select the template for the catalogue.
Tip: Only templates that are available for the platform Amazon are displayed. -
Select the sales channel on which the listing should be offered.
-
Select a catalogue with your mappings for offer data.
Tip: If you have no fitting catalogue yet, click on add Create catalogue. You will be forwarded to the Data » Catalogues menu and can create a catalogue. -
Optional: Activate Automatically activate listings after creation, if listing data should be automatically transferred to Amazon after the listing is created.
-
Click arrow_forward NEXT.
→ The Select variations view opens. Next, select the variations you want to add to the listing.
Step 2: Select variations:
-
Select the variations you want to create the offer listing for.
Tip: Use the search to filter for variations.
Note: Only variations that are linked to Amazon in the Item » Items » [Open item] » [Open variation] menu are displayed.
Tip: If you want to create offer listings for all available variations, click on Click here to create listings for all [] variations above. You will be automatically redirected to the Preview and confirmation step. Offer listings can be created for a maximum of 50,000 variations at a time. -
Click add ADD TO SELECTED VARIATIONS.
→ The selected variations are displayed in the Selected variations section.
Note: If you check a variation in the Selected variations section, you can remove the variation from the selection by clicking Remove from list. -
Click arrow_forward NEXT.
→ The selected variations will be displayed in a new view. In the last step, you preview and confirm your selection.
Step 3: Preview and confirm selection:
-
Preview your settings in the Listing details section.
-
Preview your selected variations in the Listing preview section. The listings are grouped by items. Extend a listing group (chevron_right) to see which variations are contained in the respective listing group.
-
If everything is set and done, click save CREATE OFFER LISTINGS.
Note: If you activated Automatically activate listings after creation a window with a summary of your settings opens. Click check CONFIRM to create the offer listings.
17.4. Activating offer listings
After you have created the offer listings, you have to activate the listings so that they can be transferred to Amazon.
To do so, activate the individual listings and the listing group. The listing can only be transferred to the sales channel if both the listing and the listing group are activated.
Note: You can also activate listings immediately after creation by activating the option Automatically activate listings after creation. If you activate the option to automatically activate listings after creation, you still have to activate the data exchange for the listing group.
Activating offer listings:
-
Go to Sales channels » Channel Control Centre » [Open Amazon].
→ The General settings menu opens. -
Open the Offer listings menu.
-
In the line of the offer listing you want to activate, click more_vert.
-
Click toggle_on Activate data sync.
Tip: If you want to activate multiple offer listings at once, place a check mark next to the desired offer listings and click toggle_on arrow_drop_down » Activate data sync at the top of the toolbar.
→ The data exchange for the listing is activated. The listing can only be transferred to the sales channel if the listing group is also activated.
Activating a listing group:
-
Go to Sales channels » Channel Control Centre » [Open Amazon].
→ The General settings menu opens. -
Open the Offer listings menu.
-
Open the listing group view (folder).
-
In the line of the listing group you want to activate, click more_vert.
-
Click toggle_on Activate data sync.
Tip: If you want to activate multiple listing groups at once, place a check mark next to the desired listing groups and click toggle_on arrow_drop_down » Activate data sync at the top of the toolbar.
→ The data exchange for the listing group is activated.
17.5. Viewing listing errors
The Errors tab of the Sales channels » Channel Control Centre » [Open sales channel] » Offer listings / Product listings menu provides an overview of all errors that occurred in PlentyONE when exporting your product and offer listings.
Tip: The overview of listing errors is only displayed if at least one error has occurred when exporting the listings.
Here you can see:
-
the affected listings
-
error details
For each error, you can download a CSV file containing the affected listings by clicking the download button. You can correct the errors directly in the CSV file. You can then re-import the corrected CSV file.
Table 14 contains an overview of listing errors.
| Column | Explanation |
|---|---|
keyboard_arrow_down [Information about the error] |
Information about the error is provided here. It contains the affected field of the data record, a brief description of the error and the number of listings for which this error has occurred. |
download Download data as CSV |
The CSV file with the data records is downloaded. |
Listing name |
The name of the listing. |
Parent SKU |
The parent SKU of the main variation. |
SKU |
The SKU of the sub-variation. |
Variation ID |
The ID of the variation. |
Channel |
The sales channel to which the listing is exported. |
Export activity |
Shows whether the variation is being exported.
|
Status |
The listing’s status on the sales channel. Possible statuses are:
|
Errors |
The error overview. |
Template |
The template selected for the listing. |
Catalogue |
The catalogue selected for the listing. |
18. Repricer: Winning the BuyBox on Amazon
With the Repricer, you can automatically adjust your prices based on predefined criteria to increase your chances of winning the Amazon BuyBox. To do so, first create pricing strategies and then link them to your variations.
-
Step 1: In the Settings » Item » Repricer menu, you create Repricer strategies and determine the conditions when these strategies go into effect.
-
Step 2: Link the desired variations to the Repricer strategies. This is done in a variation’s Repricer tab.
| Detailed instructions on how to set up the Repricer is available here. |
19. Manually importing Amazon orders
In the menu Sales channels » Channel Control Centre » [Open your Amazon sales channel] » Data exchange » Order import you can manually import Amazon orders from a CSV file.
Setting up the manual order import:
-
Navigate to Sales channels » Channel Control Centre » [Open your Amazon sales channel] » Data exchange » Order import.
-
Select the option Import CSV file from the Process for order import drop-down list.
→ The Settings area opens. -
Carry out the settings. Pay attention to the explanations given in Table 15.
-
Click on Preview () to show a preview of the import.
| Setting | Explanation |
|---|---|
Book incoming payment |
The payment is automatically booked when importing the order. |
Use old format |
Activate if you still use the old Amazon import format. |
Client |
Select the client for the order import. |
Amazon account |
Select the Amazon account. |
CSV file |
Select the CSV file for the order import. |
Selecting the CSV file for the order import:
-
Click on Select file.
-
Select the CSV file for the import.
-
Click on Open.
-
Click on Preview ().
→ The available orders are displayed. -
For the orders that are to be exported, activate the option Import.
-
Click on the gear-wheel icon to carry out the import.
| If orders are imported from Amazon that you did not upload with PlentyONE and/or that contain items which have not yet been created in PlentyONE, then you can manually assign the items for these orders and set the corresponding status. |
|
Missing invoice address
If the invoice address is missing from the orders that were retrieved from Amazon, then contact the Amazon support. Amazon has to carry out this setting. |
|
Original currency and standard currency are different
Additional information is saved for orders that are imported with a different currency than the standard currency saved in PlentyONE. In this case, both the original currency and the original gross and net amounts are saved for every item included in the order. |
20. Setting up invoice generation for Amazon orders
Invoices for your Amazon orders can be generated in different ways, depending on the settings you select in the Sales channels » Channel Control Centre » [Open your Amazon sales channel] » [Select Amazon account] » Tab: Settings.
| Option | Explanation |
|---|---|
Amazon Invoice Document Uploader - IDU |
PlentyONE calculates the VAT. PlentyONE generates the invoice via a flow. |
VCS Amazon |
Amazon invoice numbers and credit notes for Amazon orders are imported into PlentyONE. |
VCS plentymarkets (VCS Lite) |
Amazon calculates the VAT. Amazon invoices are automatically generated by PlentyONE and transferred to Amazon. |
|
Best practice for Amazon VCS
Also read the best practice for Amazon VCS. This contains additional information about setting up Amazon’s invoice service VCS in PlentyONE. |
20.1. Setting up Amazon IDU
VCS is an optional service. If you activate this service in Amazon Seller Central, Amazon calculates the VAT for your Amazon orders. If you do not want to use Amazon VCS, you can upload invoice documents created in PlentyONE to Amazon (Amazon Invoice Document Uploader - IDU). Proceed as described below.
-
You can only upload invoices to Amazon after a shipping confirmation was sent to Amazon.
-
Amazon rejects invoices if the invoice number contains spaces. As such, make sure that your number range for invoices does not contain any spaces.
Activating Amazon IDU in PlentyONE:
-
Navigate to Sales channels » Channel Control Centre » [Open your Amazon sales channel] » [Amazon account] » Tab: Settings.
-
For the setting Generate invoice, select the option plentymarkets.
-
Click Save (save).
→ PlentyONE calculates the VAT for Amazon orders.
→ Invoices for Amazon orders are created by PlentyONE. -
Set up the flow described below to upload invoices to Amazon.
20.1.1. Automatically uploading invoices to Amazon
Create an event-based flow to automatically upload invoices to Amazon that have been created either by PlentyONE or with an external software. However, invoices created by PlentyONE always take priority over external invoices. This means that all invoice documents are checked and if invoices created by PlentyONE are found, they are uploaded first. If there is no PlentyONE invoice, the external invoice will be uploaded to Amazon.
With PlentyONE Flow (short: "Flow"), you can automate workflows for your business processes. Flow provides you with two functions in the Automation menu:
-
In Flow Studio, you create and configure automated workflows. Depending on the trigger type, there are three types of flows: event-based, time-based or manual.
-
In the Flow Tracker, you can monitor running or completed workflows.
The central element in both functions is the Canvas – a graphical interface on which the workflows are visualised with Actions and Controls. In Flow Studio the canvas can be edited, in Flow Tracker it is only used for visualisation and is therefore read-only.
-
Is this your first time working with PlentyONE Flow? Then read up on the basic concept of Flow first.
-
Go to Automation » Flow Studio.
-
Click Create flow (add).
→ A stepper opens and guides you through the following three steps.-
General
-
Enter a unique name and, if necessary, a description for the new flow.
-
Click Next.
-
-
Trigger
-
Select Event-based as the trigger.
-
Click Next.
-
-
Settings
-
If desired, select a UI from the optional drop-down list Flow available in.
→ The option to manually trigger the flow directly from the selected UI is added to the group functions in that UI.
Note: UIs currently selectable: Order UI. -
From the drop-down list Trigger selection, select the event according to Table 17.
Note: If the trigger event has additional settings, then these are invariably mandatory. Without performing these settings, you will not be able to save the flow. -
Save () the settings.
→ The flow is created.
→ The Flow Studio Canvas appears, on which two elements are already displayed: The trigger type and the placeholder for the next step.
Note: With some event-based flows you cannot save the flow if it consists of only a trigger. In such cases, you need to add at least one further step.
-
-
-
Configure the new flow according to Table 17.
-
Save () the settings.
Note: The selected statuses, controls and filters in Table 17 only serve as an example. Select the statuses, controls and filters for the flow which best suit your workflow.
| Setting | Option | Selection | ||||||
|---|---|---|---|---|---|---|---|---|
Trigger selection |
Select an event, for example:
|
Select a document type, for example:
|
||||||
Controls |
Branch |
Note: If there is more than one filter, add the others as conditions (playlist_add). Select AND as the relationship between the conditions.
|
||||||
Actions |
Multichannel > Amazon |
Upload invoice / credit note to Amazon |
20.2. Setting up VCS plentymarkets/VCS Lite
If you select VCS plentymarkets, Amazon calculates the VAT, but invoices for Amazon orders are created by PlentyONE and automatically uploaded to Amazon. Amazon calls this option VCS Lite.
-
You can only upload invoices to Amazon after a shipping confirmation was sent to Amazon.
-
Amazon rejects invoices if the invoice number contains spaces. As such, make sure that your number range for invoices does not contain any spaces.
20.2.1. Activating VCS plentymarkets/VCS Lite in Amazon Seller Central
To get started, activate the VCS service in Amazon Seller Central.
Activating VCS plentymarkets/VCS Lite in Amazon Seller Central:
-
Log into Amazon Seller Central.
-
Go to Settings » Tax settings » VAT calculation settings.
-
Navigate to the area Invoice generation.
-
Select the option I will upload my own VAT invoices.
-
Optional: Select the date that you want the Amazon VAT calculation service to start.
-
Save the settings.
→ The date on which the VCS service is activated is displayed. -
Write down the date shown.
Tip: On the activation date, the VCS service is activated at 12 pm Universal Time (UTC). -
Set yourself a reminder for the day on which you need to activate Amazon VCS in PlentyONE.
20.2.2. Activating VCS plentymarkets/VCS Lite in PlentyONE
On the date Amazon activates the VCS settings, you also need to activate VCS plentymarkets in PlentyONE. To do so, proceed as described below.
Activating VCS plentymarkets/VCS Lite in PlentyONE:
-
Navigate to Sales channels » Channel Control Centre » [Open your Amazon sales channel] » [Amazon account] » Tab: Settings.
-
For the setting Generate invoice, select the option VCS plentymarkets.
Important: Only activate VCS plentymarkets on the date on which Amazon VCS is activated in Amazon Seller Central.
Tip: On the activation date, the VCS service is activated at 12 pm Universal Time (UTC). -
Click Save (save).
→ Invoices for Amazon orders are automatically generated by PlentyONE and transferred to Amazon.
→ Amazon calculates the VAT for Amazon orders.
→ Invoices for Amazon orders can no longer be created manually or with a flow. -
Important: If you have used Amazon IDU up to now, deactivate the flow that uploads invoices to Amazon. Otherwise, invoice documents are uploaded to Amazon in douplicates. This can overload the interface so that some invoices are not uploaded to Seller Central at all.
20.3. Setting up VCS Amazon
If you activate VCS Amazon, Amazon calculates the VAT and generates the invoices for your Amazon orders. Amazon invoice numbers and credit notes for Amazon orders are imported into PlentyONE.
20.3.1. Activating VCS Amazon in Amazon Seller Central
To get started, activate the VCS service in Amazon Seller Central.
Activating VCS Amazon in Amazon Seller Central:
-
Log into Amazon Seller Central.
-
Go to Settings » Tax settings » VAT calculation settings.
-
Navigate to the area Invoice generation.
-
Select the option I want Amazon to automatically generate VAT invoices..
-
Optional: Select the date that you want the Amazon VAT calculation service to start.
-
Save the settings.
→ The date on which the VCS service is activated is displayed. -
Write down the date shown.
Tip: On the activation date, the VCS service is activated at 12 pm Universal Time (UTC). -
Set yourself a reminder for the day on which you need to activate Amazon VCS in PlentyONE.
20.3.2. Activating VCS Amazon in PlentyONE
On the date Amazon activates the VCS settings, you also need to activate VCS Amazon in PlentyONE. To do so, proceed as described below.
Activating VCS Amazon in PlentyONE:
-
Navigate to Sales channels » Channel Control Centre » [Open your Amazon sales channel] » [Amazon account] » Tab: Settings.
-
For the setting Generate invoice, select the option VCS Amazon.
Important: Only activate VCS Amazon on the date on which Amazon VCS is activated in Amazon Seller Central.
Tip: On the activation date, the VCS service is activated at 12 pm Universal Time (UTC). -
Click Save (save).
→ Amazon calculates the VAT for Amazon orders.
→ Invoice numbers for Amazon orders are generated by Amazon and imported into PlentyONE.
→ Invoices for Amazon orders can no longer be created manually or with a flow. -
Important: If you have used Amazon IDU up to now, deactivate the flow that uploads invoices to Amazon. Otherwise, invoice documents are uploaded to Amazon in douplicates. This can overload the interface so that some invoices are not uploaded to Seller Central at all.
20.4. Troubleshooting: Manually uploading invoices
If all your settings for the invoice creation are correct, invoice information is exchanged with Amazon automatically. Were not all invoices for your Amazon orders uploaded to Amazon?
-
Make sure that you have set up the upload of invoices for Amazon orders correctly as described in this chapter.
-
If all settings are correct and only some invoices are missing, you can upload these invoices to Amazon manually. To do so, proceed as described below.
Manually uploading invoices to Amazon:
-
Navigate to Sales channels » Channel Control Centre » [Open your Amazon sales channel] » Data exchange » Reports.
-
Open the tab Upload invoices.
-
From the drop-down list Order ID type, select the option Order ID.
Tip: If part shipments exist in the system, not all invoices are uploaded when you select the option Amazon order ID. As such, we recommend the option Order ID. -
Enter the ID of the invoice.
Tip: Enter more than one order ID separated by commas. -
Click on Apply ().
→ PlentyONE starts to upload any missing invoices for valid orders to Amazon.
20.5. Troubleshooting: Unlocking VCS orders for manual invoice creation
When you use the VCS service, you do not generate invoice documents yourself. Instead, all order documents are generated automatically when the VCS reports are imported. As such, orders are locked for manual invoice generation. However, in some cases you need to manually generate invoices for VCS orders:
-
Amazon is the customer.
-
You did not save a VAT identification number (VATIN) for the country in which the order originated in Seller Central.
-
The order is not really a VCS order and was imported retroactively. This happens if the order was placed before you activated VCS but imported after you activated VCS.
In such cases, you need to unlock the VCS orders manually. This allows you to generate the necessary invoice documents.
| VCS reports still have the highest priority. That includes unlocked orders for which you have manually generated invoice documents. If Amazon sends invoice documents in a subsequent VCS report, the invoices you generated are cancelled and a new invoice is generated. |
Unlocking VCS orders:
-
Navigate to Sales channels » Channel Control Centre » [Open your Amazon sales channel] » Data exchange » Reports.
-
Switch to the tab Unlock VCS orders
-
In the drop-down list Order ID type, select if you want to enter the Amazon order ID or the PlentyONE Order ID to search for the orders.
-
In the field Order ID list, enter the ID of the orders. To enter several IDs, separate them by commas.
-
Click Unlock VCS orders ().
→ The Results area shows how many orders were unlocked. The table shows the status of each order.
→ You can manually generate invoice documents for the unlocked orders.
Important: If Amazon transfers their own documents in a subsequent VCS report, the invoice documents that you created manually will become invalid: As a result, your invoice documents are cancelled and a new invoice is created.
Go to Data » Log to find out when and by which user orders were unlocked. Table 18 shows the filters you can use to find unlocking events in the log.
| Filter | Selection |
|---|---|
Integration |
PlentyLegacy\\ModMarkets |
Identifier |
AmazonUnlockVcsOrder |
References |
|
Viewing unlocking events in the data log:
-
Go to Data » Log.
-
In the column to the left, select appropriate filters from the drop-down lists.
-
Optional: Select filters for dates and/or times to only show entries from a specific period.
Tip: For further information about the filters, refer to the Data log page of the manual. -
Click Search ().
→ The results are shown.
21. Permitting payment method in customer classes
As soon as an active Amazon account exists, the Amazon payment method is automatically available in your PlentyONE system. No separate configurations are needed for this. You just need to permit the payment method in one or more customer classes.
Permitting the payment method in a customer class:
-
Go to Setup » CRM » Customer classes.
-
Open the customer class for which you want to permit the payment method.
-
For the setting Allowed payment methods, activate the option Amazon.
-
Save () the settings.
22. Carrying out Amazon specific shipping profile settings
Since 19/4/2021, the names of shipping service providers and shipping services that are communicated to Amazon to register a shipping must be identical to the names used in Seller Central. To ensure that the names are identical, you need to link your shipping service providers and shipping services with the values that Amazon accepts. This is done in your shipping profiles.
Carrying out Amazon specific shipping profile settings:
-
Go to Setup » Orders » Shipping » Settings.
-
Click on the Shipping profiles tab.
-
Open the shipping profile.
-
Click on the Table of shipping charges tab.
-
Expand the region ().
-
Navigate to the area Amazon shipping settings.
-
Select the drop-down list Transport service, select the shipping service provider.
-
From the drop-down list Shipping service, select the type of shipping.
Note: The drop-down lists contain values for most common services. If you want to send other values, select the option Other and enter the value in the input field. -
Click Save (save).
→ When registering the shipping, the selected values are sent to Amazon for this shipping profile.
Note: If you do not select any values from the drop-down lists, the shipping profile’s default values are sent to Amazon. -
Optional: Repeat these settings for all shipping profiles that you use for Amazon.
23. Sending shipping confirmations to Amazon
As soon as the Amazon order was processed in your PlentyONE system and the goods were shipped, you have to inform Amazon of the new status so that the sales figures can be credited to your account. Your PlentyONE system automatically takes care of this important step via the interface as well.
Orders have to meet the following requirements in order for the shipping confirmation to be sent to Amazon:
-
Referrer: Amazon or an Amazon sub-referrer
-
Status range 7 (less than 8)
-
External order number
-
Imported order (not created manually)
-
Outgoing items booked (time must not be in the future)
Important: For Amazon.co.uk orders, a "Ship From" address can also be transmitted in the shipping confirmation. This address affects Amazon’s VAT calculation. If the address is missing, Amazon may assume a different shipping country, causing the calculated VAT to not match that of your actual shipping country.
The "Ship From" address is transmitted automatically once the required sender information has been entered and saved for each warehouse. You can enter the sender information in the menu Setup » Orders » Shipping » Shipping service provider » Settings » [Open warehouse].
The following fields are transmitted:
-
Company
-
Street
-
House number
-
Additional address information
-
Postcode
-
Town
-
Country
To ensure the VAT is calculated correctly, at a minimum the fields Company, Street and Country must be completed.
Manually sending shipping confirmations:
If the shipping confirmation is not automatically transferred, for example because the servers are temporarily unavailable, or if you want orders to be manually confirmed shortly before an accounting deadline, so that they will still be taken into consideration during the next payment, then you can also transfer shipping confirmations manually to Amazon. No shipping confirmation is sent to Amazon for Prime orders (Amazon_Prime, Amazon_PrimeSame_Day, Amazon_Prime_NextDay, and Amazon_Prime_SecondDay).
Manually sending shipping confirmations to Amazon:
-
Navigate to Sales channels » Channel Control Centre » [Open your Amazon sales channel] » Data exchange » Shipping confirmation.
-
Select an Amazon account from the drop-down list.
-
Enter a date next to Items shipped on.
→ All of the outgoing items from this date are transmitted to Amazon. -
Click on Send shipping confirmation.
Note: Currently it is not possible to send shipping confirmations for orders of the type delivery order to Amazon via PlentyONE.
24. Editing returns
Even with Amazon, you have to anticipate the occasional order cancellation after a shipment has taken place. The customer then has to send the items back to you directly.
Important: To create and import Amazon returns, an Amazon SKU must be assigned to the item in the order. For further information refer to the Define SKU manually sections.
For further information about creating a return in PlentyONE and resetting the outgoing items again, refer to the Booking items out page of the manual.
Amazon received the customer’s payment on your behalf. As such, the reversal also has to take place via Amazon. You also have to take care of this in the order folder in the Amazon Seller Central.
|
Carrying out a reversal manually or via flow
The interface does not automatically trigger the refund of the purchase price with Amazon. Rather, this has to be carried out manually or automatically with the help of a flow. If you forget to manually refund the sum or if you forget to set up a flow for automatically refunding the purchase price, you risk a customer complaint with Amazon and negative feedback. |
MFN returns (= shipment by the seller) can be reported to Amazon in form of credit notes with a flow. Returns for Amazon can only be created for orders of the type Credit note. To do so, proceed as described below.
24.1. Creating order statuses
First, create an order status for Amazon returns in the Setup » Orders » Order status menu, for example [9.6] Return sent to Amazon. You need this order status for the Amazon settings.
24.2. Setting the order status
Set this order status in the Amazon settings as described below.
Setting an order status for returns:
-
Navigate to Sales channels » Channel Control Centre » [Open your Amazon sales channel] » Settings.
-
Select the Amazon account.
-
Click on the Order settings tab.
-
For the setting Status for transmitted returns, select the order status that you previously created for Amazon returns.
-
Click Save (save).
24.3. Sending returns to Amazon automatically
Create an event-based Flow to automatically send returns in form of credit notes to Amazon. As soon as the flow action Create a return at Amazon is triggered in PlentyONE, the credit note created at Amazon is repayed.
|
Flows and credit note import
Use flows to initiate refunds in PlentyONE. The automatic credit note import (option "Credit note import" in the order settings) ensures that credit notes are not duplicated in your system. If you manually create credit notes or have them created by a third-party system and there are no credit notes in your PlentyONE system, a credit note is created during the import. |
With PlentyONE Flow (short: "Flow"), you can automate workflows for your business processes. Flow provides you with two functions in the Automation menu:
-
In Flow Studio, you create and configure automated workflows. Depending on the trigger type, there are three flow types: event-based, time-based or manual.
-
In the Flow Tracker, you can monitor running or completed workflows.
The central element in both functions is the Canvas – a graphical interface on which the workflows are visualised with Actions and Controls. In Flow Studio the canvas can be edited, in Flow Tracker it is only used for visualisation and is therefore read-only.
-
Is this your first time working with PlentyONE Flow? Then read up on the basic concept of Flow first.
-
Go to Automation » Flow Studio.
-
Click Create flow (add).
→ A stepper opens and guides you through the following three steps.-
General
-
Enter a unique name and, if necessary, a description for the new flow.
-
Click Next.
-
-
Trigger
-
Select Event-based as the trigger.
-
Click Next.
-
-
Settings
-
If desired, select a UI from the optional drop-down list Flow available in.
→ The option to manually trigger the flow directly from the selected UI is added to the group functions in that UI.
Note: UIs currently selectable: Order UI. -
From the drop-down list Trigger selection, select the event according to Table 19.
Note: If the trigger event has additional settings, then these are invariably mandatory. Without performing these settings, you will not be able to save the flow. -
Save () the settings.
→ The flow is created.
→ The Flow Studio Canvas appears, on which two elements are already displayed: The trigger type and the placeholder for the next step.
Note: With some event-based flows you cannot save the flow if it consists of only a trigger. In such cases, you need to add at least one further step.
-
-
-
Configure the new flow according to Table 19.
-
Save () the settings.
Note: The selected statuses, controls and filters in Table 19 only serve as an example. Select the statuses, controls and filters for the flow which best suit your workflow.
| Setting | Option | Selection | ||||||
|---|---|---|---|---|---|---|---|---|
Trigger selection |
Select a suitable trigger. |
|||||||
Controls |
Branch |
Note: If you want to use multiple filters, add the additional filters as conditions (playlist_add). Select AND as the relationship between the conditions.
|
||||||
Actions |
Multichannel > Amazon |
Create a return at Amazon |
25. Reserving stock for pending orders
Pending orders are imported into your PlentyONE system with the status [1] Incomplete data and remain there until Amazon approves the orders. Until the approval, no addresses or prices will be saved for the order. After the approval by Amazon, the order is updated and addresses and prices are saved. The automatic stock update decides in which status the order is placed.
If Amazon does not approve the order, the order is not updated, but instead automatically set to status [8] Cancelled.
There are two ways to reserve stock for pending orders in PlentyONE:
-
Option 1: PlentyONE Flow
-
Option 2: Directly in the basic order settings
25.1. Option 1: PlentyONE Flow
Create an event-based flow to automatically put the order from status 1 to a status where stock is reserved.
With PlentyONE Flow (short: "Flow"), you can automate workflows for your business processes. Flow provides you with two functions in the Automation menu:
-
In Flow Studio, you create and configure automated workflows. Depending on the trigger type, there are three flow types: event-based, time-based or manual.
-
In the Flow Tracker, you can monitor running or completed workflows.
The central element in both functions is the Canvas – a graphical interface on which the workflows are visualised with Actions and Controls. In Flow Studio the canvas can be edited, in Flow Tracker it is only used for visualisation and is therefore read-only.
-
Is this your first time working with PlentyONE Flow? Then read up on the basic concept of Flow first.
-
Go to Automation » Flow Studio.
-
Click Create flow (add).
→ A stepper opens and guides you through the following three steps.-
General
-
Enter a unique name and, if necessary, a description for the new flow.
-
Click Next.
-
-
Trigger
-
Select Event-based as the trigger.
-
Click Next.
-
-
Settings
-
If desired, select a UI from the optional drop-down list Flow available in.
→ The option to manually trigger the flow directly from the selected UI is added to the group functions in that UI.
Note: UIs currently selectable: Order UI. -
From the drop-down list Trigger selection, select the event according to Table 20.
Note: If the trigger event has additional settings, then these are invariably mandatory. Without performing these settings, you will not be able to save the flow. -
Save () the settings.
→ The flow is created.
→ The Flow Studio Canvas appears, on which two elements are already displayed: The trigger type and the placeholder for the next step.
Note: With some event-based flows you cannot save the flow if it consists of only a trigger. In such cases, you need to add at least one further step.
-
-
-
Configure the new flow according to Table 20.
-
Save () the settings.
Note: The selected statuses, controls and filters in Table 20 only serve as an example. Select the statuses, controls and filters for the flow which best suit your workflow.
| Setting | Option | Selection | |||||||||
|---|---|---|---|---|---|---|---|---|---|---|---|
Trigger selection |
Select a trigger, for example:
|
For Order types, select the type Incomplete order. |
|||||||||
Controls |
Branch |
Note: If you want to use multiple filters, add the additional filters as conditions (playlist_add). Select AND as the relationship between the conditions.
|
|||||||||
Actions |
Order > Change order status |
Select the order status from the drop-down list in which stock will be reserved. |
25.2. Option 2: Directly in the basic order settings
In the basic settings of the order you can define in which order statuses stock is reserved with the setting Status for order reservation.
Defining order status for stock reservation:
-
Go to Setup » Orders » Settings.
-
For Status for order reservation, select the statuses for which stock should be reserved.
-
Click Save (save).
26. Managing Amazon reports
The Sales channels » Channel Control Centre » [Open your Amazon sales channel] » Reports » Processing menu provides an overview of the processing status of your Amazon reports. In this menu, you can see which reports have already been processed and which reports are still in the queue.
You can also reset or skip your Amazon reports here. That way, you can define which reports should be processed first. Or you can reduce your system’s workload by skipping reports.
Besides that, you can also download your Amazon reports in this menu.
Note: When importing reports, orders are imported asynchronously. This means that when reports are imported, orders are imported in parallel.
Table 21 contains an overview of the Amazon reports in the menu Sales channels » Channel Control Centre » [Open your Amazon sales channel] » Reports » Processing.
| If you only want to take a look at certain reports, then you can apply filters and narrow down the reports which are displayed. To do so, click on Filters (tune) at the top of the menu. |
| Column | Explanation |
|---|---|
Seller ID |
The seller ID of your Amazon seller account. |
Report ID |
The report ID of the Amazon report. |
The processing status of the report. |
|
Report type |
The report type. An overview of all Amazon report types is available here. |
Report created on |
Shows the date and the time when the report was created. |
Report updated on |
Shows the date and the time when the report was last updated. |
Actions |
Note: Some report types cannot be reset or skipped.
Note: Reports which are older than 31 days (minus 6h) cannot be downloaded, reset, or skipped. |
The table below contains an overview of all Amazon report types.
| Report type | What does the report do? |
|---|---|
Amazon Fulfillment Network - Stock report |
|
Amazon Fulfillment Network - Returns |
|
Amazon Fulfillment Network - Order report - EU |
|
Amazon Fulfillment Network - Order report - NA |
|
VCS Lite - Data |
|
VCS - Invoices generated by Amazon |
|
Merchant Fulfilled Network - Order report - EU |
|
Merchant Fulfilled Network - Order report - NA |
|
26.1. Requesting reports
In the menu Sales channels » Channel Control Centre » [Open your Amazon sales channel] » Reports » Request you can request Amazon reports manually. For example, this can be useful if data is missing in your Amazon reports and you want to request a new report.
Notes on requesting reports:
-
You can only request reports of a period of a maximum of one week.
-
The timeframe of the requested report should be as short as possible, as processing big reports can cause issues due to the amount of data.
-
The number of requests is limited. For example, you can only request certain report types 2 or 5 times per day.
|
Reports without data cannot be created
If no data exists for the requested time frame of the report, then Amazon will not create the report. Currently, it is not possible for PlentyONE to inform customers that a report could not be created. |
Requesting a report:
-
Navigate to Sales channels » Channel Control Centre » [Open your Amazon sales channel] » Reports » Request.
-
Carry out the settings. Pay attention to the explanations given in Table 23.
-
Click on Request.
→ The requested report is created by Amazon. As soon as the report is available, you can retrieve it in the Sales channels » Channel Control Centre » [Open your Amazon sales channel] » Reports » Processing menu in your PlentyONE system.
→ It can take several minutes until the report is available in your system.
| Setting | Explanation |
|---|---|
Start date (mandatory) |
Enter a date in the format DD.MM.YYYY or select a date via the calendar (today). |
Start time (mandatory) |
Enter a time or select it via (schedule). |
End date |
Enter a date in the format DD.MM.YYYY or select a date via the calendar (today). |
End time |
Enter a time or select it via (schedule). |
Seller ID (mandatory) |
Select the seller ID of the Amazon seller account that you want to request reports for. |
Report type (mandatory) |
Select the report type. If you hover over a report type in the drop-down list, a tooltip with information about this report type is shown. |
27. Retrieving Amazon feeds
The Sales channels » Channel Control Centre » [Open your Amazon sales channel] » Feeds menu provides an overview of the processing status of your Amazon feeds. You can also download the feed requests sent by PlentyONE to Amazon and the feed submission results received from Amazon. This allows you to see which data PlentyONE has sent to Amazon for processing a specific feed type and whether Amazon has successfully processed this data.
Note: You can retrieve and view the data that PlentyONE has sent to Amazon for updating prices and stock levels in the price and stock export logs and in the data log. If errors have occurred during the price or stock update, you can download the error reports in the data export menu.
An Amazon feed is a structured data file that contains information about your items, orders, listings or invoices. This data file is sent to Amazon to create listings on the Amazon marketplace or update item data, order data, listing data and invoice data. Amazon feeds contain data such as product titles, prices, images and stock levels. Depending on the task, the Amazon feeds are divided into different feed types.
The feed request contains the data that PlentyONE transmits to Amazon. The transmitted data varies depending on the feed type (e.g. Order Fulfillment Feed, Upload VAT invoice Feed, etc.). In the feed submission result, you can see whether Amazon has successfully processed the data from the feed request.
Table 24 contains an overview of the Amazon feeds in the menu Sales channels » Channel Control Centre » [Open your Amazon sales channel] » Feeds.
| If you only want to take a look at certain Amazon feeds, then you can apply filters and narrow down the Amazon feeds which are displayed. To do so, click on Filters (tune) at the top of the menu. |
| Column | Explanation |
|---|---|
Seller ID |
The seller ID of your Amazon seller account. |
Feed type |
The feed type. An overview of the feed types for Amazon feeds is available here. |
Processing status |
The processing status of the Amazon feed.
|
Feed ID |
The feed ID of the Amazon feed. |
Marketplace IDs |
The marketplace IDs of the Amazon marketplaces to which the Amazon feed is applied.
|
Actions |
|
The table below contains an overview of the feed types used for Amazon.
| Feed type | What does the feed do? |
|---|---|
Order Fulfillment Feed |
|
Order Adjustments Feed (refunds) |
|
Flat File Listings Feed |
|
Flat File Inventory Loader Feed |
|
Upload VAT invoice |
|
FBA Inbound Shipment Carton Information Feed |
|
27.1. Downloading feed requests
In the menu Sales channels » Channel Control Centre » [Open your Amazon sales channel] » Feeds you can download feed requests and Feed Submission Results for Amazon feeds. This can be useful if an Amazon feed has the processing status Done with warnings or Done with errors. The feed submission result provides you with further information about the warnings and errors. In addition to a warning or error message, this information also includes an Amazon order ID and a message ID or an original record number and a SKU. In the feed request, you can use this information to find and view the data for which the warning or error has occurred.
Downloading a feed request:
-
Navigate to Sales channels » Channel Control Centre » [Open your Amazon sales channel] » Feeds.
-
Click Search (search).
A table with the transmitted Amazon feeds opens.
Note: The Amazon feeds are sorted by feed ID in ascending order by default. -
Select the desired Amazon feed.
Tip: You can apply filters to narrow down the Amazon feeds displayed. -
Click Download Feed Request (sim_card_download) in the row with the desired Amazon feed.
→ The feed request is downloaded as an XML, CSV or PDF file. The file format depends on the feed type.
27.2. Downloading feed submission results
In the menu Sales channels » Channel Control Centre » [Open your Amazon sales channel] » Feeds you can download feed requests and Feed Submission Results for Amazon feeds. This can be useful if an Amazon feed has the processing status Done with warnings or Done with errors. The feed submission result provides you with further information about the warnings and errors. In addition to a warning or error message, this information also includes an Amazon order ID and a message ID or an original record number and a SKU. In the feed request, you can use this information to find and view the data for which the warning or error has occurred.
Notes on downloading feed submission results:
-
Feed submission results are only available for Amazon feeds which are in the processing status Done (circle), Done with warnings (circle) or Done with errors (circle).
-
For Amazon feeds which are in Ready to request (circle) processing status, the feed submission result must first be requested before it can be downloaded. To do so, click on Request Feed Submission Result on Amazon (schedule_send) in the row with the desired Amazon feed.
Downloading feed submission result:
-
Navigate to Sales channels » Channel Control Centre » [Open your Amazon sales channel] » Feeds.
-
Click Search (search).
A table with the transmitted Amazon feeds opens.
Note: The Amazon feeds are sorted by feed ID in ascending order by default. -
Select the desired Amazon feed.
Tip: You can apply filters to narrow down the Amazon feeds displayed. -
Click Download Feed Submission Result (file_download) in the row with the desired Amazon feed.
→ The feed submission result is downloaded as an XML or CSV file. The file format depends on the feed type.
- Downloading the feed submission result when you have just downloaded the feed request
-
-
Click Download Feed Submission Result (file_download) in the row with the desired Amazon feed.
→ The feed submission result is downloaded as an XML or CSV file. The file format depends on the feed type.
-
27.3. Analysing information in the feed submission result
If you have downloaded the feed submission result for an Amazon feed, you can open it to see whether the Amazon feed has been successfully processed by Amazon. If an Amazon feed has been processed with the status Done with warnings or Done with errors, the feed submission result will give you more information about the warnings and errors. Table 26 contains an overview of the information in the feed submission result.
Note: This table only contains the information that is relevant for analysing the feed submission result.
| Content | Explanation |
|---|---|
Feed submission result in CSV format |
|
Feed Processing Summary: |
The summary of the feed processing. |
Number of records processed |
The number of processed data records. The number after Number of records processed indicates how many records have been processed from the feed request. |
Number of records successful |
The number of successfully processed data records. The number after Number of records successful indicates how many records have been successfully processed by Amazon. Note:
|
original-record-number |
The number of the processed data record. Note: This content only appears if warnings or errors occurred when processing the data records. Tip: You can use the original-record-number and the SKU to find and view the data for which the warning or error occurred in the feed request. |
SKU |
The SKU of the processed data record. Note: This content only appears if warnings or errors occurred when processing the data records. Tip: You can use the original-record-number and the SKU to find and view the data for which the warning or error occurred in the feed request. |
Error code |
Code to identify the error or warning. Note: This content only appears if warnings or errors occurred when processing the data records. |
Error type |
Note: This content only appears if warnings or errors occurred when processing the data records. |
error-message |
Description of the error or warning and how to proceed. Note: This content only appears if warnings or errors occurred when processing the data records. |
Feed submission result in XML format Note: Feed submission results in XML format are . |
|
MessageID |
The message ID. It identifies the processed data set. Tip: You can use the MessageID and the AmazonOrderID to find and view the data for which the warning or error occurred in the feed request. |
ProcessingReport |
The processing report. It contains the summary of the feed processing and, in the case of warnings or errors during feed processing, further information on the warnings and errors. |
ProcessingSummary |
The summary of the feed processing. |
MessagesProcessed |
The number of successfully processed data records. The number after MessagesProcessed indicates how many records have been processed from the feed request. |
MessagesSuccessful |
The number of successfully processed data records. The number after MessagesSuccessful indicates how many records have been successfully processed by Amazon. |
MessagesWithError |
The number of data records for which errors occurred during processing. The number after MessagesWithError indicates the number of data records for which errors occurred during processing. |
MessagesWithWarning |
The number of data records for which warnings occurred during processing. The number after MessagesWithWarning indicates the number of data records for which warnings occurred during processing. |
Result |
The result of the feed processing. If warnings or errors occurred during feed processing, further information is provided here. Note: This content only appears if warnings or errors occurred when processing the data records. |
ResultCode |
Result code. It identifies the type of processing result.
Note: This content only appears if warnings or errors occurred when processing the data records. |
ResultMessageCode |
Code to identify the error or warning. Note: This content only appears if warnings or errors occurred when processing the data records. |
ResultDescription |
Description of the error or warning and how to proceed. Note: This content only appears if warnings or errors occurred when processing the data records. |
AdditionalInfo |
Additional information on the affected data record. Note: This content only appears if warnings or errors occurred when processing the data records. |
AmazonOrderID |
The Amazon order ID. Tip: You can use the MessageID and the AmazonOrderID to find and view the data for which the warning or error occurred in the feed request. Note: This content only appears if warnings or errors occurred when processing the data records. |
27.4. Find data in the feed request using the information from the feed submission result
If you have downloaded the feed request and the feed submission result for an Amazon feed, you can open the feed submission result to see whether the Amazon feed has been successfully processed by Amazon. If an Amazon feed has been processed with the status Done with warnings or Done with errors, the feed submission result will give you more information about the warnings and errors. In addition to a warning or error message, this information also includes an Amazon order ID and a message ID or an original record number and a SKU. In the feed request, you can use this information to find and view the data for which the warning or error occurred.
Find data in the feed request using Amazon order ID and message ID:
-
Go to the location with the downloaded feed request and the downloaded feed submission result.
-
Open the feed submission result.
-
Search the document for the message ID of the data record where the warning or error occurred.
-
Open the feed request.
-
Navigate to the line with the corresponding message ID.
→ This is the data record where the warning or error occurred.
Find data in the feed request using original record number and SKU:
-
Go to the location with the downloaded feed request and the downloaded feed submission result.
-
Open the feed submission result.
-
Search the document for the original record number of the record where the warning or error occurred.
-
Open the feed request.
-
Navigate to the line with the corresponding original record number. → This is the data record where the warning or error occurred.
28. Retrieving (error) reports
Events in your system are logged in (error) reports. If something does not work as expected, you can use these reports to identify the issue yourself without relying on our support.
Depending on whether you are using the test mode the (error) reports are found in different menus.
Table 27 provides an overview of where to find each (error) report:
| Process | Test mode activated? | (Error) reports |
|---|---|---|
Catalogue export |
yes |
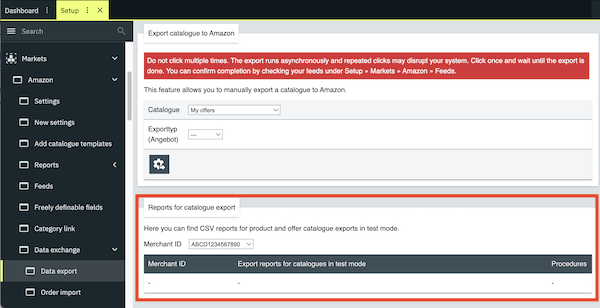
|
Export of a newly created offer catalogue |
no |
|
Offer catalogue update |
no |
|
Product catalogue export |
no |
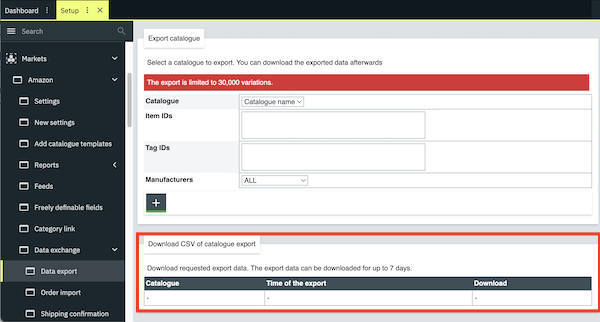
|
Stock update |
no |
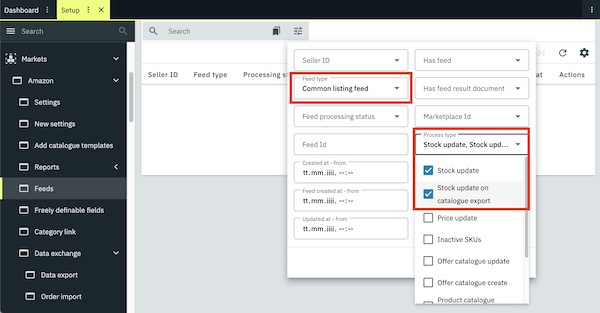
|
Price and stock export |
no |
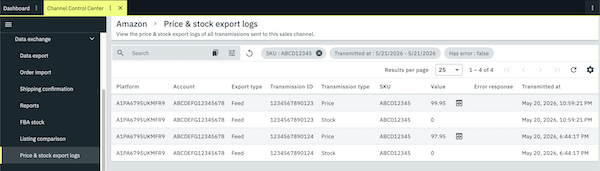
|
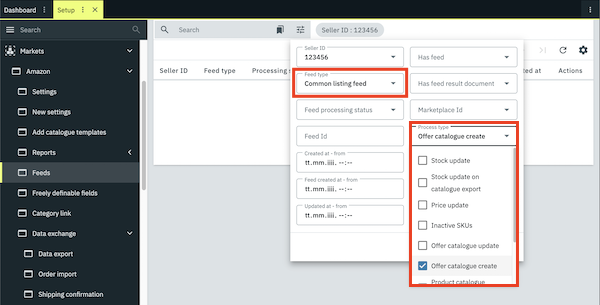
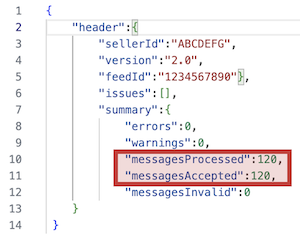
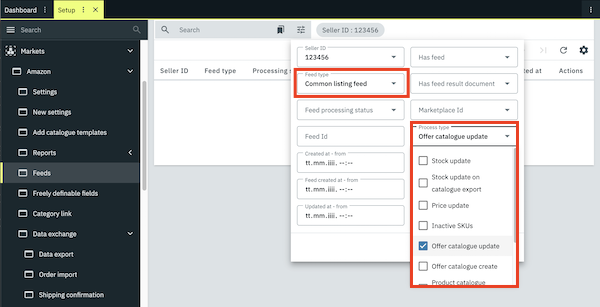
29. Viewing the data log for price and stock updates
Events in your system are logged in the menu Data » Log. This allows you to check the data log for errors without relying on our support.
For Amazon, you can view log files for price and stock level updates here.
Viewing the data log:
-
Go to Data » Log.
-
Click Filters (tune) at the top of the menu.
-
In the Integration field, enter the option AmazonItemExportWorker.
-
In the Identifier field, enter the option:
-
AmazonPriceUpdate to retrieve log files for price updates
or -
AmazonStock to retrieve log files for stock level updates.
-
-
In the Reference type field, enter the option sku to search for a specific SKU.
-
In the Reference value field, enter the SKU of the variation.
-
Optional: Select a date if you only want to see entries for a specific day.
-
Click Search () to display the results.
In the log files, you will find important information, including the following:
| Property | Explanation |
|---|---|
errors: |
The error message, if errors have occurred during the process. If the field is empty, the transmission was successful. |
issues: |
The issues regarding the data. |
productType: |
The Amazon product type. |
prices: |
The price that was transferred to Amazon. |
createdAt: |
The timestamp at which the log file was created. |
identifier: |
The identifier of the log file assigned by PlentyONE. |
| Property | Explanation |
|---|---|
errors: |
The error message, if errors have occurred during the process. If the field is empty, the transmission was successful. |
issues: |
The issues regarding the data. |
productType: |
The Amazon product type. |
quantity: |
The stock level that was transferred to Amazon. |
createdAt: |
The timestamp at which the log file was created. |
identifier: |
The identifier of the log file assigned by PlentyONE. |
30. Price and stock export logs
In the menu Sales channels » Channel Control Centre » [Open your Amazon sales channel] » Data exchange » Price & stock export logs, you can find the logs for price and stock export. The overview shows whether price and stock updates were successfully sent from PlentyONE to Amazon or whether errors occurred during data transmission. You can use Filters (tune) to search the log specifically for a certain time period, a specific transmission type (e.g. price or stock), entries with errors or a specific SKU.
Unlike the data log in the Data » Log menu, this overview not only shows whether the processes in PlentyONE were executed successfully. It also directly displays the price and stock values transferred to Amazon, as well as additional information about the data transmission. This means you don’t need to open the log files and extract the information from the JSON file.
Important: This log only shows whether the data was transferred to Amazon. The log does not contain any information on whether Amazon accepted the price or stock updates or has already applied them to your offers.
Table 30 contains an overview of the price and stock export logs.
| Column | Explanation |
|---|---|
Platform |
The marketplace ID of the Amazon platform to which the data was transferred. |
Account |
The seller ID of your Amazon seller account. |
Export type |
The type of data transmission. Possible values:
|
Transmission ID |
The unique ID of the data transmission. A separate transmission ID is generated for each data transmission to Amazon. |
Transmission type |
The type of transferred data. Possible values:
|
SKU |
The SKU of the variation for which data was transferred. |
Value |
The value transferred to Amazon for the stock or price. |
Error response |
The error message, if an error occurred during data transmission. |
Transmitted at |
Date and time of the data transmission. |
Retrieving the price and stock export logs:
-
Go to Sales channels » Channel Control Centre » [Open your Amazon sales channel] » Data exchange » Price & stock export logs.
-
Optional: Narrow down the search using Filters (tune).
-
Click Search (search).
→ The log entries are displayed.
31. Downloading error reports for price and stock updates
If issues occurred during price or stock updates, you can download the corresponding error reports. To access the reports, go to Sales channels » Channel Control Centre » [Open your Amazon sales channel] » Data exchange » Data export and navigate to the section Price and stock update errors.
In this section, a new report is generated daily whenever errors are detected during the price or stock update. This report includes information regarding errors during price and stock updates. This information will help you identify the cause of the errors without having to contact support.
Note: If no errors occur during price and stock updates on a given day, no report will be generated.
Table 31 contains an overview of the reports in the Price and stock update errors section.
| Column | Explanation |
|---|---|
Seller ID |
The seller ID of your Amazon seller account. |
Price and stock update errors |
The file name of the error report. It contains the creation date in the format YYYY-MM-DD. |
Actions |
|
Downloading a report on price and stock update errors:
-
Navigate to Sales channels » Channel Control Centre » [Open your Amazon sales channel] » Data exchange » Data export.
-
Navigate to the section Price and stock update errors.
-
In the drop-down list Seller ID, select the desired seller ID.
→ The reports for the selected seller ID are displayed. -
Click Download () on the right in the line with the report.
→ The report is downloaded in CSV format.
32. FAQ
32.1. Catalogue
Item settings in the menu Item » Items » [Open item]:
-
Link product type: Link a current product type for the item In the Amazon section.
Variation settings in the menu Item » Items » [Open variation]:
-
Activate variation: In the Availability and visibility section, enable the option Active (toggle_on).
-
Add order referrer: Add the option Web API and the desired Amazon referrer in the Sales channels section.
-
Positive net stock: The variation must have a positive net stock in the Stock section.
-
Consider the Store items export filter: If you have selected Only items visible in online store for the Store items export filter in the Sales channels » Channel Control Centre » [Open your Amazon sales channel] » Settings » [Open account] » Tab: Item settings menu, make sure that the variation is also activated for the online store in the Client (store) section.
Optional: If you only want to export variations with certain flags and tags, also configure the following settings:
-
Select flags: In the menu Sales channels » Channel Control Centre » [Open your Amazon sales channel] » Settings » [Open account] » Tab: Item settings » Section: Export filter, select the desired flags from the drop-down lists Flag 1 and/or Flag 2.
-
Add tags: Add the desired tags from the drop-down list in the Sales channels » Channel Control Centre » [Open your Amazon sales channel] » Settings » [Open account] » Tab: Item settings » Section: Export filter menu.
Note: If multiple tags are selected, they are interpreted as an OR condition. This means a variation is exported as soon as at least one of the selected tags has been assigned to it.
Offer catalogue settings:
-
Create catalogue: You have created an offer catalogue.
-
Map data fields: You have mapped the required data fields in the offer catalogue.
-
Activate catalogue: You have activated the offer catalogue.
Note: The offer catalogue is exported within 15 minutes after a value has been changed on the variation.
Item settings in the menu Item » Items » [Open item]:
-
Link product type: Link a current product type for the item In the Amazon section.
Variation settings in the menu Item » Items » [Open variation]:
-
Activate variation: In the Availability and visibility section, enable the option Active (toggle_on).
-
Add order referrer: Add the option Web API and the desired Amazon referrer in the Sales channels section.
Settings for price and stock updates in the Sales channels » Channel Control Centre » [Open your Amazon sales channel] » Settings » [Amazon account] » Tab: Item settings menu:
-
Activate price updates: Select the option 15 minutes or Hourly for Price changes .
-
Optional: If you also want to update stock, then select the option 15 minutes or hourly for Stock changes.
Offer catalogue settings:
-
Create catalogue: You have created an offer catalogue.
-
Map data fields: You have mapped the required data fields in the offer catalogue.
-
Activate catalogue: You have activated the offer catalogue.
Note: The updated offer is transmitted to Amazon at the following intervals:
-
Within 15 minutes if the price of the variation has been changed.
Item settings in the menu Item » Items » [Open item]:
-
Link product type: Link the current product type for the item In the Amazon section.
Variation settings in the menu Item » Items » [Open variation]:
-
Activate variation: In the Availability and visibility section, enable the option Active (toggle_on).
-
Add order referrer: Add the option Web API and the desired Amazon referrer in the Sales channels section.
Product catalogue settings:
-
Add catalogue template: You have added the Amazon product types for which you want to create product catalogues under Sales channels » Channel Control Centre » [Open your Amazon sales channel] » Category whitelist.
-
Create catalogue: You have created a product catalogue for the corresponding product type.
-
Map data fields: You have mapped the required data fields in the product catalogue.
-
Activate catalogue: You have activated the offer catalogue.
Note: The product catalogue is exported to Amazon once per day (at night) after a value has been changed on the variation.
The barcode is mapped with the data field External product ID (group: externally_assigned_product_identifier).
Use the data fields Main Image Location (group: main_offer_image_locator) and Other Image Location (group: other_offer_image_locator_1-5) in the offer catalogue to map offer-specific images, for example if you sell a used item and want to show the item’s condition.
These data fields are not mandatory, but they are recommended if you sell used items.
32.2. Stock
There is no data field for stock because stock is not mapped in the offer catalogue.
Stock updates are carried out according to the setting Stock changes in the Sales channels » Channel Control Centre » [Open your Amazon sales channel] » Settings » [Amazon account] » Tab: Item settings menu. If this setting is activated, the information from this setting is automatically added during the catalogue export.
If a variation has no stock limitation (the Stock limitation setting in the General tab of the variation), a defined amount is automatically transferred to Amazon as stock twice a day. This automated process ensures that an Amazon listing is regularly restocked.
This is how it works:
In the General tab of a variation, the Stock limitation setting is set to None. The following automatic process is executed:
-
PlentyONE uses the value entered for Quantity for items not limited to stock in the Item settings tab of the Amazon settings. This value is transferred to Amazon as current stock twice per day.
Example: You have entered the value '25' for Quantity for items not limited to stock. This means: For all affected variations, a stock amount of 25 is transferred to Amazon twice a day, regardless of the actual stock levels.
32.3. Other
If you use a third-party repricing tool, then go to Sales channels » Channel Control Centre » [Open your Amazon sales channel] » Settings ] » [Amazon account] » Tab: Item settings and make sure that Never is selected for the setting Price changes and that no price is mapped in the catalogue.