REWE
|
REWE marketplace closes down on 31/12/2021
REWE will close down their marketplace on the 31st of December 2021. After this date, the platform is expected to be operated until the 31st of January2022. Orders must be processed until the 31st of January2022. Existing customers can contact REWE for more details. As such, the information on this page is now only relevant for existing customers. |
1. Overview of automatic data exchange
After installing and setting up the plugin, the automatic processes described in Table 1 are available:
| Data | Interval |
|---|---|
Item export |
once a day |
Stock synchronisation |
Every 15 minutes |
Price synchronisation |
Hourly |
Order import |
Every 15 minutes |
2. Activating the automatic data exchange
Open the Setup » Markets » REWE » Basic Settings menu to set up the market REWE in PlentyONE. Activate the item export, the stock and price synchronisation, and the order import in this menu so that data is exchanged with REWE automatically.
Activating the automatic data exchange:
-
Go to Setup » Markets » REWE » Basic settings.
-
Activate the following options to activate the automatic data exchange with REWE:
-
Item export
-
Stock and price update
-
Order import
-
-
Save () the settings.
3. Defining stock export
By default, the stock information for each variation is exported based on the option you selected for the Limitation setting. You can also ignore this setting and instead export the actual net stock for all variations to REWE.
Defining stock export:
-
Go to Setup » Markets » REWE » Basic settings.
-
Select an option for Export stock. Pay attention to the explanations given in Table 2.
-
Save () the settings.
| Setting | Explanation | ||||
|---|---|---|---|---|---|
Export stock |
Select how stock is to be exported.
|
4. Defining a sales price
To sell variations on REWE, you need a sales price in which the order referrer REWE is activated. The price that you save for this sales price is the price that will be shown on REWE.
Sales prices define the conditions under which a variation is sold at a specific price and on a specific sales channel. For example, you can sell your items at a lower price in your webshop than on Amazon. Or you can sell products cheaper to B2B customers than to B2C customers.
Two default sales prices are already configured in your PlentyONE system. However, you can also create new sales prices and edit them individually. In addition to default sales prices, you can also create RRPs, special offers, and set prices.
Defining a sales price for REWE:
-
Go to Setup » Item » Sales prices » [Open sales price].
Tip: No sales prices? Then create a sales price first. -
Open the Settings tab.
-
Activate the referrer REWE.
-
Save () the settings.
5. Managing promotion prices
You can export promotion prices that are valid for a specific period.
| The promotion price is not started and ended on REWE automatically. The promotion price is only started and ended when you edit the price that is saved for the REWE special offer price in PlentyONE. |
5.1. Defining a promotion price
Prerequisites for correctly exporting promotion prices:
-
You have created a sales price of the type Special offer.
Tip: Do not forget to activate the referrer REWE for this special offer price. -
You have mapped the following data fields in the REWE catalogues:
-
Marketplace data field Promotion price PlentyONE sales price of the type Special offer
-
Marketplace data field Promotion starts = PlentyONE property REWE promotion price start date
-
Marketplace data field Promotion ends = PlentyONE property REWE promotion price end date
-
Defining a promotion price:
-
Link the sales price of the type Special offer to the variation.
-
Save a price for the special offer price.
-
Link the variation with the property REWE promotion price start date.
-
Save a date for the property.
Important: The promotion price is not started automatically on this date. -
Link the variation with the property REWE promotion price end date.
-
Save a date for the property.
Important: The promotion price is not ended automatically on this date. -
Set yourself a reminder for the start date and the end date. On these days, you need to start and end the promotion price yourself.
5.2. Starting the promotion price on the start date
On the start date, you need to change the price that you saved for the REWE special offer price in PlentyONE. This updates the prices on REWE and starts the promotion price.
There are several ways of changing the prices. Here, we show you two examples based on the number of variations for which you want to start promotion prices.
-
Open the variation.
-
Change the amount for the promotion price. For example, change the last decimal point of the amount.
-
Save the change.
→ The promotion price for the variation is started on REWE.
Tip: You can change back to the original price straight way. The change only serves to update the price on REWE.
-
Open the variation group function.
-
Carry out a price change for the promotion price. For an example, see the screenshot below.
-
Execute the variation group function.
→ The promotion price is started for all variations that have reached or exceeded the start date saved in the property REWE promotion price start date.
Tip: You can change back to the original price straight way. The change only serves to update the price on REWE.
5.3. Ending promotion prices on the end date
On the end date, you need to change the price that you saved for the REWE special offer price in PlentyONE. This updates the prices on REWE and ends the promotion price.
There are several ways of changing the prices. Here, we show you two examples based on the number of variations for which you want to end promotion prices.
-
Open the variation.
-
Change the amount for the promotion price. For example, change the last decimal point of the amount.
-
Save the change.
→ The promotion price for the variation is ended on REWE.
→ The normal sales price is shown as the new price.
Tip: You can change back to the original price straight way. The change only serves to update the price on REWE.
-
Open the group function.
-
Carry out a price change for the promotion price. For an example, see the screenshot below.
-
Execute the group function.
→ The promotion price is ended for all variations that have reached or exceeded the end date saved in the property REWE promotion price end date.
→ The normal sales price is shown as the new price.
Tip: You can change back to the original price straight way. The change only serves to update the price on REWE.
6. Setting the commission
|
Commission settings are optional
The settings for the commission for REWE are optional. If you do not set a commission, orders will be imported into PlentyONE with the sales prices that are displayed at REWE. |
The standard commission is set up in the Setup » Markets » REWE » Basic settings menu. The commission serves to calculate the order sums free of commission.
Order sums free of commission are calculated with this formula:
-
Sales price REWE = Sales price customer * (1 - conversion factor)
-
Conversion factor = Commission * (1 + VAT rate)
For the calculation, the percentages for commission and VAT rate are converted into the corresponding factor, that is, divided by 100. The conversion factor is rounded to 3 decimal places.
Setting the commission:
-
Go to Setup » Markets » REWE » Basic settings.
-
In the Commission area, enter a number for the commission in percent.
-
Save () the settings.
→ The commission is the default commission for all items except for any variations for which a separate commission was set up.
You can set up a separate commission for variations. To do so, use the REWE commission variation property. The variation property REWE commission is created automatically when the REWE plugin is installed. In order to set up a separate commission for a variation, link the variation to the variation property REWE commission.
Setting up a separate commission for variations:
-
Go to Item » Edit item.
-
Open the item.
-
Click on the Variations tab.
-
Open the variation that you would like to set up a separate commission for.
-
Open the variation’s Properties tab.
-
From the Properties drop-down list, select REWE commission.
-
Click on Add ().
→ The property is linked to the variation. -
Enter a whole number or a decimal number into the Value field for the commission in percent.
-
Save () the settings.
7. Activating the order referrer
Go to Setup » Orders » Order referrer to activate the order referrer. This ensures that orders are assigned to the correct sales channel.
An order referrer tags an order with the sales channel on which the order was generated. Sales channels can be e.g. your online shop or markets on which you sell your items. Each sales channel has an individual order referrer. Some order referrers are available by default in your PlentyONE system. Further order referrers are added e.g. if you install a new plugin. For further information about the order referrer, see the page Order referrer of the PlentyONE manual.
Activating the order referrer for REWE:
-
Go to Setup » Orders » Order referrer.
-
Click Search (search).
-
In the list, navigate to the option Rewe.
-
On the right of the referrer’s line, click on Edit (edit).
→ The window Edit referrer opens. -
Activate the option Visible in selection (toggle_on).
-
Click on Save (save).
→ The referrer is active.
8. Setting the variation availability
You need to activate the variations that you want to sell on REWE. This is done in the Availability and visibility section of a variation within the Item » Items » [Open item] » [Open variation] menu.
Making a variation available for REWE:
-
Go to Item » Items » [Open item] » [Open variation].
Tip: To sell all variations of an item on REWE, carry out the settings for the item’s main variation. If the inheritance function is active for the variations, then this activates the availability of all variations of the item. -
In the Availability and visibility section, activate the option Active.
-
In the Sales channels section, click Add sales channels (add).
→ The window Add sales channels opens. -
In the drop-down list Sales channels, select the option REWE.
-
Click Apply.
→ The sales channel is added. -
Save () the settings.
→ The variation is available for REWE.
Use the variation group function to edit multiple variations at once. You select the variations that you want to edit.
Making several variations available for REWE using the variation group function:
-
Go to Item » Items.
-
Select () the variations to be edited.
-
In the toolbar, click on layers » layers Variation group function.
→ The Variation group function window opens. -
Select the action Sales channels from the drop-down list Actions.
→ The action is added to the lower part of the window. -
In the drop-down list Sales channels, select the option REWE.
-
Select the action Active from the drop-down list Actions.
→ The action is added to the lower part of the window. -
Activate the option Active.
-
Navigate to the area Availability.
-
Click Execute to apply the settings.
Batch processing allows you to edit several variations at once. You use filters to limit which variations are edited.
Making several variations available for REWE using batch processing:
-
Go to Item » Batch processing.
-
Click on the tab Variations in the upper left corner.
-
Use the filters on the left to specify which variations should be processed.
-
Navigate to the area Market availability.
-
Activate the checkbox to the left of the option REWE.
-
Activate the checkbox to the right of the option REWE.
-
Navigate to the area Availability.
-
Activate the checkbox to the left of the option Active.
-
Activate the checkbox to the right of the option Active.
-
Click on Apply to apply the settings to the variations.
9. Linking variations with the property REWE product type
Variations that you want to sell on REWE have to be linked with the REWE product type variation property. This variation property is created in your PlentyONE system as soon as you have installed the REWE plugin. Examples for REWE product types are:
-
Household
-
Garden
-
Fashion
Linking variations with the property REWE product type:
-
Go to Item » Edit item » [Open item] » [Open variation] » Tab: Settings.
Tip: To link all variations of an item, carry out these settings for the main variation. The settings are passed on to all variations of the item. -
In the Variation properties, click into the field Properties.
-
Activate the property REWE product type.
-
Click on Add ().
→ The property is added to the property list. -
Select an appropriate value from the drop-down list.
→ The REWE product types can be selected. -
Save () the settings.
10. Setting up the item export
Item data is exported to REWE via catalogues. The assistant Creating REWE catalogues helps you to create a catalogue for a specific product category.
Catalogues are used to export data from your PlentyONE system. There are two different catalogue formats:
-
Marketplace formats are used to export item data to markets.
-
Standard formats are used to export data from your PlentyONE system into a file.
Catalogues with marketplace formats allow you to tailor your item information exactly to the needs of the market. Because here, you assign a suitable PlentyONE data field to each of the data fields of the market. When your variation data is exported to the market, the market’s data fields are then filled with the correct PlentyONE data.
-
Is this your first time working with catalogues? Then read up on the basic concept of catalogues first.
|
Items cannot be deleted on commercetools
Items cannot be deleted on commercetools, neither by PlentyONE nor by REWE or commercetools. Therefore, make extra sure that the correct data fields are mapped in the catalogue prior to transferring your items. |
At present, the REWE plugin allows you to create catalogues for the following REWE product categories:
-
AFG (Soft Drinks)
-
Alcoholic beverages
-
Baby Supplies
-
Books and Magazines
-
Drugstore
-
Fashion
-
Leisure/sports
-
Garden
-
Household
-
Multimedia
-
Contact Lenses
-
Food
Information for the food product category:-
Food specifications must always be made for 100g.
-
Energy information must be provided in kcal.
-
If the Nutrition information for prepared and non-prepared foods field is not mapped, the value non-prepared is transferred to REWE by default.
-
-
New Media (DVD etc.)
-
Stationary
-
Sets
-
Toys
-
Pet supplies
10.1. Notes on the REWE item data structure: product groups and variations
REWE differentiates between product groups and variation groups.
Product group |
Examples:
In PlentyONE: In PlentyONE. product groups are items with variations with at least one REWE group attribute, depending on the product type. Example for attribute: For the product type Food, the following Attributes for product group are available (as of 05/2021):
Notes on mapping data fields: Items in PlentyONE can have more than one REWE group attribute. However, only one REWE group attribute can be used to form product groups. Therefore, the Attribute for product group field has to be matched so that the first attribute will always be the attribute that you want to use to form a product group. If an item differs in colour and print and the print should be used as the REWE group attribute, you first have to map the print in the marketplace data field Attribute for product group and only then map the colour. Tip: The REWE group attributes for each product type are available in the catalogue templates. To do so, open the drop-down list Attribute for product group in the marketplace format. |
Variations |
Examples:
In PlentyONE: In PlentyONE. variations are variations of an item no more than one REWE variation attribute, depending on the product type. Example for attribute: For the product type Food, the following Attributes for variation group are available (as of 05/2021):
Notes on mapping data fields:
Tip: The REWE variation attributes for each product type are available in the catalogue templates. To do so, open the drop-down list Attribute for variation group in the marketplace format. |
10.2. Creating a catalogue in the assistant
Creating a catalogue in the assistant:
-
Open the menu Setup » Assistants » Plugins » [Open client].
-
Click on the assistant Create REWE catalogue.
-
Follow the instructions on the screen. If you need additional information about one of the options, expand the info boxes below this description ().
-
In the step Summary, check your settings to make sure they are correct.
Tip: In the Summary step, click on the arrow () to show the settings. -
If everything is as it should be, click on Finalise.
→ The catalogue is created. -
Open the catalogue in the Data » Catalogues menu to map more fields.
Note: You need a separate catalogue for each product category.
Note: You should not change the format in the catalogue’s Format settings. To ensure that the export to the market works, all required settings are already configured when you create a catalogue. If you change the settings, errors might occur during the export.
| Setting | Explanation |
|---|---|
Select the REWE product category that should be added to the catalogue. |
Select a product category from the drop-down list. |
Enter a name for the REWE catalogue. |
Enter a name for the catalogue. The catalogue will be listed under this name in the Data » Catalogues menu. |
In this step of the assistant, you decide which variation data saved in PlentyONE you want to send to the market. To do so, you are going to map each data field of the market with the PlentyONE data field that contains the data that you want to export to the market. Instead of mapping an existing data field, you can also instead create a new data field for some fields.
SKU = From the drop-down list, select the data field in PlentyONE that contains the SKU.
Recommendation: The variation ID is unique for each variation. Map the marketplace data field SKU to the PlentyONE data field Variation ID.
Note: Do not change the SKU and Parent SKU of a variation once the variation has been created on commercetools.
Select data field = A data field that already exists in PlentyONE will be exported to REWE. Select a data field from the drop-down list Data field.
Note: The mappings you create will not be checked in terms of logic. As such, check your mappings carefully before starting the export.
Create property = Creates a property and maps this property to the data field. Properties can be used to export values for data fields that have no corresponding item data saved in PlentyONE. such as Diameter.
Automatically created property will be saved in the Setup » Settings » Properties » Configuration menu.
Automatically created properties are created with the following settings:
-
Section = Item
-
Type = depending on the market data field
-
Language = German
-
Name = Name of the product category
-
Group = REWE
Creating a sales price = Creates a sales price and maps this sales price to the data field. You can check and edit automatically created sales prices in the Setup » Item » Sales prices menu.
Automatically created sales prices are created with the following settings:
-
Subscription interval = None
-
Internal name = REWE
-
External name = REWE
-
Minimum quantity = 1
-
Live conversion = No
-
Currency = Euro
-
Display = Always display for new items
-
Client = ALL
-
Class = ALL
-
Country = Germany
Create barcode = Creates a barcode REWE and maps this barcode to the data field. If a barcode with the name REWE already exists in the system, that barcode is mapped instead. You can check and edit automatically created barcodes in the Setup » Item » Barcodes menu.
10.3. Mapping additional data fields in the catalogue (not in assistant)
You have already mapped important mandatory fields for the REWE product category in the assistant. However, after you have completed the assistant, you need to map additional data fields to send more information regarding your products to REWE.
-
The market expects product data that cannot be saved in the PlentyONE item menu? Then create a property for this data. Link this property with your variations. The actual values are saved as property values for this property. Is this your first time working with properties? Then read up on the principles of properties first.
| Availability | Explanation |
|---|---|
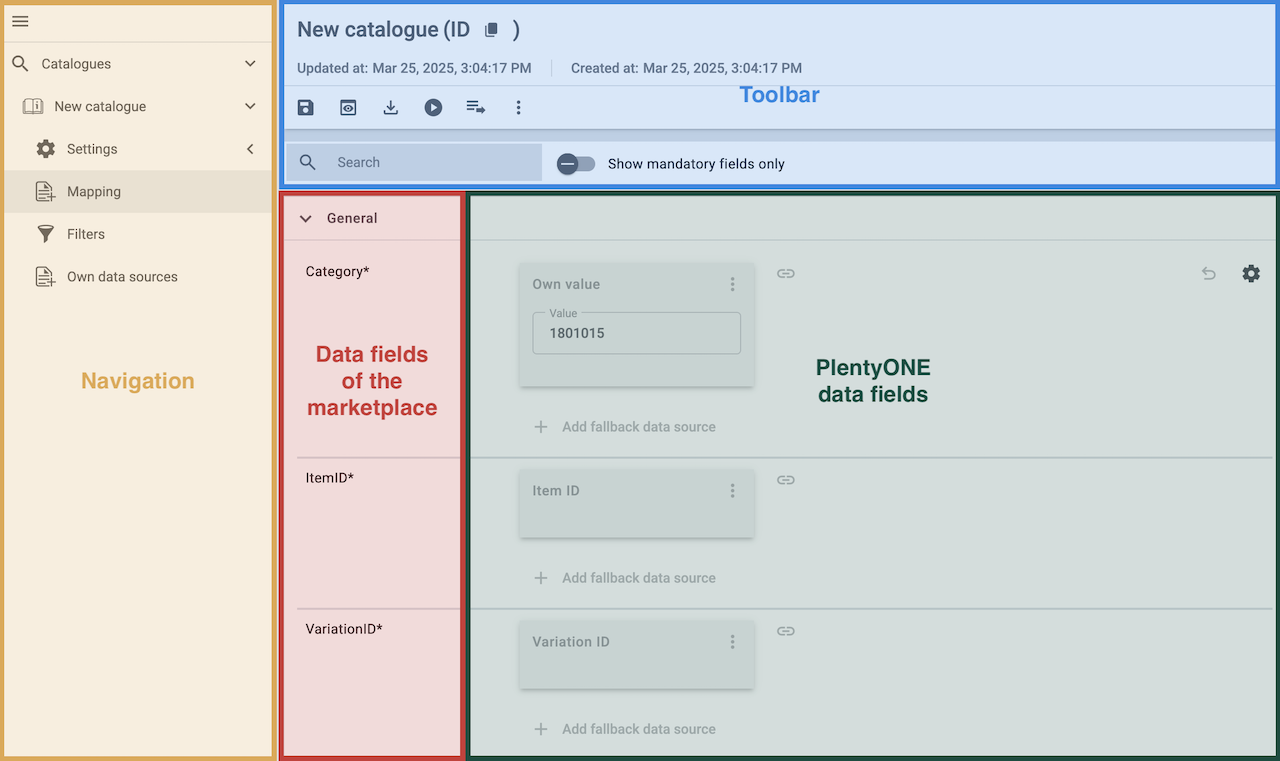
Navigation |
When you open a catalogue, the view Mapping is shown. On the very left is the navigation.
|
Toolbar |
The toolbar provides actions for the catalogue. For example, save your mappings, restore an older version of the catalogue or hide or show optional marketplace data fields. |
Marketplace data field |
To the right of the navigation, all data fields available for the market are listed. Mandatory fields are marked with an asterisk (✱). |
PlentyONE data fields |
On the right side of the catalogue, you map the marketplace data fields to appropriate PlentyONE data fields. In the screenshot above, a few of the fields are already mapped. |
Mapping catalogue fields:
-
Go to Data » Catalogues.
-
Click on the catalogue.
→ The Mapping tab opens.
→ In the left-hand column, the market’s data fields are listed.
Tip: Mandatory fields are flagged with an asterisk (*).
→ In the right column, you map the PlentyONE data fields. Any PlentyONE data fields that you already mapped are also shown in this column. -
Map suitable PlentyONE data fields to the market data fields.
For each marketplace data field, you have a number of mapping options. Expand the info boxes below to get more information about each of these mapping options.-
Simple 1:1 mapping
-
Simple 1:1 mapping with properties
-
Complex 1:1 mapping
-
1:1 mapping with fallback data fields
-
1:n mapping
-
Own value mapping
-
Mapping with mathematical calculations
-
-
Save () the catalogue.
→ The mappings are saved.
In a simple 1:1 mapping, you map a PlentyONE data field to the marketplace data field. If no suitable setting exists in PlentyONE. you can map a property instead.
As such, simple 1:1 mappings allow you to:
-
I want to fill this marketplace data field with the data from this PlentyONE setting.
-
If the data field is empty for a variation, no value is exported for this variation.
Creating a simple 1:1 mapping:
-
Next to the marketplace data field, click on + Add data field.
→ To the left, the list of available PlentyONE data fields are shown in groups. -
Click on the group you need.
→ The PlentyONE data fields of the group are shown. -
Click on the plus to the right of the PlentyONE data field you want to select.
→ The PlentyONE data field is added to the right. -
Click on Confirm.
Example: Sales price and RRP for Otto Market
This gif shows you how to map the marketplace data fields Sales price and RRP for Otto Market to PlentyONE data fields:
Reminder: In a simple 1:1 mapping, you map a PlentyONE data field to the marketplace data field. However, what can you do if PlentyONE does not offer a suitable data field? Then it’s the properties' moment to shine. Properties allow you to save any kind of information in your properties.
-
Is this your first time working with properties? Then read up on the principles of properties first.
Creating a property:
-
Create a property with the necessary values.
Tip: Find out how to do that here.
Creating a simple 1:1 mapping with properties:
-
Next to the marketplace data field, click on + Add data field.
→ To the left, the list of available PlentyONE data fields are shown in groups. -
Expand the group Property.
→ The property groups are shown. -
Expand the group you need.
-
Click on the Plus sign on the right of the property you want.
-
From the drop-down list Language, select the language in which you send the data to the market.
-
Click on Confirm.
→ The property is mapped to the marketplace data field.
Like with the simple 1:1 mappings, you map a PlentyONE setting or property to a marketplace data field. Complex mappings are necessary whenever a marketplace data field has more than one possible value. Instead of mapping data fields, for complex mappings you map individual values of these data fields. For example, you cannot simply map the PlentyONE data field Shipping profile to the marketplace data field Shipping method. Why? The market cannot know which of your shipping profiles in PlentyONE corresponds to which of their shipping methods.
| Do not enter own values for complex mappings. All values that you enter must be saved for the variations, either in a setting or as a property value. This also applies if the value Comparative value is shown. You still need to enter exactly the value of the setting or property that you mapped. |
In complex mappings, the value of the market is always exported. Only when you map an own value, the own value that you enter is exported.
You can recognise complex mappings from the field that is shown below the name of the marketplace data field. Click on the field to show the values available for the marketplace data field.

Examples for complex 1:1 mappings are:
-
Categories
-
Brands
-
Shipping setting
Important: For complex mappings, do not map own values or properties of the type None.
Creating a complex 1:1:n mapping:
-
Click on the field for the marketplace data field.
→ A list of the available values is shown. -
Select the value that you want to map a PlentyONE data field to.
→ The value is mapped. -
Next to the marketplace data field, click on + Add data field.
→ To the left, the available PlentyONE data fields are listed in groups. -
Click on a group.
→ The PlentyONE data fields of the group are shown. -
Click on the PlentyONE data field for which you want to map values.
Important: Do not map own values or properties of the type None. -
Your next steps depend on the PlentyONE data field you selected:
-
Alternative 1: The available values for the PlentyONE data value are shown on the left.
-
Next to the value you want to select, click on the plus.
→ The value is added to the field on the right. -
Click on Confirm.
-
-
Alternative 2: The PlentyONE data field is inserted and the field Comparative value is shown.
-
In the field Comparative value, enter a value that is saved in the setting or the property of the mapped PlentyONE data field.
-
Click on Confirm.
-
-
Alternative 3: The PlentyONE data field is inserted and a drop-down list is shown.
-
Select a value from the drop-down list.
-
Click on Confirm.
→ The value of the marketplace data field is exported, not the value of the PlentyONE data field.
Exception: Only when you map an own value, the own value that you enter is exported.
-
-
Example: Delivery time in days for Otto Market
This gif shows you how to map suitable PlentyONE values to the values of the marketplace data fields Delivery time in days for Otto Market:
In a 1:1 mapping with one or more fallback data fields, you map a PlentyONE data field to the marketplace data field. In addition, you specify one or more fallback data fields. This ensures that the system keeps looking if the first PlentyONE data field is missing or empty.
So this mapping specifies:
-
I want to fill the marketplace data field with the data from the selected PlentyONE setting.
-
If that data field is missing or empty for a variation, the first fallback data field is checked. The value of that fallback data field is exported instead.
-
If the first fallback data field is also missing or empty for the variation, the second fallback data field is checked. If a value is found, the value of the second fallback data field is exported for the variation etc.
Two separate fallback conditions are available:
Null (default) |
The fallback data field is used if the data field above is mapped in the catalogue but not linked to the variation. The condition "Null" is useful when you want to map fallback data fields for the following types of PlentyONE data fields:
Important: When you add a fallback data field, the fallback condition "null" is selected automatically. To apply the fallback condition "leer", you need to change the default setting. |
Empty |
The fallback data field is used if the data field above is mapped in the catalogue and linked to the variation, but is empty. The condition "Empty" is useful when you want to map fallback data fields for the following type of PlentyONE data fields:
Important: When you add a fallback data field, the fallback condition "null" is selected automatically. To apply the fallback condition "leer", you need to change the default setting. |
Note: Even if you assign one or more fallback data fields, the value of only one of those fields is exported. For each variation, the mapped PlentyONE data fields are checked in the order in which you mapped them. This means that if the first data field does not provide a value for a variation, the first fallback data field is exported etc.
Creating a 1:1 mapping with fallback data fields:
-
Next to the marketplace data field, click on + Add data field.
→ To the left, the list of available PlentyONE data fields are shown in groups. -
Click on the group you need.
→ The PlentyONE data fields of the group are shown. -
Click on the plus to the right of the PlentyONE data field you want to select.
→ The PlentyONE data field is added to the right. -
In the list of PlentyONE data fields, click on the plus icon next to the PlentyONE data field that you want to map.
→ The fallback data field is added with the fallback condition "null". -
Alternative 1: To add the fallback data field with the fallback condition "null":
-
Click on Confirm.
→ The fallback data field is exported if the data field above is not linked to the variation.
-
-
Alternative 2: To add the fallback data field with the fallback condition "empty":
-
To the left of the fallback data field, click on the cog ().
→ The window Data column settings is shown. -
For the setting Fallback condition, select the option Empty.
-
Click on Save.
→ The fallback data field is added with the fallback condition "empty". -
Click on Confirm.
→ The fallback data field is exported if the data field above is empty for the variation.
-
Example: Fallback data field for SKU for Otto Market
This GIF shows you the mapping for the OTTO Market marketplace data field SKU. The PlentyONE data field SKU is mapped to this marketplace data field. The PlentyONE data field Variation ID is mapped as the fallback data field. The fallback condition "null" is applied automatically.
Result: The fallback data field Variation ID is exported if the data field SKU is not linked to the variation.
In a 1:n mapping, you map several PlentyONE data fields to the marketplace data field. You can link these data fields with a separator.
So this mapping specifies:
-
I want to combine these PlentyONE data fields during export so that the marketplace data field is filled with the data of these two or more PlentyONE settings.
Creating a 1:n mapping:
-
Next to the marketplace data field, click on + Add data field.
→ To the left, the list of available PlentyONE data fields are shown in groups. -
Click on the group you need.
→ The PlentyONE data fields of the group are shown. -
Click on the plus to the right of the PlentyONE data field you want to select.
→ The PlentyONE data field is added to the right. -
Click on Confirm.
-
To the right of the mapped PlentyONE data field, click on Add data field ().
→ To the left, the list of available PlentyONE data fields again are shown in groups. -
Map one or several additional PlentyONE data fields to the marketplace data field as described above.
-
Click on Confirm.
-
To the very right of the row, click on Settings ().
-
Select a separator from the drop-down list Separator or add a custom separator.
-
Click on Save.
-
Save () the catalogue.
→ The mappings are saved.
→ During the export, the content of the PlentyONE data fields is combined and exported as one field.
You are sure that you want to export the same value for all variations of a catalogue for a marketplace data field? Then specify an own value. This own value is then exported for all variations.
So this mapping specifies:
-
For this marketplace data field, I want to export the value that I entered in the field Own value for all variations of this catalogue. The value you enter is always exported. The value overwrites the market value also in complex mappings where usually the value of the market is exported. As such, make sure you enter an own value that the market accepts for this marketplace data field.
Creating an own value mapping:
-
Next to the marketplace data field, click on + Add data field.
→ To the left, the list of available PlentyONE data fields are shown in groups. -
Click on the plus next to Own value at the top of the list.
→ The field for the own value is added to the view. -
Enter a value into the input field.
→ This value is exported for all variations.
Example: Diameter information
You want to export diameter information for some of your variations. The diameter is saved in centimetres for all your variations. Instead of creating a property for the unit and linking this property to the variations, you can enter the own value cm.
This is an example of how you can map an own value for the diameter unit:
Mathematical calculations allow you to change numerical values automatically during the export.
-
This function only works for data fields that contain numerical values.
-
This functionality is new and not available for all catalogue formats.
So this mapping specifies:
-
I want the numerical value of a PlentyONE data field to be recalculated during the export. Basic arithmetic operations are available for the formulas.
Recalculating numerical values:
-
Next to the marketplace data field, click on + Add data field.
→ To the left, the list of available PlentyONE data fields are shown in groups. -
At the very top of the list, click on the plus icon next to Formula (calculate).
→ The data field Formula is added to the field on the right. -
Click into the data field.
→ The window Modify value is shown. -
Enter a numerical value or select a PlentyONE data field at the bottom right of the window to add it to the calculation (add).
Tip: Use the search function. This helps you to find data fields quickly. -
Optional: If the symbol more_vert is shown in the data field, select the correct assignment for the data field.
Tip: A number tells you how many assignments are necessary for the data field.-
Click on the icon more_vert.
-
In the window shown, select the assignments from the drop-down list.
-
Save the settings.
-
-
Enter numbers and mathematical operators with the on-screen calculator or the keyboard.
-
Save the settings.
→ The entered formula is displayed in the overview.
→ The calculation will be carried out in the next export.
10.4. Particularities for mapping data fields
Every market structures item data differently. As such, there are some particularities for each market when mapping data fields. Table 3 contains mapping information for important data fields for REWE.
| Marketplace data field | PlentyONE data field | ||||||
|---|---|---|---|---|---|---|---|
SKU |
We recommend to link the data field SKU with the PlentyONE data field Variation ID because the variation ID is clearly assigned to the variation. |
||||||
Attribute for product group |
As described above, REWE distinguishes between product bgroups and variation groups. Reminder: You need a REWE product group if the variations of an item have different images because they look different. Product group attributes are attributes that influence how the product looks. As such, you would pap the following PlentyONE data field to the marketplace data field Attribute for product group:
Of course you can also map fallback data fields. This might be necessary if you use both attributes and properties in PlentyONE for the data that you want to export for the marketplace data field Attribute for product group. Example 1: Mapping colour information for product type "Fashion"
The following example describes how you can map colour information in a catalogue for the product type "Fashion".
Summary for catalogue experts: Mapping colour information for product type "Fashion":
Detailed description for first-time catalogue users: The following two descriptions illustrate the settings in detail:
Mapping colour information in attributes for product type "Fashion":
Mapping colour information in properties for product type "Fashion":
Example 2: Mapping package sizes for product type "Household"
The following example describes how you can map package size information in a catalogue for the product type "Household".
Summary for catalogue experts: Mapping package sizes for product type "Household":
Detailed description for first-time catalogue users: The following two descriptions illustrate the settings in detail:
Mapping package sizes in attributes for product type "Household":
Mapping package sizes in properties for product type "Household":
|
||||||
Promotion price; |
Use these marketplace data fields to export temporary promotion prices to REWE.
|
10.5. Example: Mapping the data field "Product description"
An example of how you can link the mandatory field Produktbeschreibung (product description) to data saved in PlentyONE is described below.
-
Go to Data » Catalogues.
-
Click on the catalogue.
→ The catalogue opens. -
For the REWE data field Product description, select a PlentyONE data field from the drop-down list.
Example: Item text > Name 1, Name 2 or Name 3 -
Link the other data fields in the same way. Link at least all mandatory fields.
Tip: Mandatory fields are flagged with an asterisk (*). -
Save () the settings.
→ The content of the selected PlentyONE data field is shown as the product description on REWE.
11. Linking data fields created in the assistant with variations
If you selected the options Create sales price, Create barcode and/or Create property in the assistant, these prices, barcodes and/or properties are created automatically. You need to link these newly created data fields with the variations that you want to export to the market. This is described on the Item pages of the manual:
-
How to link Sales prices.
-
How to link Barcodes.
-
How to link properties and save a property value.
Tip: Properties created in the assistant are automatically added to the property group REWE of the Setup » Settings » Properties » Groups menu. Open this group to see what new properties need to be mapped.
12. Activating the catalogue export to REWE
You have set up REWE in PlentyONE and created a catalogue for exporting your item data? Then start the export of your item data. To do so, activate the catalogues which should be exported to REWE in the Data » Catalogues menu.
Activating the catalogue export to REWE:
-
Go to Data » Catalogues.
→ The catalogues are listed. -
Scroll to the REWE catalogue.
-
In the Active column, move the toggle button to the right ().
→ The catalogue is active.
→ The catalogue data is exported to REWE once a day.
Tip: Go to Data » Catalogue export status for information about the status of the export.
13. Matching shipping service providers
Shipping service providers saved in PlentyONE are matched with REWE shipping service providers in the Setup » Markets » REWE » Shipping service provider matching menu. If you do not match shipping service providers, then the shipping service provider unknown is sent to REWE.
Matching shipping service providers:
-
Go to Setup » Markets » REWE » Shipping service provider matching.
-
Select the REWE shipping service provider from the drop-down list.
-
Save () the settings.
14. Matching reasons for return
Return reasons saved in PlentyONE are matched with REWE return reasons int the Setup » Markets » REWE » Return reason matching menu. If you do not match reasons for return, then the reason for return Other is sent to REWE. For further information about REWE reasons for return, refer to the seller documentation that you have received from REWE.
Linking return reasons:
-
Go to Setup » Markets » REWE » Return reason matching.
-
Select the REWE return reason from the drop-down list.
-
Save () the settings.
15. Synchronising tax categories
If the tax categories were changed at REWE, you have to synchronise the tax categories in PlentyONE. Tax categories are synchronised with REWE in the Setup » Markets » REWE » Basic settings menu in the Tax categories area.
Synchronising tax categories:
-
Go to Setup » Markets » REWE » Basic settings.
-
Go to the Tax categories area and click on Synchronise.
→ The tax categories are synchronised with REWE.
Last update indicates the last time the tax categories were synchronised with REWE.
|
Synchronise tax categories before switching to REWE live system
You need to synchronise the tax categories in PlentyONE before you switch from the REWE stage test environment to the live system. Otherwise, your item catalogue will not be exported. Enter your access data and the product key for the live system prior to switching to the live system. Afterwards, synchronise the tax categories. You have to map the tax categories again in your REWE catalogues after you synchronised them. |
16. Manually synchronising brands
Brands are automatically synchronised with REWE once per day. Additionally, you can manually synchronise brands with REWE at any time. To do so, open the Setup » Markets » REWE » Basic settings menu.
Manually synchronising brands:
-
Go to Setup » Markets » REWE » Basic settings.
-
In the Brands area, click on Synchronise.
→ The brands are synchronised with REWE.
Tip: Last update indicates the last time the brands were synchronised with REWE.
17. Deactivating the creation of a contact
By default, REWE orders are always assigned to the contact and the invoice address of REWE. Activate the option Deactivate contact creation if you do not want to create a contact. Instead, only addresses are saved. Table 4 describes the differences between the two options.
| Setting | Explanation |
|---|---|
Deactivating the creation of a contact |
The order import in detail
The order import in detail
|
Deactivating the creation of a contact:
-
Go to Setup » Markets » REWE » Basic settings.
-
Navigate to the Order import area.
-
Activate the option Deactivate contact creation.
-
Save () the setting.
→ Only the invoice address and delivery address are created and linked to the order.
→ No contact is created.
18. Automatically updating the order status for REWE
Set up event procedures to automatically update the order status on REWE whenever specific events occur. You can set up the following event procedures:
-
Send out-of-stock status to REWE
-
Send buyer cancellation to REWE
-
Send seller cancellation to REWE
-
Send shipping preparation to REWE
-
Send shipping preparation completion to REWE
-
Send shipping confirmation to REWE
-
Send parcel delivery completion to REWE
-
Send return completion to REWE
An example of an event procedure you can use to report the shipping confirmation to REWE is described below. Set up other event procedures in the same way.
-
Go to Setup » Orders » Events.
-
Click on Add event procedure ().
→ The Create new event procedure window opens. -
Enter a distinct name for the event procedure.
-
Select the event according to Table 5.
-
Save () the settings.
-
Carry out the additional settings according to Table 5.
-
Select the setting Active ().
-
Save () the settings.
Setting |
Option |
Selection |
Event |
Order change: Status change |
Select a status. |
Filter 1 |
Order > Order type |
Order |
Filter 2 |
Order > Referrer |
Rewe |
Procedure |
Plugin |
Send shipping confirmation to REWE |
|
Matching reasons for return
You need to match PlentyONE reasons for return with the reasons for return predefined by REWE. For example, when the event procedure Send return completion to REWE is triggered, a reason for return must be saved. For further information about matching reasons for return, refer to the chapter Matching reasons for return. |
19. Information for REWE delivery periods
The variation availability in PlentyONE is assigned to delivery periods at REWE. An overview of the delivery periods at REWE and the corresponding PlentyONE availabilities can be found in Table 6.
|
Availability in case of errors
If an availability error occurs, the delivery period longer than 3 months is shown on the REWE marketplace. |
PlentyONE availability |
REWE delivery period |
1 |
1-3 working days |
2 |
ca. 3-6 working days |
3 |
ca. 6-8 working days |
4 |
ca. 8-10 working days |
5 |
ca. 10-15 working days |
6 |
ca. 15-20 working days |
7 |
ca. 20-30 working days |
8 |
ca. 30-40 working days |
9 |
ca. 40-50 working days |
10 |
ca. 50-60 working days |