refurbed (Setup via Sales Channels » Accounts)
The marketplace refurbed offers renewed products at a reduced price that are more sustainable than new products. This includes for example mobile phones, laptops, tablets or smartwatches.
|
Now available: The Channel Control Centre
The Channel Control Centre is a centralised solution for managing all of your sales channels in a single location in your system. It is recommended that you set up this sales channel there instead by following this setup guide. If you already set up this sales channel using the method described on this page, then you now have the option to move it to the CCC directly. |
|
Closed beta phase
The refurbed integration is currently in the closed beta phase. If you want to register, send an email to seller@refurbed.com. |
1. Becoming a seller at refurbed
Send an email to seller@refurbed.com in order to register as a seller so you can offer your products on refurbed. Afterwards, you will receive your access data that are required for the setup in PlentyONE.
2. Frequency of data exchange
After you have set up refurbed in PlentyONE, data is exchanged with the market in the intervals described in Table 1.
| Data | Interval |
|---|---|
Creating offers |
once a day |
Updating offers |
every 15 minutes |
Price synchronisation |
hourly |
Product creation |
daily |
Order import |
every 15 minutes |
Import returns |
hourly |
3. Setting up the data exchange
In order for the interface to successfully carry out the order import and the import of returns, at least the settings in the following table are required.
| Settings section | Settings |
|---|---|
Item export |
|
Basic settings for the sales channel |
|
Catalogue settings |
|
Listing settings |
|
Variation settings |
|
Offer creation |
|
Basic settings for the sales channel |
|
Catalogue settings |
|
Listing settings |
|
Variation settings |
|
Order import |
|
Basic settings for the sales channel |
|
Import returns |
|
Basic settings for the market |
|
4. Setting up refurbed in PlentyONE
First, create an account and then carry out the basic settings to set up refurbed in PlentyONE. To do so, proceed as described below.
4.1. Creating an account
In the Sales Channels » Accounts menu, create an account for refurbed.
Creating an account:
-
Open the Sales Channels » Accounts menu.
-
Click on Create account (add).
→ The window Create account opens. -
Select refurbed from the drop-down list Platform.
-
Select the Client (Shop) from the drop-down list.
-
Enter a name for the account.
-
Click on add CREATE.
→ The account for refurbed is created.
4.2. Account overview
In the Sales Channels » Accounts menu, you can create your refurbed account. In addition, you can find an overview of the account here.
Table 3 contains an overview of the accounts in the Sales Channels » Accounts menu.
| Setting | Explanation | ||||||||||
|---|---|---|---|---|---|---|---|---|---|---|---|
bigtop_updates Connection |
Connection status of the account.
|
||||||||||
Name |
Account name. |
||||||||||
more_vert More |
Click here to display more actions.
|
||||||||||
Listings online |
Hover over Listings online to see the number of product listings and offer listings that are listed on sales channels for this account. |
||||||||||
Errors |
Hover over Errors to see the number of errors that occurred for product listings and offer listings. |
4.3. Carrying out channel settings
Next, carry out the channel settings for refurbed.
Carrying out the channel settings for refurbed:
-
Open the Sales Channels » Accounts menu.
-
Click on the tile for refurbed.
→ The tab Channel settings opens. -
Carry out the settings. Pay attention to the explanations given in Table 4.
Note: You can only carry out the settings in the General, Orders, Shipping zone and Shipping label creation sections once you have correctly entered the token that you received from refurbed in the CONNECT section and clicked CONNECT. -
Save (save) the settings.
| Setting | Explanation |
|---|---|
CONNECT (link) |
Click here to connect to refurbed. Enter the token you received from refurbed and click CONNECT (link). |
General |
|
Active |
Activate (toggle_on) the account in order to enable the data exchange with refurbed. |
Offer export |
Activate (toggle_on) to create offers on refurbed once per day and to update offers on refurbed every 15 minutes. |
Product export |
Activate (toggle_on) to create new products on refurbed once per day. |
Orders |
|
Order import |
Activate the order import (toggle_on) to import orders from refurbed in PlentyONE. |
Assign VAT rates via PlentyONE |
Activate this option if VAT rates should be calculated by PlentyONE based on the variations contained in the order during order import. This will overwrite the VAT rate set by refurbed. |
Importing returns |
Activate the import of returns (toggle_on) to import returns from refurbed in PlentyONE. |
Shipping zone |
|
AfterShip carrier |
Select an AfterShip carrier from the drop-down list. |
Shipping label creation |
|
Warehouses |
Map your PlentyONE warehouse to the corresponding refurbed delivery address. |
4.4. Adjusting the general settings
In the General settings tab, you can edit the account name and enable or disable data exchange with the relevant sales channel. In the following chapters, these functions will be further explained.
4.4.1. Renaming the sales channel
You can rename the sales channel anytime. To do so, proceed as follows.
Renaming the sales channel:
-
Open the Sales Channels » Accounts menu.
-
Open the account for refurbed.
→ The menu Channel settings opens. -
Open the menu General settings.
-
Enter a name for the sales channel.
-
Save () the settings.
4.4.2. (De)Activating the data exchange
You can fully activate or deactivate data exchange between a sales channel and its corresponding online marketplace at any time using a button in the general settings. To delete multiple mappings, proceed as follows:
(De)activating the data exchange:
-
Go to Sales Channels » Accounts.
-
Open the account for refurbed.
→ The menu Channel settings opens. -
Open the menu General settings.
-
Activate the toggle Data sync enabled to activate the data exchange with the respective market.
OR: Deactivate the toggle Data sync enabled to deactivate the data exchange with the respective market. -
Save () the settings.
4.5. Activating the account
In the Sales Channels » Accounts menu, activate the account to enable the data exchange with refurbed.
Activating the account for refurbed:
-
Open the Sales Channels » Accounts menu.
-
Click More (more_vert) in the tile for refurbed.
→ A drop-down list with further options appears. -
Select the Activate account (toggle_on) option from the drop-down list.
→ The account is activated and data can be exchanged with refurbed.
4.6. Deleting an account
In order to delete an account, proceed as follows. Note that only inactive accounts that do not have any orders connected can be deleted.
Deleting an account:
-
Open the Sales Channels » Accounts menu.
-
Click More (more_vert) in the tile for refurbed.
→ A drop-down list with further options appears. -
Select the Delete account (delete) option from the drop-down list.
→ The window Delete account opens. -
Click DELETE ACCOUNT (delete) in order to confirm the deletion.
→ The account is deleted.
4.7. Activating the order referrer
Go to Setup » Orders » Order referrer to activate the order referrer. This ensures that orders are assigned to the correct sales channel.
An order referrer tags an order with the sales channel on which the order was generated. Sales channels can be e.g. your online shop or markets on which you sell your items. Each sales channel has an individual order referrer. Some order referrers are available by default in your PlentyONE system. Further order referrers are added e.g. if you install a new plugin. For further information about the order referrer, see the page Order referrer of the PlentyONE manual.
Activating the order referrer for refurbed:
-
Go to Setup » Orders » Order referrer.
-
Click Search (search).
-
In the list, navigate to the option refurbed with the ID 183.00.
-
On the right of the referrer’s line, click Edit (edit).
→ The window Edit referrer opens. -
Activate the option Visible in selection (toggle_on).
-
Click SAVE (save).
→ The referrer is active.
|
Change to new referrer required for plugin users
If you are already using the refurbed plugin and you want to change to the marketplace integration, it is required to use the new referrer. |
4.8. Assign serial numbers
You can assign an IMEI number (International Mobile Equipment Identity) (for smartphones) or a serial number (for items in any other category) to each item. This number allows you to track shipped items and identify your returns. To do so, enter the IMEI number or the serial number in the item data record and allow the item to be scanned during picking. The IMEI number or serial number is then automatically assigned to the order.
Entering serial numbers:
-
Go to Item » Items » [Open item].
→ The data record opens. -
At the top in the toolbar, click More (more_vert).
→ A drop-down list with further options appears. -
Click Item serial numbers (123).
→ The Item serial numbers window opens. -
Click Add an item serial number (add).
→ The input field for the serial number opens. -
Enter the IMEI or serial number under Serial number.
Note: IMEI numbers must have 15 digits. -
Click NEXT.
→ A summary of the input is displayed. -
Click CREATE SERIAL NUMBER.
→ The IMEI or serial number is saved and you can track your return. -
Click CLOSE.
Enable your warehouse employee to scan the serial number of the item by activating the function in the item data record.
Making it possible to scan an item:
-
Go to Item » Items » [Open item].
→ The data record opens. -
Select the setting Yes for the option Serial number in the Settings section.
-
Save (save) the settings.
To track your return by serial number, go to Orders » Orders and search the order using the Serial number filter. If the serial number filter is not displayed, you can add it in the editing mode.
Note: Whenever a return from refurbed is imported in PlentyONE, the tracking URL of the returned item will be attached as an order note, too.
4.9. Assigning SKUs
If you already have offers on refurbed, you have to link each variation in PlentyONE to the corresponding offer on refurbed. This is done via the SKU. This ensures that variations are correctly assigned to your listings on refurbed when they are updated. To correctly assign your variations to your products on refurbed, copy the SKU from your refurbed account and save it as the SKU for the relevant variation in PlentyONE. Afterwards, map the SKU in the refurbed offer catalogue.
Step 1: Linking a variation with an SKU from refurbed
-
Log into your refurbed account.
-
Open the desired product.
-
Copy the SKU.
-
In PlentyONE, go to Item » Items.
-
Open the variation that corresponds to the product on refurbed.
→ The General tab opens. -
Switch to the Sales channels tab.
-
In the SKU section, click Add SKU (add).
→ The Add SKU window opens. -
Select refurbed from the referrer drop-down list.
-
Select the corresponding Account.
-
Click APPLY.
→ The referrer-account pairing is added as a data row in the SKU section. -
Enter the SKU you copied from the refurbed back end into the data row.
-
Click Save (save).
Step 2: Mapping the SKU in the offer catalogue
-
In PlentyONE, go to Data » Catalogues.
-
Open the offer catalogue for refurbed.
-
Assign the SKU that you have saved for the variation in refurbed to the SKU data field.
Tip: Alternatively, you can also create a property for the SKU. There, you enter the SKU for refurbed. -
Click Save (save).
5. Exporting product data
Product data is exported to refurbed using catalogues. Go to Data » Catalogues to create catalogues for refurbed.
Catalogues are used to export data from your PlentyONE system. There are two different catalogue formats:
-
Marketplace formats are used to export item data to markets.
-
Standard formats are used to export data from your PlentyONE system into a file.
Catalogues with marketplace formats allow you to tailor your item information exactly to the needs of the market. Because here, you assign a suitable PlentyONE data field to each of the data fields of the market. When your variation data is exported to the market, the market’s data fields are then filled with the correct PlentyONE data.
-
Is this your first time working with catalogues? Then read up on the basic concept of catalogues first.
5.1. Creating a product catalogue
Product data is exported to refurbed via a catalogue. Go to Data » Catalogues to create catalogues for refurbed. Then, map the refurbed data fields to product data saved in PlentyONE in the catalogue you created. If you have activated the catalogue, the account, the listing and the variations, the product data is automatically exported to refurbed once a day.
Creating a product catalogue:
-
Go to Data » Catalogues.
-
Click Create catalogue (add).
-
Enter a name for the catalogue.
-
In the drop-down list Marketplace, select the option Refurbed-Products.
-
In the drop-down list Export type, select the option Listing.
-
In the drop-down list Category, select the product category in which you want to offer your items on refurbed.
-
Select the account.
-
Click save CREATE CATALOGUE.
→ The catalogue is created.
→ The catalogue is opened for editing.
5.1.1. Mapping data fields in the product catalogue
After you have created a product catalogue, map the sales channel’s data fields to item data saved in PlentyONE. This chapter describes how you map data fields and what particularities apply for exports to refurbed.
-
The market expects product data that cannot be saved in the PlentyONE item menu? Then create a property for this data. Link this property with your variations. The actual values are saved as property values for this property. Is this your first time working with properties? Then read up on the principles of properties first.
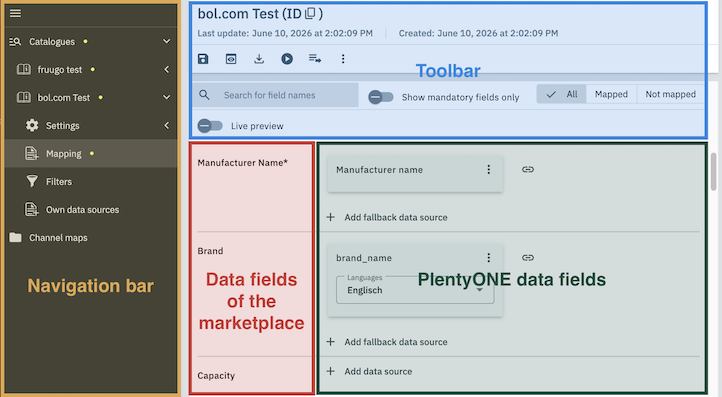
| Availability | Explanation |
|---|---|
Navigation |
When you open a catalogue, the view Mapping is shown. On the very left is the navigation.
|
Toolbar |
The toolbar provides actions for the catalogue. For example, save your mappings, restore an older version of the catalogue or hide or show optional marketplace data fields. |
Live preview |
You can use the Live preview feature to display which values of a given variation would be exported to the marketplace by each mapping. Simply activate the toggle and enter the ID of the variation you want to use in order to show live previews for that variation. |
Marketplace data field |
To the right of the navigation, all data fields available for the market are listed. Mandatory fields are marked with an asterisk (✱). |
PlentyONE data sources |
On the right side of the catalogue, you map the marketplace data fields to appropriate PlentyONE data sources. In the screenshot above, a few of the fields are already mapped. |
Mapping catalogue fields:
-
Go to Data » Catalogues.
-
Click on the catalogue.
→ The Mapping tab opens.
→ In the left-hand column, the market’s data fields are listed.
Tip: Mandatory fields are flagged with an asterisk (*).
→ In the right-hand column, you can map your PlentyONE data sources. Any PlentyONE data sources that you already mapped are also shown in this column. -
Map suitable PlentyONE data sources to the market data fields.
For each marketplace data field, you have a number of mapping options. Expand the info boxes below to get more information about each of these mapping options.-
Simple 1:1 mapping
-
Simple 1:1 mapping with properties
-
Complex 1:1 mapping
-
1:1 mapping with fallback data sources
-
1:n mapping
-
Own value mapping
-
Mapping with mathematical calculations
-
-
Save () the catalogue.
→ The mappings are saved.
In a simple 1:1 mapping, you map a PlentyONE data source to the marketplace data field. If no suitable setting exists in PlentyONE, you can map a property instead.
As such, simple 1:1 mappings are useful if you want to achieve the following:
-
I want to fill this marketplace data field with the data from this PlentyONE setting.
-
If the data field is empty for a variation, no value is exported for this variation.
Creating a simple 1:1 mapping:
-
Next to the marketplace data field, click on + Add data source.
→ To the left, the list of available PlentyONE data sources are shown in groups. -
Select a PlentyONE data source in the list.
→ The data source is added to the right, but not yet confirmed or saved. -
Click on Confirm.
In a simple 1:1 mapping, you map a PlentyONE data source to the marketplace data field. But PlentyONE does not always offer a suitable data source. In such cases you can create the data source in your system yourself by setting up a property. Properties allow you to save any kind of information in your properties.
-
Is this your first time working with properties? Then read up on the principles of properties first.
Creating a simple 1:1 mapping with properties:
-
Next to the marketplace data field, click on + Add data source.
→ To the left, the list of available PlentyONE data sources are shown in groups. -
Expand the group Property.
→ The property groups are shown. -
Expand the group you need.
-
Click on the Plus sign on the right of the property you want. → The property is added as a data source, but not yet confirmed or saved.
-
From the drop-down list Language, select the language in which you send the data to the market.
-
Click on Confirm.
→ The property is mapped to the marketplace data field.
Complex mappings are necessary whenever a marketplace data field only has a select number of possible values. Like the name implies, they cannot be resolved by simply mapping the whole data field to one of your PlentyONE data sources. Instead, you map the individual values that can be entered in the data field to PlentyONE data sources.
For example, a marketplace may only allow for the color of an item to be described using a limited selection of terms such as "Blue", while the variations saved in your system may use more distinct terms such as "Sky blue" or "Royal blue". In such cases the marketplace data field for item colors will be a complex mapping that allows you to map the colors "Sky blue" and "Royal blue" saved in your variations to the value "Blue" used by the marketplace.
| Do not enter own values for complex mappings. All values that you enter must be saved for the variations, either in a setting or as a property value. This also applies if the value Comparative value is shown. You still need to enter exactly the value of the setting or property that you mapped. |
A complex mapping will always export the value selected for the marketplace data field, regardless of what kind of data source you mapped it to. The only exception are own values, which will be exported as-is.
You can recognise complex mappings from the field that is shown below the name of the marketplace data field. Click on the field to show the values available for the marketplace data field.
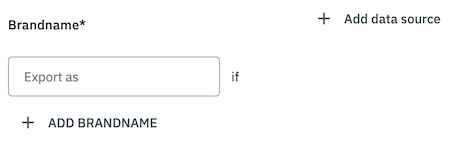
Examples for complex 1:1 mappings are:
-
Categories
-
Brands
-
Shipping settings
Important: For complex mappings, do not map own values or properties of the type None.
Creating a complex 1:1:n mapping:
-
Click on the field for the marketplace data field.
→ A list of the available values is shown. -
Select the value that you want to map a PlentyONE data source to.
→ The value is added as a mappable field. -
Next to the added field, click on + Add data source.
→ To the left, the available PlentyONE data sources are listed in groups. -
Select the PlentyONE data source you want to map tho the marketplace value.
Important: Do not map own values or properties of the type None. -
Your next steps depend on the PlentyONE data source you selected:
-
Alternative 1: The available values for the PlentyONE data value are shown on the left.
-
Next to the value you want to select, click on the plus.
→ The value is added to the field on the right. -
Click on Confirm.
-
-
Alternative 2: The PlentyONE data source is inserted and the field Comparative value is shown.
-
In the field Comparative value, enter a value that is saved in the setting or the property of the mapped PlentyONE data source.
-
Click on Confirm.
-
-
Alternative 3: The PlentyONE data source is inserted and a drop-down list is shown.
-
Select a value from the drop-down list.
-
Click on Confirm.
→ The value of the marketplace data field is exported, not the value of the PlentyONE data source.
Exception: If you map an own value to a marketplace data field, the own value that you enter is exported directly.
-
-
You can use fallback data sources in a 1:1 mapping to ensure that a value is provided for a marketplace data field even when the preferred data source is missing or empty.
In other words, this mapping specifies:
-
I want to fill the marketplace data field with the data from the selected primary PlentyONE data source.
-
If that data source is missing or empty for a variation, then the first fallback data source for this field is checked. If this fallback data source contains usable data, then that data is used to fill the marketplace data field.
-
If the first fallback data source is also missing or empty and other fallback data sources are mapped to this data field, then this process is repeated for the other fallback data sources in sequence until either usable data is found or all fallback data sources have been checked.
Two separate fallback conditions are available:
Null (default) |
The fallback data source is used if the data field above is mapped in the catalogue but not linked to the variation. The condition "Null" is useful when you want to map fallback data sources for the following types of PlentyONE data sources:
|
Empty |
The fallback data source is used if the data field above is mapped in the catalogue and linked to the variation, but is empty. The condition "Empty" is useful when you want to map fallback data sources for the following type of PlentyONE data sources:
Important: When you add a fallback data source, the fallback condition "Null" is selected automatically. To apply the fallback condition "Empty", you need to change the default setting. |
Note: If you assign multiple fallback data sources to a single data field, the value of only one of those fallback data sources is exported, i.e. the first mapped fallback data source that provides a usable value.
Creating a 1:1 mapping with fallback data sources:
-
Next to the marketplace data field, click on + Add data source.
→ To the left, the list of available PlentyONE data sources are shown in groups. -
Click on the plus to the right of the PlentyONE data source you want to use as the primary data source.
→ The PlentyONE data source is added to the right. -
Click on + Add fallback data source below the primary data source.
→ The fallback data source is added with the fallback condition Null. -
(Optional) If you want to use the fallback condition Empty instead:
-
Hover over the fallback data source with your cursor and click on the Settings () option that appears to the right.
→ The window Data column settings is shown. -
For the setting Fallback condition, select the option Empty.
-
Click on Save.
→ The fallback data source’s fallback condition is changed to Empty.
-
-
Click on Confirm.
→ The fallback data source is exported if the fallback condition is fulfilled.
In a 1:n mapping, you map several PlentyONE data sources to the same marketplace data field. Unlike fallback data sources, these data sources are combined using a specified separator and used as a single value.
In other words, this mapping specifies:
-
I want to combine these PlentyONE data sources during export so that the marketplace data field is filled with the data of these two or more PlentyONE settings.
Creating a 1:n mapping:
-
Next to the marketplace data field, click on + Add data source.
→ To the left, the list of available PlentyONE data sources are shown in groups. -
Click on the plus to the right of the PlentyONE data source you want to select.
→ The PlentyONE data source is added to the right. -
Click on Confirm.
-
To the right of the mapped PlentyONE data source, click on Add data source ().
→ To the left, the list of available PlentyONE data sources again are shown in groups. -
Map the desired number of additional PlentyONE data sources to the marketplace data field as described above.
-
Click on Confirm.
-
To the very right of the row, click on Settings ().
-
Select a separator from the drop-down list Separator or add a custom separator.
-
Click on Save.
-
Save () the catalogue.
→ The mappings are saved.
→ During the export, the content of the PlentyONE data sources is combined and exported as one field.
If you want to export the exact same value for all of your variations to a particular marketplace data field, then you can map this value to the data field using the Own value data source.
This kind of mapping specifies:
-
For this marketplace data field, I want to export the value that I entered in the data source Own value for all variations of this catalogue.
Creating an own value mapping:
-
Next to the marketplace data field, click on + Add data source.
→ To the left, the list of available PlentyONE data sources are shown in groups. -
Select the Own value option at the top of the list.
→ The data source Own value is mapped to the data field. -
Enter a value into the input field in the Own value.
-
Click on Confirm.
→ The entered value is exported for all variations.
|
Be especially careful when using Own value mappings!
The value you enter in an Own value mapping is always exported for every variation tied to the catalogue. The value also overwrites the market value in complex mappings where usually the value of the market would be exported. As such, only use an Own value mapping for a marketplace data field when you are certain that the value you entered will be accepted for that data field by the marketplace for all of your variations in order to ensure that your variations are exported to the marketplace successfully. |
Mathematical formulas allow you to change numerical values automatically during the export. In other words, this mapping specifies:
-
I want the numerical value of a PlentyONE data source to be recalculated during the export. Basic arithmetic operations are available for the formulas.
Recalculating numerical values:
-
Next to the marketplace data field, click on + Add data source.
→ To the left, the list of available PlentyONE data sources are shown in groups. -
At the very top of the list, click on the + icon next to Formula (calculate).
→ The data field Formula is added to the field on the right. -
Click into the data field.
→ The window Modify value is shown. -
Enter a numerical value or select a PlentyONE data source at the bottom right of the window to add it to the calculation (add).
Tip: Use the search function. This helps you to find data fields quickly. -
Optional: If the symbol more_vert is shown in the data field, select the correct assignment for the data field.
Tip: A number tells you how many assignments are necessary for the data field.-
Click on the icon more_vert.
-
In the window shown, select the assignments from the drop-down list.
-
Save the settings.
-
-
Enter numbers and mathematical operators with the on-screen calculator or the keyboard.
-
Save the settings.
→ The entered formula is displayed in the overview.
→ When an export is carried out, the formula is used to calculate the value that is exported for each variation.
Keep in mind that this mapping type only works with PlentyONE data sources that provide numerical values and for marketplace data fields that accept numerical values. Additionally, this mapping type is relatively new and not available for all catalogue formats yet.
5.1.2. Activating the catalogue export
You have set up refurbed in PlentyONE and created a catalogue for exporting your item data? Then activate the catalogues you want to export to refurbed in the Data » Catalogues menu and continue with creating product listings.
Once you have activated the product catalogue, the refurbed account, the product listing and the variations, the product data will be automatically exported to refurbed once a day.
Activating the catalogue export to refurbed:
-
Go to Data » Catalogues.
→ The catalogues are listed. -
Scroll to the refurbed catalogue.
-
In the Active column, move the toggle button to the right (toggle_on).
→ The catalogue is active.
→ The catalogue data is exported to refurbed once a day.
Tip: Go to Data » Catalogue export status for information about the status of the export.
6. Exporting offer data
Offer data is exported to refurbed using catalogues. Go to Data » Catalogues to create catalogues for refurbed.
Catalogues are used to export data from your PlentyONE system. There are two different catalogue formats:
-
Marketplace formats are used to export item data to markets.
-
Standard formats are used to export data from your PlentyONE system into a file.
Catalogues with marketplace formats allow you to tailor your item information exactly to the needs of the market. Because here, you assign a suitable PlentyONE data field to each of the data fields of the market. When your variation data is exported to the market, the market’s data fields are then filled with the correct PlentyONE data.
-
Is this your first time working with catalogues? Then read up on the basic concept of catalogues first.
6.1. Creating an offer catalogue
Offer data is exported to refurbed via a catalogue. Go to Data » Catalogues to create catalogues for refurbed. Then, map the refurbed data fields to offer data saved in PlentyONE in the catalogue you created. If you have activated the catalogue, the account, the listing and the variations, offer data is automatically exported to refurbed every 15 minutes.
Creating an offer catalogue:
-
Go to Data » Catalogues.
-
Click Create catalogue (add).
-
Enter a name for the catalogue.
-
In the drop-down list Marketplace, select the option Refurbed-Offers.
-
In the drop-down list Export type, select the option Listing.
-
From the drop-down list Category, select the option Refurbed Offers.
-
Select the account.
-
Click save CREATE CATALOGUE.
→ The catalogue is created.
→ The catalogue is opened for editing.
6.1.1. Mapping data fields in the catalogue
After you have created a catalogue, map the sales channel’s data fields to item data saved in PlentyONE. This chapter describes how you map data fields and what particularities apply for exports to refurbed.
-
The market expects product data that cannot be saved in the PlentyONE item menu? Then create a property for this data. Link this property with your variations. The actual values are saved as property values for this property. Is this your first time working with properties? Then read up on the principles of properties first.
| Availability | Explanation |
|---|---|
Navigation |
When you open a catalogue, the view Mapping is shown. On the very left is the navigation.
|
Toolbar |
The toolbar provides actions for the catalogue. For example, save your mappings, restore an older version of the catalogue or hide or show optional marketplace data fields. |
Live preview |
You can use the Live preview feature to display which values of a given variation would be exported to the marketplace by each mapping. Simply activate the toggle and enter the ID of the variation you want to use in order to show live previews for that variation. |
Marketplace data field |
To the right of the navigation, all data fields available for the market are listed. Mandatory fields are marked with an asterisk (✱). |
PlentyONE data sources |
On the right side of the catalogue, you map the marketplace data fields to appropriate PlentyONE data sources. In the screenshot above, a few of the fields are already mapped. |
Mapping catalogue fields:
-
Go to Data » Catalogues.
-
Click on the catalogue.
→ The Mapping tab opens.
→ In the left-hand column, the market’s data fields are listed.
Tip: Mandatory fields are flagged with an asterisk (*).
→ In the right-hand column, you can map your PlentyONE data sources. Any PlentyONE data sources that you already mapped are also shown in this column. -
Map suitable PlentyONE data sources to the market data fields.
For each marketplace data field, you have a number of mapping options. Expand the info boxes below to get more information about each of these mapping options.-
Simple 1:1 mapping
-
Simple 1:1 mapping with properties
-
Complex 1:1 mapping
-
1:1 mapping with fallback data sources
-
1:n mapping
-
Own value mapping
-
Mapping with mathematical calculations
-
-
Save () the catalogue.
→ The mappings are saved.
In a simple 1:1 mapping, you map a PlentyONE data source to the marketplace data field. If no suitable setting exists in PlentyONE, you can map a property instead.
As such, simple 1:1 mappings are useful if you want to achieve the following:
-
I want to fill this marketplace data field with the data from this PlentyONE setting.
-
If the data field is empty for a variation, no value is exported for this variation.
Creating a simple 1:1 mapping:
-
Next to the marketplace data field, click on + Add data source.
→ To the left, the list of available PlentyONE data sources are shown in groups. -
Select a PlentyONE data source in the list.
→ The data source is added to the right, but not yet confirmed or saved. -
Click on Confirm.
In a simple 1:1 mapping, you map a PlentyONE data source to the marketplace data field. But PlentyONE does not always offer a suitable data source. In such cases you can create the data source in your system yourself by setting up a property. Properties allow you to save any kind of information in your properties.
-
Is this your first time working with properties? Then read up on the principles of properties first.
Creating a simple 1:1 mapping with properties:
-
Next to the marketplace data field, click on + Add data source.
→ To the left, the list of available PlentyONE data sources are shown in groups. -
Expand the group Property.
→ The property groups are shown. -
Expand the group you need.
-
Click on the Plus sign on the right of the property you want. → The property is added as a data source, but not yet confirmed or saved.
-
From the drop-down list Language, select the language in which you send the data to the market.
-
Click on Confirm.
→ The property is mapped to the marketplace data field.
Complex mappings are necessary whenever a marketplace data field only has a select number of possible values. Like the name implies, they cannot be resolved by simply mapping the whole data field to one of your PlentyONE data sources. Instead, you map the individual values that can be entered in the data field to PlentyONE data sources.
For example, a marketplace may only allow for the color of an item to be described using a limited selection of terms such as "Blue", while the variations saved in your system may use more distinct terms such as "Sky blue" or "Royal blue". In such cases the marketplace data field for item colors will be a complex mapping that allows you to map the colors "Sky blue" and "Royal blue" saved in your variations to the value "Blue" used by the marketplace.
| Do not enter own values for complex mappings. All values that you enter must be saved for the variations, either in a setting or as a property value. This also applies if the value Comparative value is shown. You still need to enter exactly the value of the setting or property that you mapped. |
A complex mapping will always export the value selected for the marketplace data field, regardless of what kind of data source you mapped it to. The only exception are own values, which will be exported as-is.
You can recognise complex mappings from the field that is shown below the name of the marketplace data field. Click on the field to show the values available for the marketplace data field.
Examples for complex 1:1 mappings are:
-
Categories
-
Brands
-
Shipping settings
Important: For complex mappings, do not map own values or properties of the type None.
Creating a complex 1:1:n mapping:
-
Click on the field for the marketplace data field.
→ A list of the available values is shown. -
Select the value that you want to map a PlentyONE data source to.
→ The value is added as a mappable field. -
Next to the added field, click on + Add data source.
→ To the left, the available PlentyONE data sources are listed in groups. -
Select the PlentyONE data source you want to map tho the marketplace value.
Important: Do not map own values or properties of the type None. -
Your next steps depend on the PlentyONE data source you selected:
-
Alternative 1: The available values for the PlentyONE data value are shown on the left.
-
Next to the value you want to select, click on the plus.
→ The value is added to the field on the right. -
Click on Confirm.
-
-
Alternative 2: The PlentyONE data source is inserted and the field Comparative value is shown.
-
In the field Comparative value, enter a value that is saved in the setting or the property of the mapped PlentyONE data source.
-
Click on Confirm.
-
-
Alternative 3: The PlentyONE data source is inserted and a drop-down list is shown.
-
Select a value from the drop-down list.
-
Click on Confirm.
→ The value of the marketplace data field is exported, not the value of the PlentyONE data source.
Exception: If you map an own value to a marketplace data field, the own value that you enter is exported directly.
-
-
You can use fallback data sources in a 1:1 mapping to ensure that a value is provided for a marketplace data field even when the preferred data source is missing or empty.
In other words, this mapping specifies:
-
I want to fill the marketplace data field with the data from the selected primary PlentyONE data source.
-
If that data source is missing or empty for a variation, then the first fallback data source for this field is checked. If this fallback data source contains usable data, then that data is used to fill the marketplace data field.
-
If the first fallback data source is also missing or empty and other fallback data sources are mapped to this data field, then this process is repeated for the other fallback data sources in sequence until either usable data is found or all fallback data sources have been checked.
Two separate fallback conditions are available:
Null (default) |
The fallback data source is used if the data field above is mapped in the catalogue but not linked to the variation. The condition "Null" is useful when you want to map fallback data sources for the following types of PlentyONE data sources:
|
Empty |
The fallback data source is used if the data field above is mapped in the catalogue and linked to the variation, but is empty. The condition "Empty" is useful when you want to map fallback data sources for the following type of PlentyONE data sources:
Important: When you add a fallback data source, the fallback condition "Null" is selected automatically. To apply the fallback condition "Empty", you need to change the default setting. |
Note: If you assign multiple fallback data sources to a single data field, the value of only one of those fallback data sources is exported, i.e. the first mapped fallback data source that provides a usable value.
Creating a 1:1 mapping with fallback data sources:
-
Next to the marketplace data field, click on + Add data source.
→ To the left, the list of available PlentyONE data sources are shown in groups. -
Click on the plus to the right of the PlentyONE data source you want to use as the primary data source.
→ The PlentyONE data source is added to the right. -
Click on + Add fallback data source below the primary data source.
→ The fallback data source is added with the fallback condition Null. -
(Optional) If you want to use the fallback condition Empty instead:
-
Hover over the fallback data source with your cursor and click on the Settings () option that appears to the right.
→ The window Data column settings is shown. -
For the setting Fallback condition, select the option Empty.
-
Click on Save.
→ The fallback data source’s fallback condition is changed to Empty.
-
-
Click on Confirm.
→ The fallback data source is exported if the fallback condition is fulfilled.
In a 1:n mapping, you map several PlentyONE data sources to the same marketplace data field. Unlike fallback data sources, these data sources are combined using a specified separator and used as a single value.
In other words, this mapping specifies:
-
I want to combine these PlentyONE data sources during export so that the marketplace data field is filled with the data of these two or more PlentyONE settings.
Creating a 1:n mapping:
-
Next to the marketplace data field, click on + Add data source.
→ To the left, the list of available PlentyONE data sources are shown in groups. -
Click on the plus to the right of the PlentyONE data source you want to select.
→ The PlentyONE data source is added to the right. -
Click on Confirm.
-
To the right of the mapped PlentyONE data source, click on Add data source ().
→ To the left, the list of available PlentyONE data sources again are shown in groups. -
Map the desired number of additional PlentyONE data sources to the marketplace data field as described above.
-
Click on Confirm.
-
To the very right of the row, click on Settings ().
-
Select a separator from the drop-down list Separator or add a custom separator.
-
Click on Save.
-
Save () the catalogue.
→ The mappings are saved.
→ During the export, the content of the PlentyONE data sources is combined and exported as one field.
If you want to export the exact same value for all of your variations to a particular marketplace data field, then you can map this value to the data field using the Own value data source.
This kind of mapping specifies:
-
For this marketplace data field, I want to export the value that I entered in the data source Own value for all variations of this catalogue.
Creating an own value mapping:
-
Next to the marketplace data field, click on + Add data source.
→ To the left, the list of available PlentyONE data sources are shown in groups. -
Select the Own value option at the top of the list.
→ The data source Own value is mapped to the data field. -
Enter a value into the input field in the Own value.
-
Click on Confirm.
→ The entered value is exported for all variations.
|
Be especially careful when using Own value mappings!
The value you enter in an Own value mapping is always exported for every variation tied to the catalogue. The value also overwrites the market value in complex mappings where usually the value of the market would be exported. As such, only use an Own value mapping for a marketplace data field when you are certain that the value you entered will be accepted for that data field by the marketplace for all of your variations in order to ensure that your variations are exported to the marketplace successfully. |
Mathematical formulas allow you to change numerical values automatically during the export. In other words, this mapping specifies:
-
I want the numerical value of a PlentyONE data source to be recalculated during the export. Basic arithmetic operations are available for the formulas.
Recalculating numerical values:
-
Next to the marketplace data field, click on + Add data source.
→ To the left, the list of available PlentyONE data sources are shown in groups. -
At the very top of the list, click on the + icon next to Formula (calculate).
→ The data field Formula is added to the field on the right. -
Click into the data field.
→ The window Modify value is shown. -
Enter a numerical value or select a PlentyONE data source at the bottom right of the window to add it to the calculation (add).
Tip: Use the search function. This helps you to find data fields quickly. -
Optional: If the symbol more_vert is shown in the data field, select the correct assignment for the data field.
Tip: A number tells you how many assignments are necessary for the data field.-
Click on the icon more_vert.
-
In the window shown, select the assignments from the drop-down list.
-
Save the settings.
-
-
Enter numbers and mathematical operators with the on-screen calculator or the keyboard.
-
Save the settings.
→ The entered formula is displayed in the overview.
→ When an export is carried out, the formula is used to calculate the value that is exported for each variation.
Keep in mind that this mapping type only works with PlentyONE data sources that provide numerical values and for marketplace data fields that accept numerical values. Additionally, this mapping type is relatively new and not available for all catalogue formats yet.
6.1.2. Activating the catalogue export
You have set up refurbed in PlentyONE and created a catalogue for exporting your offer data? Then activate the catalogues you want to export to refurbed in the Data » Catalogues menu and continue with creating offer listings.
Once you have activated the offer catalogue, the refurbed account, the offer listing and the variations, the offer data will be automatically exported to refurbed every 15 minutes.
Activating the catalogue export to refurbed:
-
Go to Data » Catalogues.
→ The catalogues are listed. -
Scroll to the refurbed catalogue.
-
In the Active column, move the toggle button to the right (toggle_on).
→ The catalogue is active.
→ The catalogue data is exported to refurbed every 15 minutes.
Tip: Go to Data » Catalogue export status for information about the status of the export.
7. Managing listings
You create and manage offers for refurbed via listings. The Sales channels » Accounts » [Open account] menu offers you an overview of your listings. Here you can create and manage product listings and offer listings. Click on the tile for refurbed to create product listings or offer listings for refurbed.
| Right now, product listings cannot be created for refurbed. Instead create offer listings. |
7.1. Offer listings
In the list Offer listings menu of the account you gain an overview of your offer listings.
Tip: You can switch between specific views of offers and the listing group view via the menu button and folder.
-
menu gives you an overview of all the offer listings.
-
folder shows you the listing groups of the offer listings. Extend a listing group by clicking chevron_right, to see all listings within the group.
| If you only want to take a look at certain offer listings, apply filters and narrow down the listings which are displayed. To do so, click on Filters (tune) at the top of the menu. |
Applying filters:
-
Open the Sales Channels » Accounts » [Open account] » Offer listings menu.
-
Click Filters (tune) at the top of the menu.
-
Select one or multiple filters.
-
Click Search (search).
→ The selected filters are applied and the appropriate offer listings are displayed.
→ The filters that were applied are displayed at the top of the menu.
Tip: You can also reset (refresh) the selected filters. Then all offer listings will be displayed again.
Table 5 offers an overview of the single listing view of offer listings.
| Column | Explanation | ||||||
|---|---|---|---|---|---|---|---|
Data sync |
This column indicates whether data exchange for the offer listing is active or paused. |
||||||
Group ID |
The ID of the listing group to which the offer listing is assigned. By clicking on the ID, you can open the listing group view. |
||||||
Listing Name |
Name of the offer listing. |
||||||
SKU |
SKU of the offer listing. |
||||||
Variation ID |
ID of the variation. |
||||||
Channel |
The sales channel to which the listing is exported. |
||||||
Status on Channel |
Displays the listing status on the sales channel, for example if the listing is already listed on the sales channel. Possible status are:
Note: For platforms with multiple sales channels, the number after the status icon indicates on how many sales channels the offer listing has this status. |
||||||
List on |
The sales channels on which the offer listing is to be offered are displayed here. |
||||||
Errors |
Indicates whether the listing is incorrect. Click to open the overview of listing errors. |
||||||
Template |
The template selected for the listing. |
||||||
Catalogue |
The catalogue selected for the listing. |
||||||
Creation date |
The date and time on which the listing was created. |
||||||
more_vert |
Click here to display more actions.
|
Table 6 offers an overview of the group view of offer listings.
| Column | Explanation | ||||||
|---|---|---|---|---|---|---|---|
Data sync |
This column indicates whether data exchange for the listing group is active or paused. |
||||||
Group name |
Name of the listing group |
||||||
SKU |
SKU of the listing group. |
||||||
Channel |
The sales channel to which the listing group is exported. |
||||||
Errors |
The error overview. |
||||||
Template |
The template selected for the listing group. |
||||||
Catalogue |
The catalogue selected for the listing group. |
||||||
Creation date |
The date and time on which the listing group was created. |
||||||
more_vert |
Click here to display more actions.
|
7.2. Creating listings
You create and manage products and offers on refurbed via listings. Carry out the following steps to create listings for refurbed.
-
If the item you want to sell is not listed on the sales channel yet you will need to create a product listing for it first. Creating a product listing sends the product data to the sales channel and allows for the item to be listed.
In order to actually be able to sell the item on the sales channel you will need to additionally create an offer listing. The offer listing contains data related to the sale of the item, such as its price and stock. In other words, a product listing allows you to list an item on a sales channel that did not previously exist on that sales channel, but in order to sell that item on that sales channel you also need an offer listing for that item. -
If the item you want to sell is already listed on the sales channel you only need to create an offer listing. Offer listings send the data related to your offer, such as the price, stock, shipping costs etc., to the sales channel.
In most cases you will only need an offer listing in order to offer a product on a sales channel. Many sales channels do not differentiate between product and offer listings. You only need to send offer listings to these kinds of sales channels.
7.2.1. Creating product listings
Product listings are created in three steps:
-
First, you enter listing details, meaning you select the platform, template, and catalogue for the listing.
-
Next, you select the variations from which the product listings are created.
-
Lastly, check and confirm your selection and create the listings.
|
Create product listings using the group function
You can also create product listings directly in the Items menu using the variation group function. You can find more information about the variation group function here. |
Step 1: Specify listing details:
-
Open the Sales Channels » Accounts menu.
-
Open the account for refurbed.
→ The menu Channel settings opens. -
Open the menu format_list_bulleted Product listings.
-
Click on add Create products.
→ The view Create products opens. -
Select the platform refurbed.
-
Select the template for the catalogue.
-
Select a catalogue with your mapping for item data.
Tip: If you have no fitting catalogue yet, click on add Create catalogue. You will be forwarded to the Data » Catalogues menu and can create a catalogue. -
Optional: Activate Automatically activate listings after creation, if listing data should be automatically transferred to refurbed after the listing is created.
-
Click arrow_forward NEXT.
→ The Select variations view opens. Next, select the variations you want to add to the listing.
Step 2: Select variations:
-
Select the variations you want to create the product listing for.
Tip: Use the search to filter for variations.
Note: Only variations that are linked to refurbed in the Item » Items » [Open item] » [Open variation] menu are displayed.
Tip: If you want to create a product listing for all available variations, click on Click here to create listings for all [] variations above. You will be automatically redirected to the Preview and confirmation step. Product listings can be created for a maximum of 50,000 variations at a time. -
Click add ADD TO SELECTED VARIATIONS.
→ The selected variations are displayed in the Selected variations section.
Note: If you check a variation in the Selected variations section, you can remove the variation from the selection by clicking Remove from list. -
Click arrow_forward NEXT.
→ The selected variations will be displayed in a new view. In the last step, you preview and confirm your selection.
Step 3: Preview and confirm selection:
-
Preview your settings in the Listing details section.
-
Preview your selected variations in the Listing preview section. The listings are grouped by items. Extend a listing group (chevron_right) to see which variations are contained in the respective listing group.
-
If everything is set and done, click CREATE PRODUCT LISTINGS.
Note: If you activated Automatically activate listings after creation a window with a summary of your settings opens. Click check CONFIRM to create the product listings.
7.2.2. Activating product listings
After you have created the product listings, you have to activate the listings so that they can be transferred to refurbed.
To do so, activate the individual listings and the listing group. The listing can only be transferred to the sales channel if both the listing and the listing group are activated.
Note: You can also activate listings immediately after creation by activating the option Automatically activate listings after creation. If you activate the option to automatically activate listings after creation, you still have to activate the data exchange for the listing group.
Activating product listings:
-
Open the menu Sales Channels » Accounts » [Open refurbed account].
→ The menu Channel settings opens. -
Open the Product listings menu.
-
In the line of the product listing you want to activate, click more_vert.
-
Click toggle_on Activate data sync.
Tip: If you want to activate multiple product listings at once, place a check mark next to the desired product listings and click toggle_on arrow_drop_down » Activate data sync at the top of the toolbar.
→ The data exchange for the listing is activated. The listing can only be transferred to the sales channel if the listing group is also activated.
Activating a listing group:
-
Open the menu Sales Channels » Accounts » [Open refurbed account].
→ The menu Channel settings opens. -
Open the Product listings menu.
-
Open the listing group view (folder).
-
In the line of the listing group you want to activate, click more_vert.
-
Click toggle_on Activate data sync.
Tip: If you want to activate multiple listing groups at once, place a check mark next to the desired listing groups and click toggle_on arrow_drop_down » Activate data sync at the top of the toolbar.
→ The data exchange for the listing group is activated.
7.2.3. Creating offer listings
| Select the template Refurbed Offers for offers. |
Offer listings are created in three steps:
-
First, you enter listing details, meaning you select the platform, template, and catalogue for the listing.
-
Next, you select the variations from which the offer listings are created.
-
Lastly, check and confirm your selection and create the listings.
| You can also create offer listings directly from your product listings. Here you can learn how to do that. |
Step 1: Specify listing details:
-
Open the Sales Channels » Accounts menu.
-
Open the account for refurbed.
→ The menu Channel settings opens. -
Open the menu format_list_bulleted Offer listings.
-
Click add arrow_drop_down and select Create offers.
→ The Create offers view opens. -
Select the platform refurbed.
-
Select the template for the catalogue.
Tip: Only templates that are available for the platform refurbed are displayed. -
Select a catalogue with your mappings for offer data.
Tip: If you have no fitting catalogue yet, click on add Create catalogue. You will be forwarded to the Data » Catalogues menu and can create a catalogue. -
Optional: Activate Automatically activate listings after creation, if listing data should be automatically transferred to refurbed after the listing is created.
-
Click arrow_forward NEXT.
→ The Select variations view opens. Next, select the variations you want to add to the listing.
Step 2: Select variations:
-
Select the variations you want to create the offer listing for.
Tip: Use the search to filter for variations.
Note: Only variations that are linked to refurbed in the Item » Items » [Open item] » [Open variation] menu are displayed.
Tip: If you want to create offer listings for all available variations, click on Click here to create listings for all [] variations above. You will be automatically redirected to the Preview and confirmation step. Offer listings can be created for a maximum of 50,000 variations at a time. -
Click add ADD TO SELECTED VARIATIONS.
→ The selected variations are displayed in the Selected variations section.
Note: If you check a variation in the Selected variations section, you can remove the variation from the selection by clicking Remove from list. -
Click arrow_forward NEXT.
→ The selected variations will be displayed in a new view. In the last step, you preview and confirm your selection.
Step 3: Preview and confirm selection:
-
Preview your settings in the Listing details section.
-
Preview your selected variations in the Listing preview section. The listings are grouped by items. Extend a listing group (chevron_right) to see which variations are contained in the respective listing group.
-
If everything is set and done, click CREATE OFFER LISTINGS.
Note: If you activated Automatically activate listings after creation a window with a summary of your settings opens. Click check CONFIRM to create the offer listings.
7.2.4. Activating offer listings
After you have created the offer listings, you have to activate the listings so that they can be transferred to refurbed.
To do so, activate the individual listings and the listing group. The listing can only be transferred to the sales channel if both the listing and the listing group are activated.
Note: You can also activate listings immediately after creation by activating the option Automatically activate listings after creation. If you activate the option to automatically activate listings after creation, you still have to activate the data exchange for the listing group.
Activating offer listings:
-
Open the menu Sales Channels » Accounts » [Open refurbed account].
→ The menu Channel settings opens. -
Open the Offer listings menu.
-
In the line of the offer listing you want to activate, click more_vert.
-
Click toggle_on Activate data sync.
Tip: If you want to activate multiple offer listings at once, place a check mark next to the desired offer listings and click toggle_on arrow_drop_down » Activate data sync at the top of the toolbar.
→ The data exchange for the listing is activated. The listing can only be transferred to the sales channel if the listing group is also activated.
Activating a listing group:
-
Open the menu Sales Channels » Accounts » [Open refurbed account].
→ The menu Channel settings opens. -
Open the Offer listings menu.
-
Open the listing group view (folder).
-
In the line of the listing group you want to activate, click more_vert.
-
Click toggle_on Activate data sync.
Tip: If you want to activate multiple listing groups at once, place a check mark next to the desired listing groups and click toggle_on arrow_drop_down » Activate data sync at the top of the toolbar.
→ The data exchange for the listing group is activated.
8. Order processing
This chapter first provides an overview of the order and return workflows for refurbed. It then covers features for shipping and return tracking.
8.1. Workflow of an order
-
Your items are listed on refurbed.
-
Customers place an order on refurbed.
-
The order is imported in PlentyONE and already contains all data.
Note: Orders with differential taxation are imported with a VAT rate of 0%
Tip: You can optionally accept orders via flow or event procedure or reject them via flow or event procedure. If you don’t use a flow or event procedure, orders are accepted automatically. -
The order is shipped.
-
The shipping confirmation must be sent to refurbed by flow or event procedure.
-
The invoice must be uploaded to refurbed via flow or event procedure.
→ The invoice is sent to the customer via flow or event procedure.
Further notes on the order process:
-
In order to send items, make sure that a package number exists on the order.
-
If you want to have different serial numbers for specific items, create two separate delivery orders.
-
Even if an order is split into several delivery orders, you can only create an invoice for a complete order.
-
If a return label exists, you can find it in the Notes section of the respective order.
-
If your customer has provided a private VAT ID, you can find it in the Additional information (Name 4) field in the Addresses section of the respective order.
8.2. Workflow of a return
-
Your items are listed on refurbed.
-
Customers place an order on refurbed.
-
The order is imported in PlentyONE and already contains all data.
Note: Orders with differential taxation are imported with a VAT rate of 0%
Tip: You can optionally accept orders via flow or event procedure or reject them via flow or event procedure. If you don’t use a flow or event procedure, orders are accepted automatically. -
The order is shipped.
-
The shipping confirmation must be sent to refurbed by flow or event procedure.
-
The invoice must be uploaded to refurbed via flow or event procedure.
→ The invoice is sent to the customer via flow or event procedure. -
Customers can return the entire order or individual items.
-
The return is imported into PlentyONE. At this point, the return label has already been generated automatically by refurbed.
Note: To import returns, you must activate the toggle Import returns in the channel settings and select an AfterShip carrier. -
Customers send the return back to you.
-
Once you have received the return, the return must be reported to refurbed by flow or event procedure.
-
The refund is initiated.
-
When the refund amount is sent to refurbed, a debit payment for the refund amount is added to the order in PlentyONE.
Note: You can find the payment under Orders » Orders » [Open order] in the Assigned payments section. Click on the Payment ID to view the payment details. The payment contains:-
the refunded Amount,
-
the Status,
-
the Received on date,
-
and in the Reason for payment field, the Order ID or, in the case of a partial return, the Order Item ID.
-
8.3. Optional: Using Refurbed Shipping (DHL Express)
You can use the shipping service provider Refurbed Shipping to ship your items. Currently, only DHL Express is supported.
Note: If you want to sell items via refurbed Switzerland, using Refurbed Shipping is mandatory. For more information, see Setting up sales to Switzerland.
Using Refurbed Shipping:
-
Open the Sales Channels » Accounts menu.
-
Click on the tile for refurbed.
→ The tab Channel settings opens. -
In the Shipping label creation section, map your PlentyONE warehouse to the corresponding refurbed delivery address.
Note: You can obtain the refurbed delivery address from your refurbed account manager. It is required for shipping label creation. -
Confirm the order on refurbed.
Tip: You can use a flow or an event procedure for this. -
Go to Orders » Shipping centre.
-
Open the required order.
-
Click Register shipment () in the top left of the toolbar.
→ The window Register shipment opens. -
Select Refurbed Shipping from the Shipping service provider drop-down list.
-
Optional: Select an Order status in case of success and an Order status in case of error.
-
Click REGISTER SHIPMENT (save).
The shipping label and package number are automatically saved to the order. You can download the label in the Packages section of the order and then print it.
8.4. Setting up sales to Switzerland
You can also sell your items via the sales channel refurbed Switzerland. To do so, proceed as follows.
Setting up sales to Switzerland:
-
Contact your refurbed account manager to have sales to Switzerland enabled.
Note: The activation process includes the following steps:-
Your account manager enables shipping via DHL Express. This is required because Refurbed Shipping must be used for shipments to Switzerland, and currently only DHL Express is supported by Refurbed Shipping.
-
The information required for customs clearance is collected.
-
You participate in an onboarding session for selling to Switzerland.
-
-
Set up Refurbed Shipping by mapping a warehouse in PlentyONE to the corresponding refurbed delivery address in the channel settings.
Important: Using Refurbed Shipping is mandatory for shipping to Switzerland. -
Enter the additional information listed in Table 13 for the items you want to offer in Switzerland.
Important: This information is required for the shipping registration to Switzerland. If a value is missing, the shipment will not be registered. -
Create a document template for commercial invoices.
Note: The commercial invoice is automatically sent to refurbed when the shipment is registered. You do not have to carry out any additional settings.
8.4.1. Preparing a document template for commercial invoices
Orders from Switzerland require the issuing of commercial invoices. Commercial invoices are a special type of invoice that is primarily used in customs procedures. A commercial invoice must contain some additional information that would not be required in a regular invoice.
Note: The commercial invoice is automatically sent to refurbed when the shipment is registered. To do this, an invoice document of the type Invoice or External invoice must be attached to the order before the shipping registration is made. If several invoice documents are linked to the order, the most recently created invoice is sent automatically.
You can prepare a template for commercial invoices in the DocumentBuilder. Use either a copy of the default template for invoices or a custom template and add all additional mandatory details. To do so, carry out the four steps described in the instructions below.
Tip: Are you new to order documents? Then read up on order documents first.
8.4.1.1. Step 1: Creating a template for commercial invoices
Create a separate template for commercial invoices and adjust it until it includes all mandatory information, for example:
-
Customer VAT number
-
Delivery date
Note: The following example uses a copy of the default template for invoices. If you have already created your own template for refurbed invoices, you may need to add the required widgets via drag-and-drop.
Creating a template for commercial invoices:
-
Go to Setup » Documents » DocumentBuilder.
-
Open the template you use for refurbed invoices.
-
Click More in the toolbar and select the option Copy template.
-
In the Copy template window, select the document type Invoice or Custom order document.
→ A copy of the template is created in your system and opened immediately. -
Click Open Editor (edit).
→ The editor opens and the widgets are loaded. -
Adjust the template until it includes all mandatory information.
-
Click Save (save).
→ The necessary information is shown on invoices.
8.4.1.2. Step 2: Enabling the template
To ensure the template is only used for refurbed orders from Switzerland, you only enable it for the refurbed order referrer and the delivery country Switzerland.
Enabling the invoice template for Refurbed:
-
Go to Setup » Documents » DocumentBuilder.
-
Open the template you use for refurbed commercial invoices.
-
Click Referrer in the Order settings section.
→ A drop-down list with all active referrers opens. -
Deselect all order referrers except Refurbed.
-
Click Delivery country in the Order settings section.
→ A drop-down list with all delivery countries set up in your system opens. -
Deselect all delivery countries except Switzerland.
-
Click Save (save).
→ The invoice template is exclusively used for orders from Switzerland with the order referrer Refurbed.
8.4.1.3. Optional: Step 3: Checking the preview
Before activation, check whether all information is displayed correctly on the commercial invoice.
Displaying the preview:
-
Go to Setup » Documents » DocumentBuilder.
-
Open the template you use for refurbed commercial invoices.
-
Click Show preview (visibility) at the top.
8.4.1.4. Step 4: Activating the template
Activate the template so that it can be used for refurbed orders.
Activating the template:
-
Go to Setup » Documents » DocumentBuilder.
-
Click the context menu (more_vert) on the far right side in the row of your refurbed template for commercial invoices.
-
Click task Activate template.
-
Confirm your decision.
Or: Open the template and click the Activate Template toggle (toggle_off) at the top.
→ The template is activated.
Note: You can only activate a template if no other template in DocumentBuilder has exactly the same settings. Moreover, if a template is in an activated state, you cannot make changes to it (except to the name).
8.4.2. Shipping registration for Switzerland
Note: The flow refurbed: Send commercial invoice to refurbed is no longer required and was removed. The commercial invoice is automatically sent to refurbed when the shipment is registered.
For deliveries to Switzerland, the shipping process is handled in three consecutive stages. Each step is only carried out if the previous step was successful. The shipping process works as follows:
-
Step 1: Transfer customs data (per order item)
-
Step 2: Send commercial invoice (per order)
-
Step 3: Create shipping label (per package)
| This order is mandatory. The shipping label will only be generated once the customs data and the commercial invoice have been sent to refurbed. If a step fails, the next step will not be initiated. |
If any of the processing steps fails, the following logic applies:
-
Notification in the shipping centre: The order is marked as faulty in the Shipping centre. The error message contains details about the error.
-
No data storage: In PlentyONE, no incomplete data is saved if an error occurs: neither the package number, nor the shipping label, nor any other shipping information.
-
Log entry: A detailed error message is issued in the Data » Log menu under module_refurbed. This error message contains the PlentyONE order ID and the refurbed order ID.
-
Retry: The shipping process starts again with step 1.
8.4.2.1. Requirements for shipping registration
In order for a shipment to Switzerland to be registered, the following requirements must be met for the refurbed order in PlentyONE:
| Step | Requirement | Behaviour if information is missing |
|---|---|---|
Prior to step 1 |
The customs data must be saved completely at the order. This includes:
You can find further information on the customs data that must be provided when selling to Switzerland in Table 13. |
The shipping registration is cancelled before it is sent to refurbed. The error message contains details about the missing fields. |
Prior to step 2 |
An invoice document must be attached to the order (type Invoice or External invoice). |
If no invoice document is available, the shipping registration will fail in step 2. |
9. Automating order processing
You can automatically inform refurbed about changes to the order status. Two options are available for this purpose:
-
Option 1: PlentyONE Flow (recommended)
-
Option 2: Event procedures (old method)
9.1. Option 1: PlentyONE Flow (recommended)
Create event-based flows to automatically inform refurbed about changes to the order status. The following actions are available for refurbed in the PlentyONE Flow Studio:
-
Automatically inform refurbed that the order was confirmed. (How?)
-
Automatically inform refurbed that the order was rejected. (How?)
-
Automatically inform refurbed that the order was cancelled. (How?)
-
Automatically transfer serial numbers to refurbed. (How?)
-
Automatically inform refurbed that the items have been shipped. (How?)
-
Automatically upload invoices to refurbed. (How?)
-
Automatically inform refurbed that an item was refunded. (How?)
-
Mark serial numbers that have become available again due to returns and can be reused. (How?)
With PlentyONE Flow (short: "Flow"), you can automate workflows for your business processes. Flow provides you with two functions in the Automation menu:
-
In Flow Studio, you create and configure automated workflows. Depending on the trigger type, there are three flow types: event-based, time-based or manual.
-
In the Flow Tracker, you can monitor running or completed workflows.
The central element in both functions is the Canvas – a graphical interface on which the workflows are visualised with Actions and Controls. In Flow Studio the canvas can be edited, in Flow Tracker it is only used for visualisation and is therefore read-only.
-
Is this your first time working with PlentyONE Flow? Then read up on the basic concept of Flow first.
9.1.1. Reporting order confirmation to refurbed
Create an event-based flow to automatically inform refurbed about the order confirmation.
-
Go to Automation » Flow Studio.
-
Click Create flow (add).
→ A stepper opens and guides you through the following three steps.-
General
-
Enter a unique name and, if necessary, a description for the new flow.
-
Click Next.
-
-
Trigger
-
Select Event-based as the trigger.
-
Click Next.
-
-
Settings
-
If desired, select a UI from the optional drop-down list Flow available in.
→ The option to manually trigger the flow directly from the selected UI is added to the group functions in that UI.
Note: UIs currently selectable: Order UI. -
From the drop-down list Trigger selection, select the event according to Table 8.
Note: If the trigger event has additional settings, then these are invariably mandatory. Without performing these settings, you will not be able to save the flow. -
Save () the settings.
→ The flow is created.
→ The Flow Studio Canvas appears, on which two elements are already displayed: The trigger type and the placeholder for the next step.
Note: With some event-based flows you cannot save the flow if it consists of only a trigger. In such cases, you need to add at least one further step.
-
-
-
Configure the new flow according to Table 8.
-
Save () the settings.
Note: The selected statuses, controls and filters in Table 8 only serve as an example. Select the statuses, controls and filters for the flow which best suit your workflow.
| Setting | Option | Selection | |||||||||
|---|---|---|---|---|---|---|---|---|---|---|---|
Trigger selection |
Select a trigger, for example:
|
Select an order status, for example:
|
|||||||||
Controls |
Branch |
Note: If you want to use multiple filters, add the additional filters as conditions (playlist_add). Select AND as the relationship between the conditions.
|
|||||||||
Actions |
Plugin (Legacy) > Refurbed |
refurbed: Send order confirmation to refurbed |
9.1.2. Reporting order rejection to refurbed
Create an event-based flow to automatically inform refurbed about the rejection of an order.
-
Go to Automation » Flow Studio.
-
Click Create flow (add).
→ A stepper opens and guides you through the following three steps.-
General
-
Enter a unique name and, if necessary, a description for the new flow.
-
Click Next.
-
-
Trigger
-
Select Event-based as the trigger.
-
Click Next.
-
-
Settings
-
If desired, select a UI from the optional drop-down list Flow available in.
→ The option to manually trigger the flow directly from the selected UI is added to the group functions in that UI.
Note: UIs currently selectable: Order UI. -
From the drop-down list Trigger selection, select the event according to Table 9.
Note: If the trigger event has additional settings, then these are invariably mandatory. Without performing these settings, you will not be able to save the flow. -
Save () the settings.
→ The flow is created.
→ The Flow Studio Canvas appears, on which two elements are already displayed: The trigger type and the placeholder for the next step.
Note: With some event-based flows you cannot save the flow if it consists of only a trigger. In such cases, you need to add at least one further step.
-
-
-
Configure the new flow according to Table 9.
-
Save () the settings.
Note: The selected statuses, controls and filters in Table 9 only serve as an example. Select the statuses, controls and filters for the flow which best suit your workflow.
| Setting | Option | Selection | |||||||||
|---|---|---|---|---|---|---|---|---|---|---|---|
Trigger selection |
Select a trigger, for example:
|
Select an order status, for example:
|
|||||||||
Controls |
Branch |
Note: If you want to use multiple filters, add the additional filters as conditions (playlist_add). Select AND as the relationship between the conditions.
|
|||||||||
Actions |
Plugin (Legacy) > Refurbed |
refurbed: Send order rejection to refurbed |
9.1.3. Reporting order cancellation to refurbed
Create an event-based flow to automatically inform refurbed about the cancellation of an order.
-
Go to Automation » Flow Studio.
-
Click Create flow (add).
→ A stepper opens and guides you through the following three steps.-
General
-
Enter a unique name and, if necessary, a description for the new flow.
-
Click Next.
-
-
Trigger
-
Select Event-based as the trigger.
-
Click Next.
-
-
Settings
-
If desired, select a UI from the optional drop-down list Flow available in.
→ The option to manually trigger the flow directly from the selected UI is added to the group functions in that UI.
Note: UIs currently selectable: Order UI. -
From the drop-down list Trigger selection, select the event according to Table 10.
Note: If the trigger event has additional settings, then these are invariably mandatory. Without performing these settings, you will not be able to save the flow. -
Save () the settings.
→ The flow is created.
→ The Flow Studio Canvas appears, on which two elements are already displayed: The trigger type and the placeholder for the next step.
Note: With some event-based flows you cannot save the flow if it consists of only a trigger. In such cases, you need to add at least one further step.
-
-
-
Configure the new flow according to Table 10.
-
Save () the settings.
Note: The selected statuses, controls and filters in Table 10 only serve as an example. Select the statuses, controls and filters for the flow which best suit your workflow.
| Setting | Option | Selection | |||||||||
|---|---|---|---|---|---|---|---|---|---|---|---|
Trigger selection |
Select a trigger, for example:
|
Select an order status, for example:
|
|||||||||
Controls |
Branch |
Note: If you want to use multiple filters, add the additional filters as conditions (playlist_add). Select AND as the relationship between the conditions.
|
|||||||||
Actions |
Plugin (Legacy) > Refurbed |
refurbed: Send order cancellation to refurbed |
9.1.4. Transferring serial numbers to refurbed
With PlentyONE Flow, you can assign serial numbers to the items of a refurbed order. The assigned serial numbers are then transferred to refurbed together with the shipping confirmation.
Important: The flow for assigning serial numbers must be executed before the Sending shipping confirmation to refurbed flow. Only serial numbers that have already been assigned are transferred to refurbed.
|
Orders with multiple items
This method is also suitable for orders with multiple items, as you can assign a separate serial number to each item. |
Follow these four steps:
9.1.4.1. Step 1: Entering and enabling serial numbers for items
First, enter item serial numbers for your items and enable the Serial number option. To do this, proceed as described in Assigning serial numbers.
9.1.4.2. Step 2: Creating a flow for assigning serial numbers
Create an event-based flow to assign serial numbers to the items in refurbed orders.
Note: Alternatively, you can use a time-based flow or a manual flow.
-
Go to Automation » Flow Studio.
-
Click Create flow (add).
→ A stepper opens and guides you through the following three steps.-
General
-
Enter a unique name and, if necessary, a description for the new flow.
-
Click Next.
-
-
Trigger
-
Select Event-based as the trigger.
-
Click Next.
-
-
Settings
-
If desired, select a UI from the optional drop-down list Flow available in.
→ The option to manually trigger the flow directly from the selected UI is added to the group functions in that UI.
Note: UIs currently selectable: Order UI. -
From the drop-down list Trigger selection, select the event according to Table 11.
Note: If the trigger event has additional settings, then these are invariably mandatory. Without performing these settings, you will not be able to save the flow. -
Save () the settings.
→ The flow is created.
→ The Flow Studio Canvas appears, on which two elements are already displayed: The trigger type and the placeholder for the next step.
Note: With some event-based flows you cannot save the flow if it consists of only a trigger. In such cases, you need to add at least one further step.
-
-
-
Configure the new flow according to Table 11.
-
Save () the settings.
Note: The selected statuses, controls, and filters in Table 11 only serve as an example. Select the statuses, controls and filters for the flow which best suit your workflow.
| Setting | Option | Selection | |||||||||
|---|---|---|---|---|---|---|---|---|---|---|---|
Trigger selection |
Select a trigger, for example:
|
Select a status from Status 5 onwards and under Status 7 or create a new status in this range. Important: The flow must be triggered before the Sending shipping confirmation to refurbed flow is executed. |
|||||||||
Controls |
Branch |
Note: If you want to use multiple filters, add the additional filters as conditions (playlist_add). Select AND as the relationship between the conditions.
|
|||||||||
Actions |
Interactive > Order |
Assign serial number |
9.1.4.3. Step 3: Assigning serial numbers in Flow Hub
Once the flow has been triggered, it waits for user input in Flow Hub. Assign the appropriate serial numbers to each item in the order and resume the flow run.
Assigning serial numbers:
-
Go to Automation » Flow Hub.
-
Click the flow for assigning serial numbers.
→ The flow runs are displayed. -
Wait until a flow run has the status Awaiting user input.
-
For the flow run with the status Awaiting user input, click play_circle RESUME.
→ The order opens. -
In the Actions | Assign serial number section, click the input field for the Serial number of the first item.
→ A list of the item serial numbers saved for the item is displayed. -
Select a serial number from the list or enter it manually.
-
Repeat steps 5 and 6 for additional items, if applicable.
Note: If an item is not listed, no serial numbers are available for it. Create serial numbers to be able to assign one. -
Click RESUME RUN.
→ The flow run is completed.
→ The selected serial numbers are assigned to the items in the order.
Note: This method also supports orders with multiple items. You can select a separate serial number for each item.
9.1.4.4. Step 4: Transferring serial numbers to refurbed
The assigned serial numbers are transferred to refurbed with the shipping confirmation flow. Therefore, make sure that this flow is executed after the serial numbers have been assigned. Otherwise, no serial numbers will be transferred to refurbed.
9.1.5. Sending shipping confirmation to refurbed
Create an event-based flow to automatically inform refurbed when you have shipped the items of an order.
-
Go to Automation » Flow Studio.
-
Click Create flow (add).
→ A stepper opens and guides you through the following three steps.-
General
-
Enter a unique name and, if necessary, a description for the new flow.
-
Click Next.
-
-
Trigger
-
Select Event-based as the trigger.
-
Click Next.
-
-
Settings
-
If desired, select a UI from the optional drop-down list Flow available in.
→ The option to manually trigger the flow directly from the selected UI is added to the group functions in that UI.
Note: UIs currently selectable: Order UI. -
From the drop-down list Trigger selection, select the event according to Table 12.
Note: If the trigger event has additional settings, then these are invariably mandatory. Without performing these settings, you will not be able to save the flow. -
Save () the settings.
→ The flow is created.
→ The Flow Studio Canvas appears, on which two elements are already displayed: The trigger type and the placeholder for the next step.
Note: With some event-based flows you cannot save the flow if it consists of only a trigger. In such cases, you need to add at least one further step.
-
-
-
Configure the new flow according to Table 12.
-
Save () the settings.
Note: The selected statuses, controls and filters in Table 12 only serve as an example. Select the statuses, controls and filters for the flow which best suit your workflow.
| Setting | Option | Selection | |||||||||
|---|---|---|---|---|---|---|---|---|---|---|---|
Trigger selection |
Select a trigger, for example:
|
Select an order status, for example:
|
|||||||||
Controls |
Branch |
Note: If you want to use multiple filters, add the additional filters as conditions (playlist_add). Select AND as the relationship between the conditions.
|
|||||||||
Actions |
Plugin (Legacy) > Refurbed |
refurbed: Send fulfillment to refurbed |
|
Deliveries to Switzerland
When the delivery country for an order is Switzerland this flow exports some additional information required for deliveries to Switzerland for each item in the delivery. Table 13 contains information on what data that is and where it is stored in your PlentyONE system.
Make sure to keep these data fields up to date for any items you want to offer in Switzerland. |
9.1.6. Sending invoice to refurbed
Create an event-based flow to automatically upload invoices to refurbed.
-
Go to Automation » Flow Studio.
-
Click Create flow (add).
→ A stepper opens and guides you through the following three steps.-
General
-
Enter a unique name and, if necessary, a description for the new flow.
-
Click Next.
-
-
Trigger
-
Select Event-based as the trigger.
-
Click Next.
-
-
Settings
-
If desired, select a UI from the optional drop-down list Flow available in.
→ The option to manually trigger the flow directly from the selected UI is added to the group functions in that UI.
Note: UIs currently selectable: Order UI. -
From the drop-down list Trigger selection, select the event according to Table 14.
Note: If the trigger event has additional settings, then these are invariably mandatory. Without performing these settings, you will not be able to save the flow. -
Save () the settings.
→ The flow is created.
→ The Flow Studio Canvas appears, on which two elements are already displayed: The trigger type and the placeholder for the next step.
Note: With some event-based flows you cannot save the flow if it consists of only a trigger. In such cases, you need to add at least one further step.
-
-
-
Configure the new flow according to Table 14.
-
Save () the settings.
Note: The selected statuses, controls and filters in Table 14 only serve as an example. Select the statuses, controls and filters for the flow which best suit your workflow.
| Setting | Option | Selection | ||||||||||||
|---|---|---|---|---|---|---|---|---|---|---|---|---|---|---|
Trigger selection |
Select a trigger, for example:
|
Select a document type, for example:
|
||||||||||||
Controls |
Branch |
Note: If you want to use multiple filters, add the additional filters as conditions (playlist_add). Select AND as the relationship between the conditions.
|
||||||||||||
Actions |
Plugin (Legacy) > Refurbed |
refurbed: Send invoice to refurbed |
9.1.7. Reporting refund to refurbed
Create an event-based flow to automatically inform refurbed of a refund.
Note: A refund is not carried out automatically and should therefore always be used in combination with the order cancellation flow. In case you only want to refund part of an order, this needs to be done per order item.
Note: When the refund amount is sent to refurbed, a debit payment for the refund amount is added to the order in PlentyONE.
-
Go to Automation » Flow Studio.
-
Click Create flow (add).
→ A stepper opens and guides you through the following three steps.-
General
-
Enter a unique name and, if necessary, a description for the new flow.
-
Click Next.
-
-
Trigger
-
Select Event-based as the trigger.
-
Click Next.
-
-
Settings
-
If desired, select a UI from the optional drop-down list Flow available in.
→ The option to manually trigger the flow directly from the selected UI is added to the group functions in that UI.
Note: UIs currently selectable: Order UI. -
From the drop-down list Trigger selection, select the event according to Table 15.
Note: If the trigger event has additional settings, then these are invariably mandatory. Without performing these settings, you will not be able to save the flow. -
Save () the settings.
→ The flow is created.
→ The Flow Studio Canvas appears, on which two elements are already displayed: The trigger type and the placeholder for the next step.
Note: With some event-based flows you cannot save the flow if it consists of only a trigger. In such cases, you need to add at least one further step.
-
-
-
Configure the new flow according to Table 15.
-
Save () the settings.
Note: The selected statuses, controls and filters in Table 15 only serve as an example. Select the statuses, controls and filters for the flow which best suit your workflow.
| Setting | Option | Selection | |||||||||
|---|---|---|---|---|---|---|---|---|---|---|---|
Trigger selection |
Select a trigger, for example:
|
Select a status, for example:
For example, you can create a new status for this: |
|||||||||
Controls |
Branch |
Note: If you want to use multiple filters, add the additional filters as conditions (playlist_add). Select AND as the relationship between the conditions.
|
|||||||||
Actions |
Plugin (Legacy) > Refurbed |
refurbed: Send refund to refurbed |
9.1.8. Mark free serial numbers
With refurbed, you can assign a serial number to each item to track the items you’ve sent and clearly identify your returns. Create an event-based flow to mark serial numbers that have become available again due to returns and to use them again for a new item.
-
Go to Automation » Flow Studio.
-
Click Create flow (add).
→ A stepper opens and guides you through the following three steps.-
General
-
Enter a unique name and, if necessary, a description for the new flow.
-
Click Next.
-
-
Trigger
-
Select Event-based as the trigger.
-
Click Next.
-
-
Settings
-
If desired, select a UI from the optional drop-down list Flow available in.
→ The option to manually trigger the flow directly from the selected UI is added to the group functions in that UI.
Note: UIs currently selectable: Order UI. -
From the drop-down list Trigger selection, select the event according to Table 16.
Note: If the trigger event has additional settings, then these are invariably mandatory. Without performing these settings, you will not be able to save the flow. -
Save () the settings.
→ The flow is created.
→ The Flow Studio Canvas appears, on which two elements are already displayed: The trigger type and the placeholder for the next step.
Note: With some event-based flows you cannot save the flow if it consists of only a trigger. In such cases, you need to add at least one further step.
-
-
-
Configure the new flow according to Table 16.
-
Save () the settings.
Note: The selected statuses, controls and filters in Table 16 only serve as an example. Select the statuses, controls and filters for the flow which best suit your workflow.
| Setting | Option | Selection | |||||||||
|---|---|---|---|---|---|---|---|---|---|---|---|
Trigger selection |
Select a trigger, for example: |
Select an order type, for example Return |
|||||||||
Controls |
Branch |
Note: If you want to use multiple filters, add the additional filters as conditions (playlist_add). Select AND as the relationship between the conditions.
|
|||||||||
Actions |
Plugin (Legacy) > Refurbed |
refurbed: Mark free serial numbers |
9.2. Option 2: Event procedures (old method)
Set up event procedures to automatically inform refurbed about changes to the order status. The following event procedures are available for refurbed:
-
Automatically inform refurbed that the order was confirmed. (How?)
-
Automatically inform refurbed that the order was rejected. (How?)
-
Automatically inform refurbed that the order was cancelled. (How?)
-
Automatically inform refurbed that the items have been shipped. (How?)
-
Automatically upload invoices to refurbed. (How?)
-
Automatically inform refurbed that the order was refunded. (How?)
-
Mark serial numbers that have become available again due to returns and can be reused. (How?)
9.2.1. Reporting order confirmation to refurbed
Set up an event procedure to automatically inform refurbed about the order confirmation.
-
Go to Setup » Orders » Events.
-
Click on Add event procedure ().
→ The Create new event procedure window opens. -
Enter a distinct name for the event procedure.
-
Select the event according to Table 17.
-
Save () the settings.
-
Carry out the additional settings according to Table 17.
-
Select the setting Active ().
-
Save () the settings.
Note: The selected statuses and filters in Table 17 only serve as an example. Select filters and statuses for the event procedure which best suit your workflow.
| Setting | Option | Selection |
|---|---|---|
Event |
Order change: Status change |
Select a status, for example [5] Cleared for shipping. |
Filter 1 |
Order > Order type |
Order |
Filter 2 |
Order > Referrer |
refurbed |
Procedure |
Plugins |
refurbed: Send order confirmation to refurbed |
9.2.2. Reporting order rejection to refurbed
Set up an event procedure to automatically inform refurbed about the rejection of an order.
-
Go to Setup » Orders » Events.
-
Click on Add event procedure ().
→ The Create new event procedure window opens. -
Enter a distinct name for the event procedure.
-
Select the event according to Table 18.
-
Save () the settings.
-
Carry out the additional settings according to Table 18.
-
Select the setting Active ().
-
Save () the settings.
Note: The selected statuses and filters in Table 18 only serve as an example. Select filters and statuses for the event procedure which best suit your workflow.
| Setting | Option | Selection |
|---|---|---|
Event |
Order change: Status change |
Select an event, e.g. [8] Cancelled. |
Filter 1 |
Order > Order type |
Order |
Filter 2 |
Order > Referrer |
refurbed |
Procedure |
Plugins |
refurbed: Send order rejection to refurbed |
9.2.3. Reporting order cancellation to refurbed
Set up an event procedure to automatically inform refurbed about the cancellation of an order.
-
Go to Setup » Orders » Events.
-
Click on Add event procedure ().
→ The Create new event procedure window opens. -
Enter a distinct name for the event procedure.
-
Select the event according to Table 19.
-
Save () the settings.
-
Carry out the additional settings according to Table 19.
-
Select the setting Active ().
-
Save () the settings.
Note: The selected statuses and filters in Table 19 only serve as an example. Select filters and statuses for the event procedure which best suit your workflow.
| Setting | Option | Selection |
|---|---|---|
Event |
Order change: Status change |
Select an event, e.g. [8.1] Cancelled by customer. |
Filter 1 |
Order > Order type |
Order |
Filter 2 |
Order > Referrer |
refurbed |
Procedure |
Plugins |
refurbed: Send order cancellation to refurbed |
9.2.4. Sending shipping confirmation to refurbed
Set up an event procedure to automatically inform refurbed when you have shipped the items of an order.
-
Go to Setup » Orders » Events.
-
Click on Add event procedure ().
→ The Create new event procedure window opens. -
Enter a distinct name for the event procedure.
-
Select the event according to Table 20.
-
Save () the settings.
-
Carry out the additional settings according to Table 20.
-
Select the setting Active ().
-
Save () the settings.
Note: The selected statuses and filters in Table 20 only serve as an example. Select filters and statuses for the event procedure which best suit your workflow.
| Setting | Option | Selection |
|---|---|---|
Event |
Order change: Status change |
Select a status, for example [7] Outgoing items booked. |
Filter 1 |
Order > Order type |
Order and Delivery order |
Filter 2 |
Order > Referrer |
refurbed |
Procedure |
Plugins |
refurbed: Send fulfillment to refurbed |
|
Deliveries to Switzerland
When the delivery country for an order is Switzerland this event procedure exports some additional information required for deliveries to Switzerland for each item in the delivery. Table 21 contains information on what data that is and where it is stored in your PlentyONE system.
Make sure to keep these data fields up to date for any items you want to offer in Switzerland. |
9.2.5. Sending invoice to refurbed
Set up an event procedure to automatically upload invoices to refurbed.
-
Go to Setup » Orders » Events.
-
Click on Add event procedure ().
→ The Create new event procedure window opens. -
Enter a distinct name for the event procedure.
-
Select the event according to Table 22.
-
Save () the settings.
-
Carry out the additional settings according to Table 22.
-
Select the setting Active ().
-
Save () the settings.
Note: The selected statuses and filters in Table 22 only serve as an example. Select filters and statuses for the event procedure which best suit your workflow.
| Setting | Option | Selection |
|---|---|---|
Event |
Documents: Invoice generated |
|
Filter 1 |
Order > Order type |
Order |
Filter 2 |
Order > Referrer |
refurbed |
Procedure |
Plugins |
refurbed: Send invoice to refurbed |
9.2.6. Reporting refund to refurbed
Set up an event procedure to automatically inform refurbed of a refund.
Note: A refund is not carried out automatically and should therefore always be used in combination with the order cancellation event procedure. In case you only want to refund part of an order, this needs to be done per order item.
Note: When the refund amount is sent to refurbed, a debit payment for the refund amount is added to the order in PlentyONE.
-
Go to Setup » Orders » Events.
-
Click on Add event procedure ().
→ The Create new event procedure window opens. -
Enter a distinct name for the event procedure.
-
Select the event according to Table 23.
-
Save () the settings.
-
Carry out the additional settings according to Table 23.
-
Select the setting Active ().
-
Save () the settings.
Note: The selected statuses and filters in Table 23 only serve as an example. Select filters and statuses for the event procedure which best suit your workflow.
| Setting | Option | Selection |
|---|---|---|
Event |
Order change: Status change |
Select a status, e.g. [9.6] Return accepted. For example, you can create a new status for this. |
Filter 1 |
Order > Order type |
Order / Return / Credit note |
Filter 2 |
Order > Referrer |
refurbed |
Procedure |
Plugins |
refurbed: Send refund to refurbed |
9.2.7. Mark free serial numbers
With refurbed, you can assign a serial number to each item to track the items you’ve sent and clearly identify your returns. Set up an event procedure to mark serial numbers that have become available again due to returns and to use them again for a new item.
-
Go to Setup » Orders » Events.
-
Click on Add event procedure ().
→ The Create new event procedure window opens. -
Enter a distinct name for the event procedure.
-
Select the event according to Table 24.
-
Save () the settings.
-
Carry out the additional settings according to Table 24.
-
Select the setting Active ().
-
Save () the settings.
Note: The selected statuses and filters in Table 24 only serve as an example. Select filters and statuses for the event procedure which best suit your workflow.
| Setting | Option | Selection |
|---|---|---|
Event |
Order change: Status change |
Select a status, e.g. [9] Return. For example, you can create a new status for this. |
Filter 1 |
Order > Order type |
Return |
Filter 2 |
Order > Referrer |
refurbed |
Procedure |
Plugins |
refurbed: Mark free serial numbers |
10. Viewing the data log
Error reports of the export are logged in the Data » Log menu. In order to view the data log and search for specific errors, proceed as follows.
Viewing the data log:
-
Go to Data » Log.
→ The data log overview opens. -
At the top, click on Filter (tune).
-
For the Identifier filter, select the option refurbed.
Tip: For a more detailed search, you can additionally use the Integration filter in order to search for a specific path. -
Click Search (search).
→ The error reports are shown according to the filter settings.
11. Data export logs
In the menu Sales Channels » Accounts » [Open refurbed account] » Data export logs, you can find the data export logs. The overview shows whether data was successfully transferred from PlentyONE to refurbed or whether errors occurred during the data export. For refurbed, logs for product and offer listings as well as price and stock updates are displayed. You can use Filters (tune) to search the log specifically for a certain time period, a specific transmission type (e.g. listing, price or stock), entries with errors or a specific SKU.
Unlike the data log in the Data » Log menu, this overview not only shows whether the processes in PlentyONE were executed successfully. It also directly displays the price and stock values transferred to refurbed, as well as additional information about the data transfer. This means you don’t need to open the log files and extract the information from the JSON file.
Important: The data export log only shows whether the data was transferred to refurbed. The log does not contain any information on whether refurbed accepted the transferred data or has already applied it to your offers or listings.
Table 25 contains an overview of the data export logs.
| Column | Explanation |
|---|---|
Platform |
The refurbed platform to which the data was transferred. |
Account |
The ID of your refurbed seller account. |
Export type |
The type of data export. Possible values:
|
Transmission ID |
The unique ID of the data transmission. A separate transmission ID is generated for each data transmission to refurbed. |
Transmission type |
The type of transferred data. Possible values:
|
SKU |
The SKU of the variation for which data was transferred. |
Value |
The value transferred to refurbed for the stock or price. |
Error response |
The error message, if an error occurred during data transmission. |
Transmitted at |
Date and time of the data transmission. |
Retrieving the data export log:
-
Go to Sales Channels » Accounts » [Open refurbed account] » Data export logs.
-
Optional: Narrow down the search using Filters (tune).
-
Click Search (search).
→ The log entries are displayed.